For week 45 of the 52 Planners in 52 Weeks challenge I used 3 different planners. I’ve used 2 planners in the same week in the past so was curious to see how 3 planners would go.
The planners I used were:
- Priority quadrant time management method
- Mi Goals Goals Book (for planning a new ecourse that’s in the works – this spread will be shared in an upcoming post after the ecourse is released!) – see the book in my Mi Goals haul
- Sarah Pinto Planner (will be in a separate blog post)
Since I rarely do tasks on the day I schedule them in my planner, preferring to just work through a to do list, I’ve been wanting to try the priority quadrant for weekly planning.
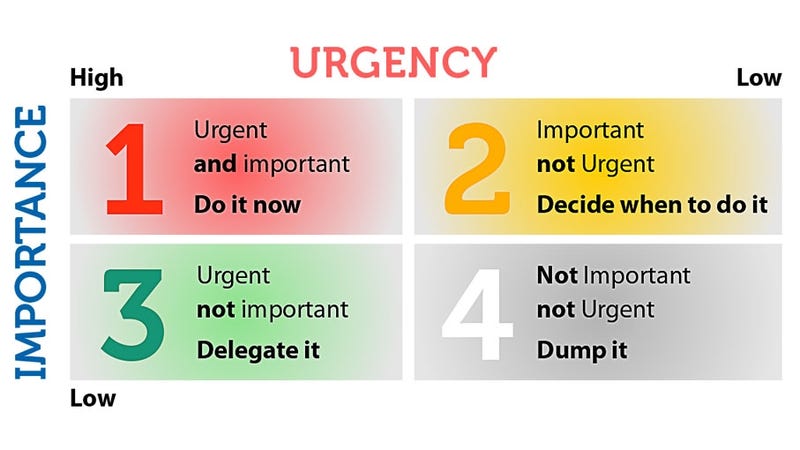
Priority Quadrant
The traditional priority quadrant (also called the ‘Eisenhower matrix’) has 4 sections:
- Urgent, important = do it now
- Important, not urgent – decide when to do it
- Urgent, not important = delegate it
- Not important, not urgent =dump it
I’m guilty of spending a lot of time in the urgent, not important and not important, not urgent (hence why I’m behind on posting about the planner challenge!)
Setting up the week
Following the traditional layout, I used thin washi tape to divide the page into 4 sections (I used one of my Plum Paper notebooks). I opted to use colored pens for the headings and then black pen to brain dump tasks.
I stuck with using a different color for each quadrant (similar to color coding by category)
Related: 50 Category Ideas for Color Coding Your Planner
If you like doing things on certain days you could use this same method but use a different colored pen or highlighter and color code by day.
I used the Staedtler ‘Noris Club’ dual tip pens (I used the 1.0mm end) for the headings that I found at Officeworks – they come in a rainbow pack! <3 They’re a marker style pen but don’t bleed through the page 🙂
Related: Favorite pens for writing headings in my planner
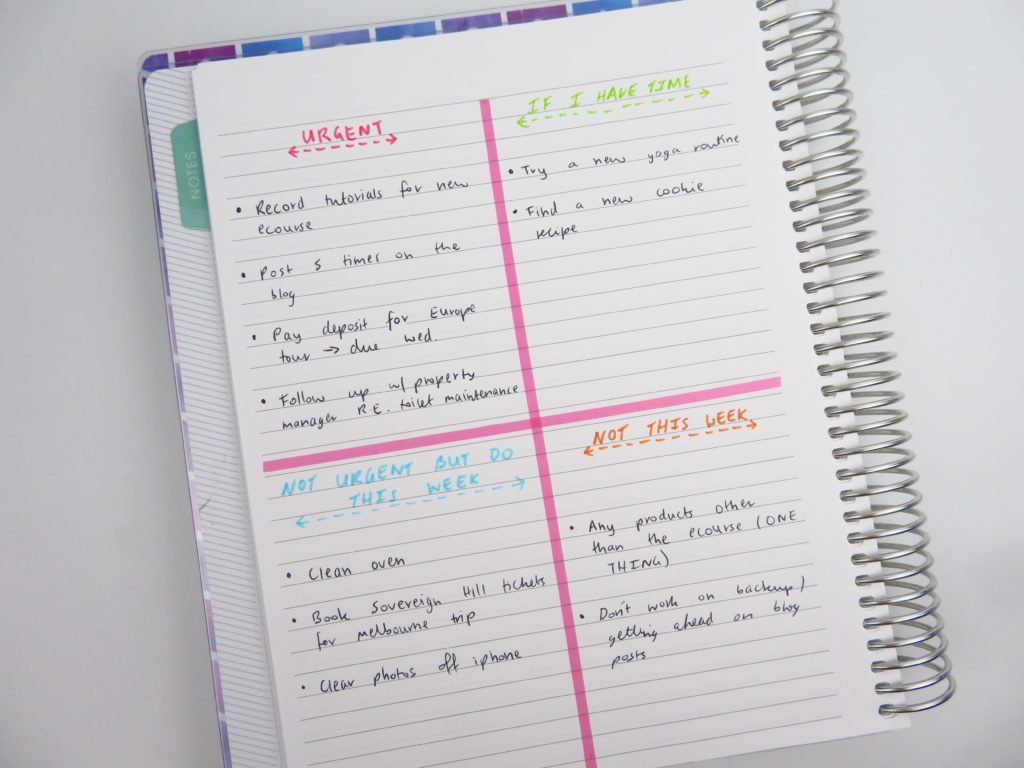
The page looked a bit dull so as I completed things I used highlighters to mark them off and add an extra pop of color. Marking things off in highlighter makes it easy to see what did and didn’t get done that week.
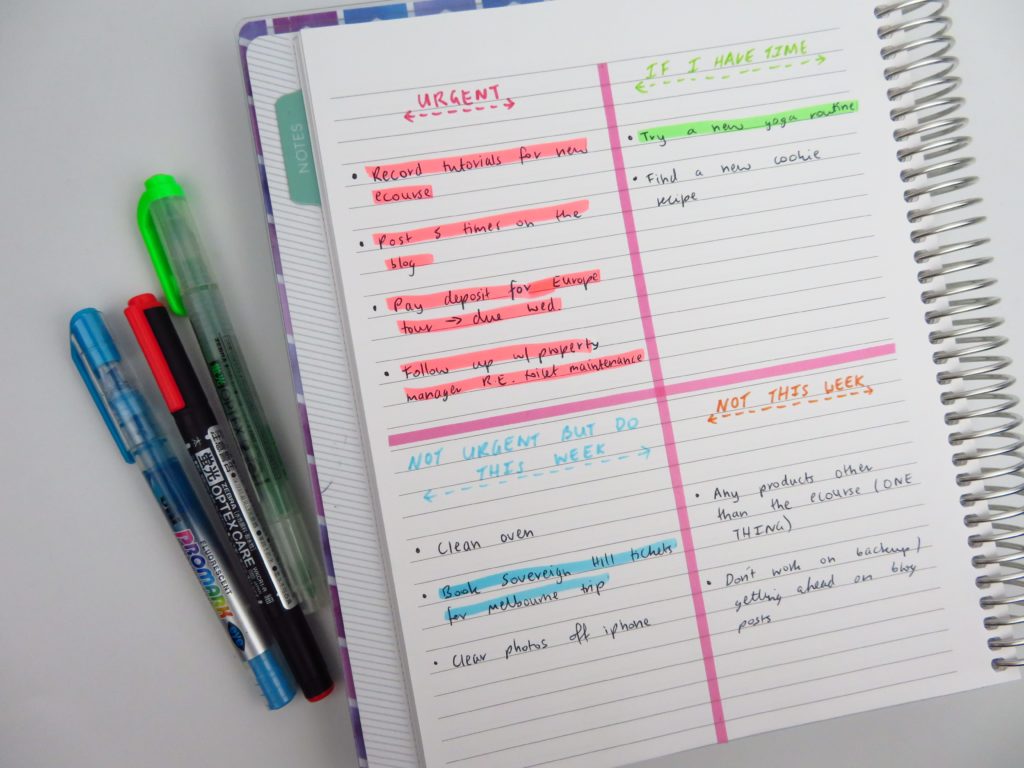
Supplies Used
- Plum Paper notebook (see my haul here)
- Highlighters
- Zebra Optex care dual tip (red / pink)
- Promark flourescent (blue)
- Sharpie retractable (orange)
- Zebra Optrez dual tip (green)
- Thin washi tape (you could also use the MAMBI deco pens)
- Staedtler ‘Noris Club’ dual tip pens (I used the 1.0mm end) for the headings (found these at Officeworks – they come in a rainbow pack! <3)
- Pentel RSVP BK91 Med black ballpoint pen (comes in a pack of rainbow colors if you wanted to color code)
Pros of this weekly spread
- Don’t waste time figuring out what you should be doing next
- Helps you identify time wasters
- Efficient, quick and easy to set up – literally took me only 5 minutes to set up
Cons of this weekly spread
- If you have a lot to do each week you might run out of room using only 1 page – you could always split the page into 4 columns spread across 2 pages like I did in week 4 of the challenge
- No habit tracker – I’m basically in a habit of doing most things I track in my habit track on autopilot by now so while it’s nice to have on a weekly spread, I wouldn’t say it’s a ‘must have’ in a weekly spread for me anymore
Using 3 planners to plan the week
As mentioned above, I used 3 planners to plan this week. I’ve used 2 planners before and it’s worked ok (one for business & blog and another for to do lists). Using 3 planners worked quite well. I think because I kept each thing completely separate. Blogging was in one planner, ecourse planning in a separate planner and the rest in this priority quadrant in a separate notebook.
Keeping each thing separate was great – I only needed to open the notebook when working on that specific thing. Not seeing everything else (as they were hidden / closed in the other notebooks / planners) was great for staying on task.
Would I plan the week this way again?
If I tried this method of planning again, I’d probably spread it over 2 pages to give more room to write tasks or try using 1 page split into 3 sections in a checklist style format with must do, should do and if I have time spread across the entire width of a page.
If you like doing things on certain days you could use this same method but use a different colored pen or highlighter and color code by day.
If you needed extra space e.g. for cleaning or to flag a project, I recommend using the printable I used for week 5 of the challenge week 5: Planning by category and task, rather than by day
Found this post helpful? Pin it!
Catch up on past week’s of the challenge:
- Week 19: Mi Goals Weekly Planner
- Week 20: Weekly planning using only a checklist and habit tracker – download a free printable
- Week 27: Using the Frank Horizontal Weekly Planner
- Week 34: Review of the Planner Pad Weekly Planner
- Week 35: Planning with a functional minimalist DIY weekly planner printable
More planning posts:
- How I plan my week: my 6 step process
- Why I don’t use ring bound planners (and what I use instead)
- 6 Useful ways to efficiently plan your week using highlighters
- 50 Tips for writing a better to do list that will make you more productive
Disclaimer: If you purchase something from Plum Paper using my referral link I’ll receive a small commission (at no extra cost to you!) I only recommend products I would recommend even if I wasn’t receiving compensation for referring you.
Leave a Reply