Using a planner key and symbols to code your planner (efficient planning methods)
If planning your day/week is taking too long and you’re tired of re-writing the same things over and over again, it’s time to start using symbols when planning!
Symbols speed up the planning process by replacing an entire phrase with a quick square, triangle, star or other symbol. It also saves a lot of space in your planner.
If you’re reading this post, you’ve probably already seen key’s / legends on Pinterest that people use for bullet journaling. Well it’s not just for bullet journaling, you can use it for any type of planning!
Using symbols to quickly plan & save space in your planner
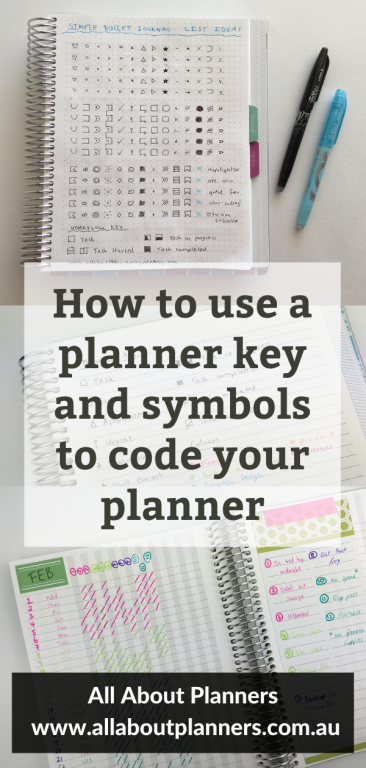
You could use the symbols from the bullet journal system which are:
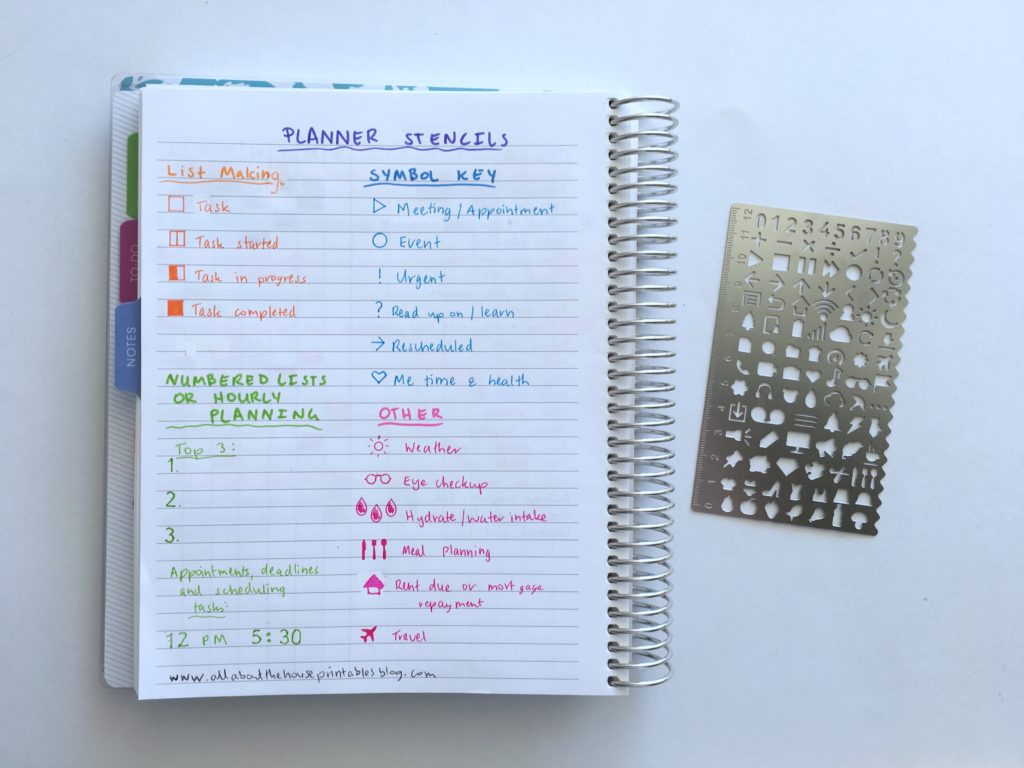
- X = Task Complete
- > = Task Migrated
- < = Task Scheduled
- o = Event
- – = Notes (facts, ideas, thoughts, and observations)
Bullet journal signifiers:
- * = Priority
- ! = Inspiration
- Picture of an eye = Explore (something that requires further research, information, or discovery)
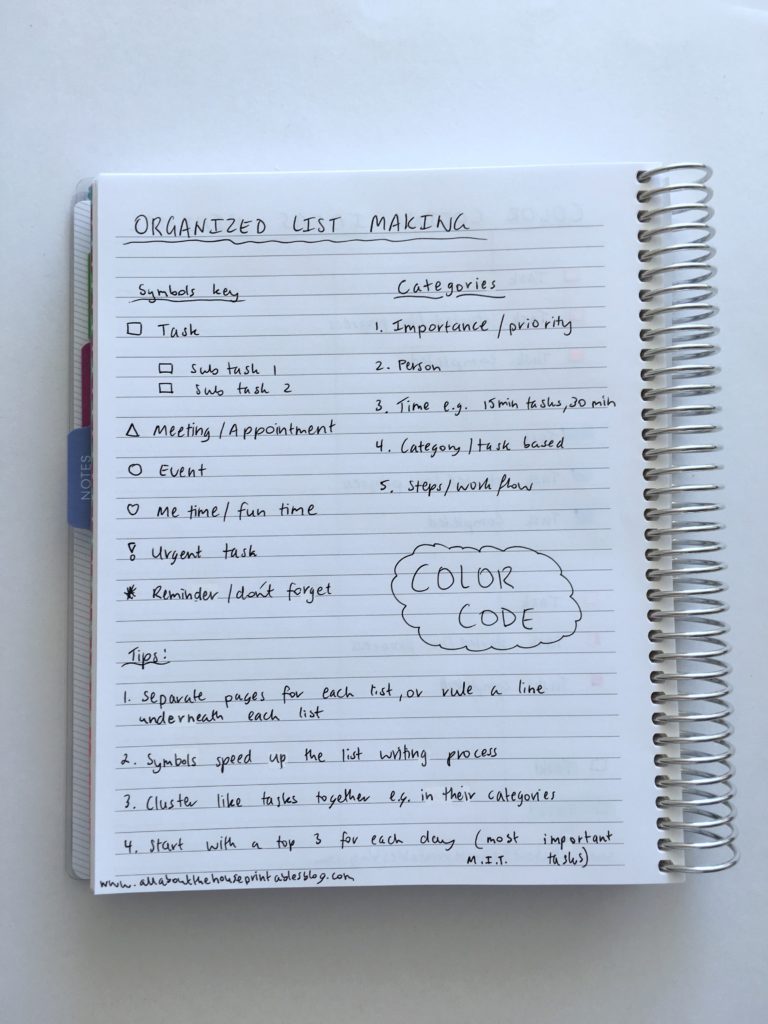
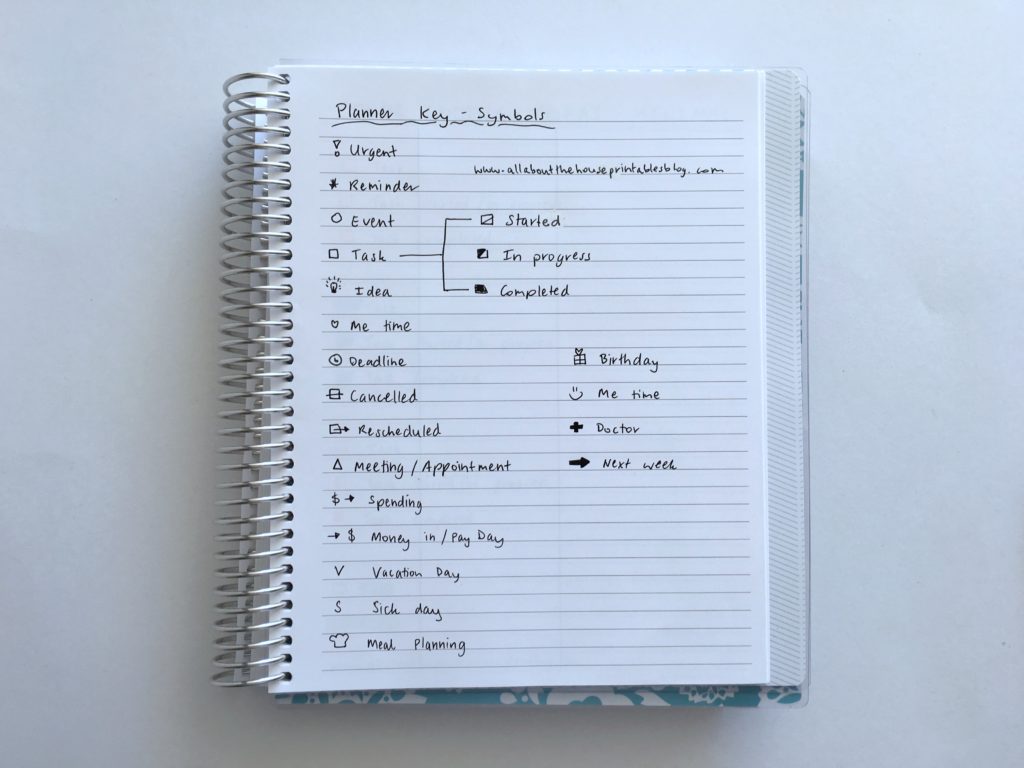
Bullet journal symbols are a good place to start for inspiration, but I recommend adapting the symbols to suit your own planning needs. I personally prefer to simplify and only use a few symbols. These are the symbols I use:
- Hollow square for general tasks
- Hollow circle for tasks relating to making a product for my shop
- Exclamation point for urgent tasks and due dates
- Asterisks for ‘don’t forget’ and important tasks
- Back when I was studying I’d also draw a small clock for school deadlines
- I sometimes use triangles for events
You’ve probably already used some symbols when planning (such as an asterisk) before. The success of the bullet journal at increasing productivity is probably because the system is built on you using the same symbols week after week so it makes you a much more efficient planner!
I’ve become a bit obsessed with looking at bullet journal spreads on Instagram. I’ve tried using a less than and greater than symbol in the task box to represent postponed and migrated tasks (like you would if you were bullet journaling), but I would always get confused about which arrow faces which way for less than and greater than back in maths in high school, so I scrapped that idea.
Once you decide what symbols you’re going to use make sure you keep track of them either in the front or back page of your notebook (so you can quickly flick to it) or using a sticky note. Once you choose symbols you’re not going to want to change them so choose wisely!

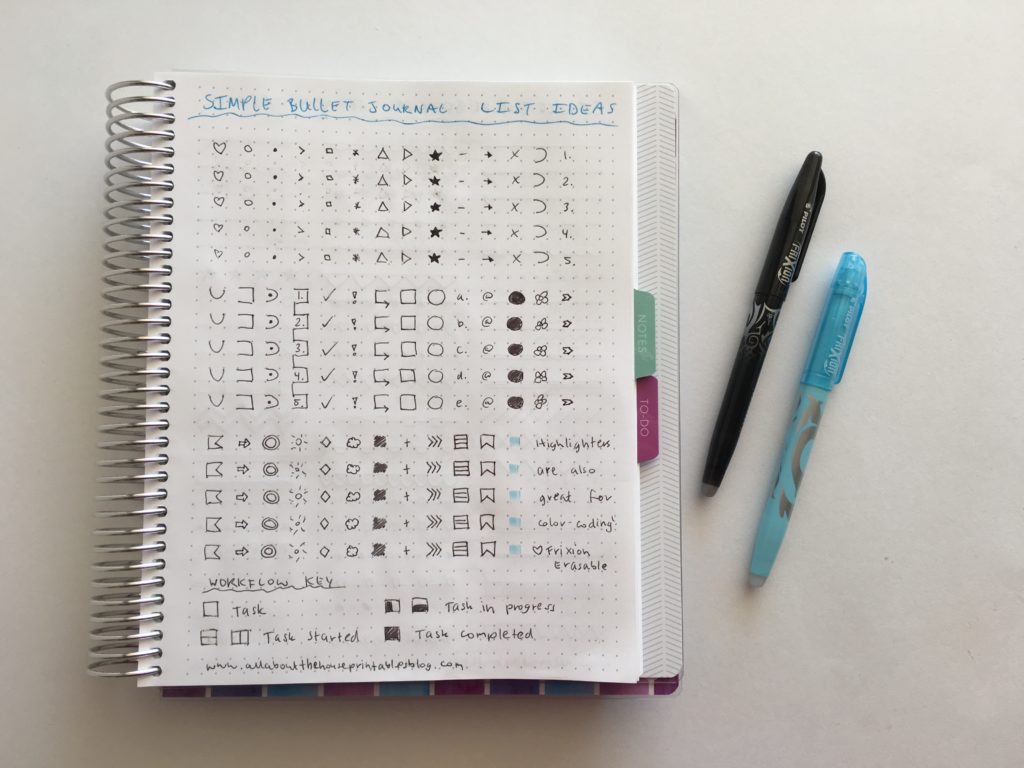
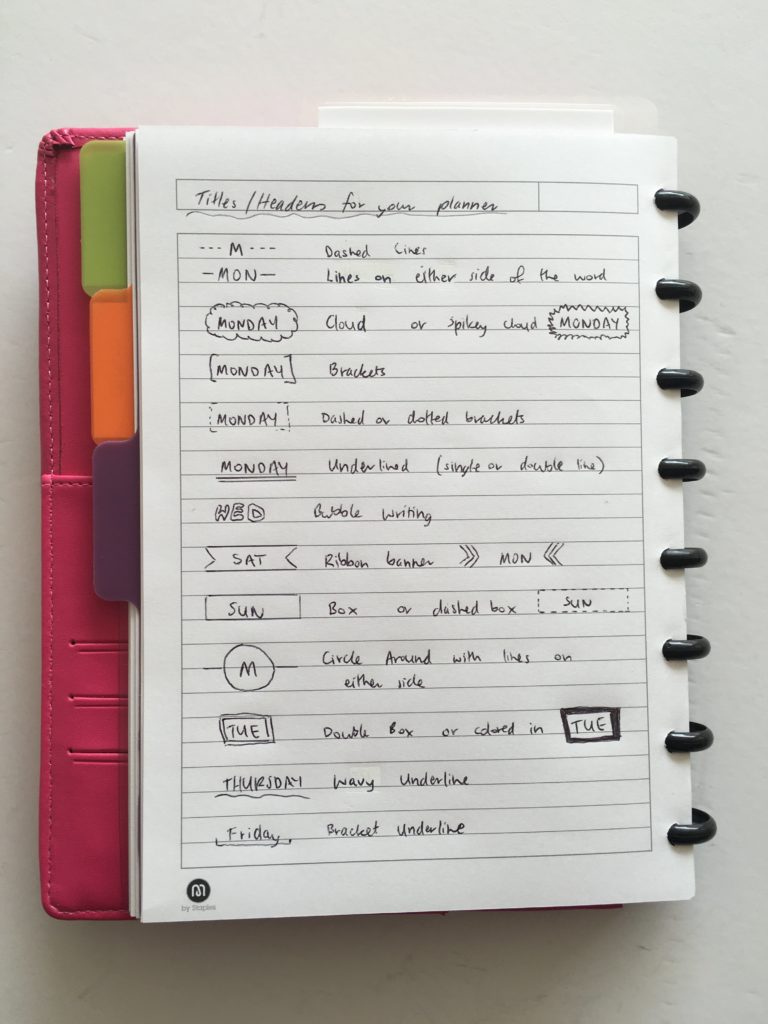
Some of the symbols / shapes you could use
- Arrows can be used to represent in and out (e.g. an arrow pointing towards the right for money in, and an arrow pointing to the left for spending)
- Hearts for me time
- A question mark for things to research further
- A different symbol for each category that you plan e.g. different school subjects
- Flags for important tasks
If you’re finding that your spread is too ‘busy’ with all that pen, using mini icon stickers are another way to plan quickly and also add a pop of color to your planner!
If you do code by symbols, be careful not to confuse yourself and make it too complicated. Sticking to different colors and using only 1 shape (for example, a square checkbox to tick off when tasks are complete) is my preferred method. If you choose to use stamps note that it can be hard to find self-inking ones (my favorite) in a variety of colors. For example, the Frixion erasable stamps come in a star shape but only in orange and a heart icon (but only in pink).
If you want to use different shapes to categorise /code your lists, here are some shapes you could use:
I like using Frixion pens & Frixion highlighters. If you find it easier to draw symbols using grid paper or dot paper, this notebook is from Plum Paper.
Related: Review of Frixion Erasable Highlighters by Pilot – are they worth the cost?
Using a stencil for coding
Stencils can speed up the planning process, especially if you decide to use lots of symbols.
Just make sure that you use fine tip pens. 0.3mm to 0.5mm are ideal – 0.7mm is usually too big to fit in the stencil.
This stencil is from my sister’s planner supplies shop, Carefully Crafted
Related: Favorite washi tape for planning, planner decorating & color coding
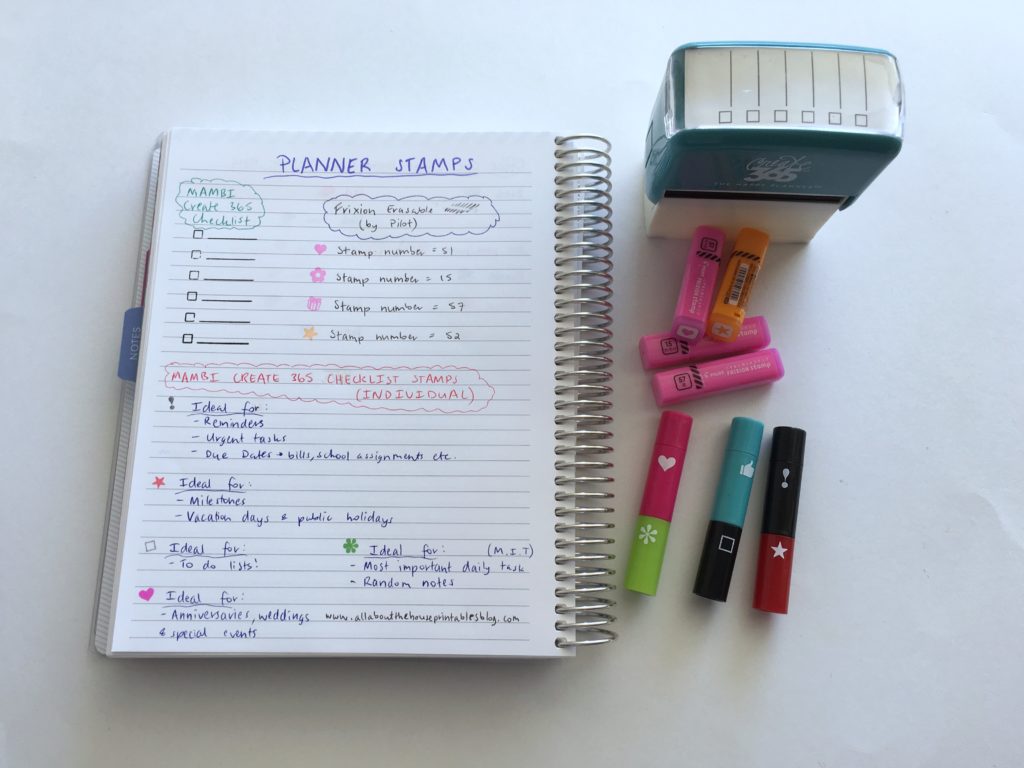
Using planner stamps for coding
Planner stamps are another good tool to use when symbol coding. I recommend self-inking planner stamps so there’s nothing messy to clean up. They’re also much quicker to use.
The stamps are the Frixion erasable and MAMBI for the checklists. Not pictured is the Frixion meal planning stamp I recently found!
The MAMBI stamps are from my sister’s planner supplies shop, Carefully Crafted
Using planner stickers for coding
I tried using mini symbol planner stickers that I made for coding for a while, but I didn’t like that there was only one sticker with a task box that could be shaded in i.e. you can’t really shade in the arrow on the personal sticker in the image below. So I made some square checkbox stickers instead.
Nowadays, I tend to just use checkboxes in a different color for all my tasks, and add a second symbol if needed (e.g. an exclamation mark if that task is urgent). I also like numbering tasks so I know where to start, and what task I should work on next.
You could also use checklist stickers with a different color for each category that you plan, or heart shape checklist stickers, start shape stickers etc.
If you want to learn how to make your own stickers like these, click here!
Coding Headings
If you’re a fellow list lover, using different designs for lists is a good way to make them stand out – especially if you’re travelling and don’t have room to take all your colored pens, highlighters etc.
I use different headings like this when brain dumping.
Using symbols to track workflow of tasks
Another benefit of using symbols is that they’re a good way to keep track of where you’re up to with the tasks on your to do list.
This is what I do:
- I draw the outline of the shape (so just the border of a square, circle etc.)
- Once the task has been started I draw a line through the middle of the box
- When it’s half completed, I shade in half the box
- When the task is completely finish I shade the remainder of the box so that it’s completely colored in
This method works best with squares, circles and triangles. i don’t recommend using shapes / graphics that take a long time to draw – symbols should be used to speed up your workflow not slow you down!
Why you should use a key when planning
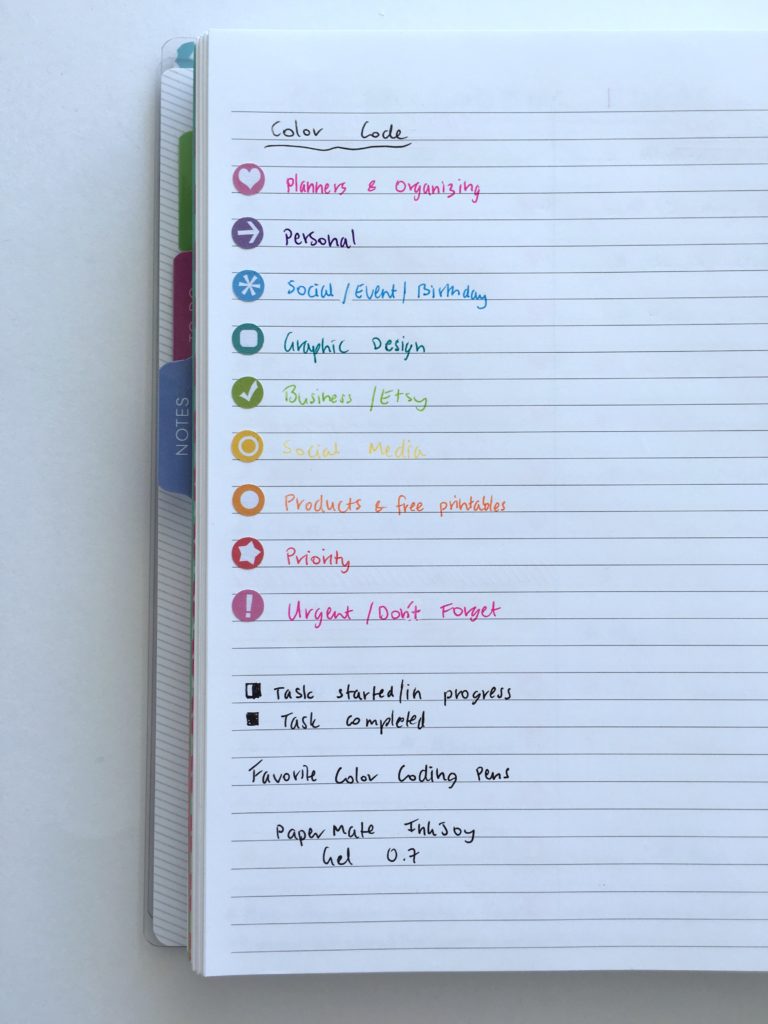
I mainly stick to color coding. However, coding by color or by symbols have similar benefits: having some sort of code / key makes you more efficient. You can glance at your planner, see a symbol and know what the task relates to, without having to read the entire task. By associating symbols to something it makes it faster to plan.
I love color coding not only because it creates a pretty rainbow in my planner, but also because I’m a visual person. If you don’t share my love of color coding or don’t want to carry numerous colored pens with you when you’re on the go, then using symbols to code your planner may be a better method for you.
Related: Planner Organization: How to color-code your planner (so you’ll actually use it effectively)
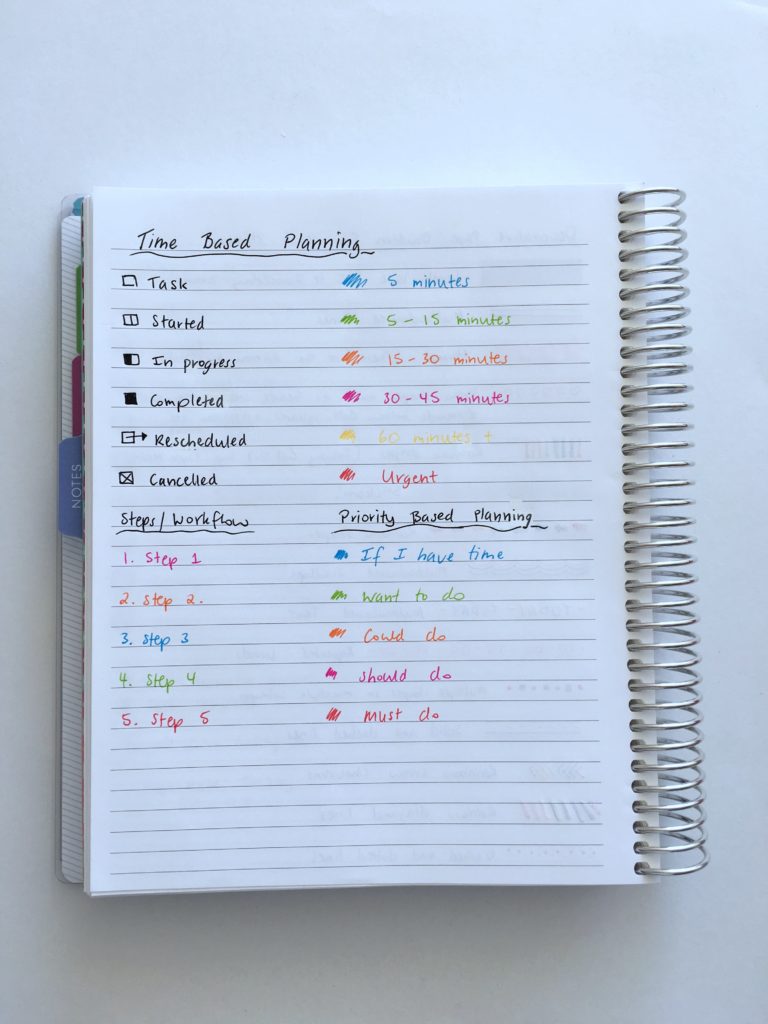
Coding by time
Highlighters are my preferred method when color coding by time taken to complete a task. I find highlighters are quicker than using a symbol and it also takes up less room. However, you could associate a symbol with a different timeframe.
So instead of using pink for 15 minute tasks like I did in the photo below, you could use:
- A triangle for 15 minute tasks
- A square for hen for 30 minute tasks
- A circle for 1 hour + tasks
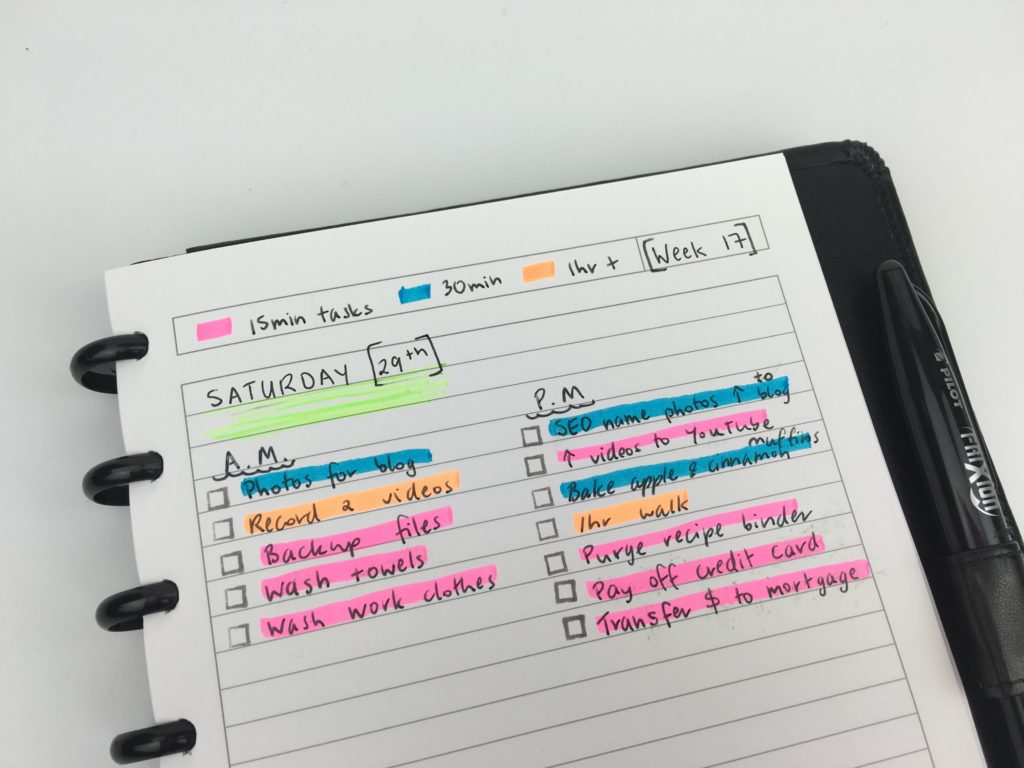
Read more: Week 17 (Part 2): Daily planning using to do lists categorised by time
Want more tips for using your planner?
- Planning 101: Need versus want versus wish list planner supplies
- Planner Organization: How to color-code your planner (so you’ll actually use it effectively)
- 130+ functional ideas to use blank notes pages of your planner or an empty notebook
- Minimalist planning: simple decorating & divider ideas for your planner using pens
- What to do if your planner isn’t working
- 5 Planner supplies you should never skimp on
Found this post helpful? Pin it!