Minimalistic planning: how to plan your week using a blank notes page and stickers (52 Planners in 52 Weeks – Week 4)
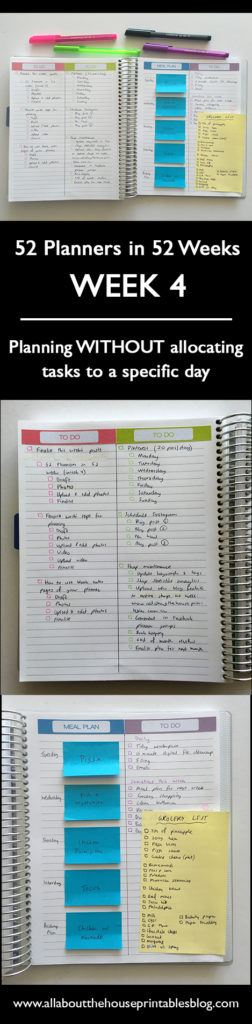
This week I pulled out a blank notebook (one of the ones I got in my Plum Paper Planners Haul) and decided to use a few of the notes page stickers to create a to do list and custom weekly planner. I wanted to try planning without allocating tasks to a specific day.
I was going to split the page into 4 sections – 1 for each of the areas I plan in my life to created categorized panning space (similar to the anything mini checklists I used for week 2 – there’s a free printable in this post if you wanted to try that planning method). I was then intending to split each section into 2 – with an open ended planning space and then some checklist space for each section.
But then I decided this wouldn’t be enough room to write and I would probably need more room for blogging tasks than I do for personal/life planning. This 1 page layout would work if you don’t have a business, blog etc. and are just doing daily life planning. But I needed more room so instead I ended up using 2 pages and 4 columns.
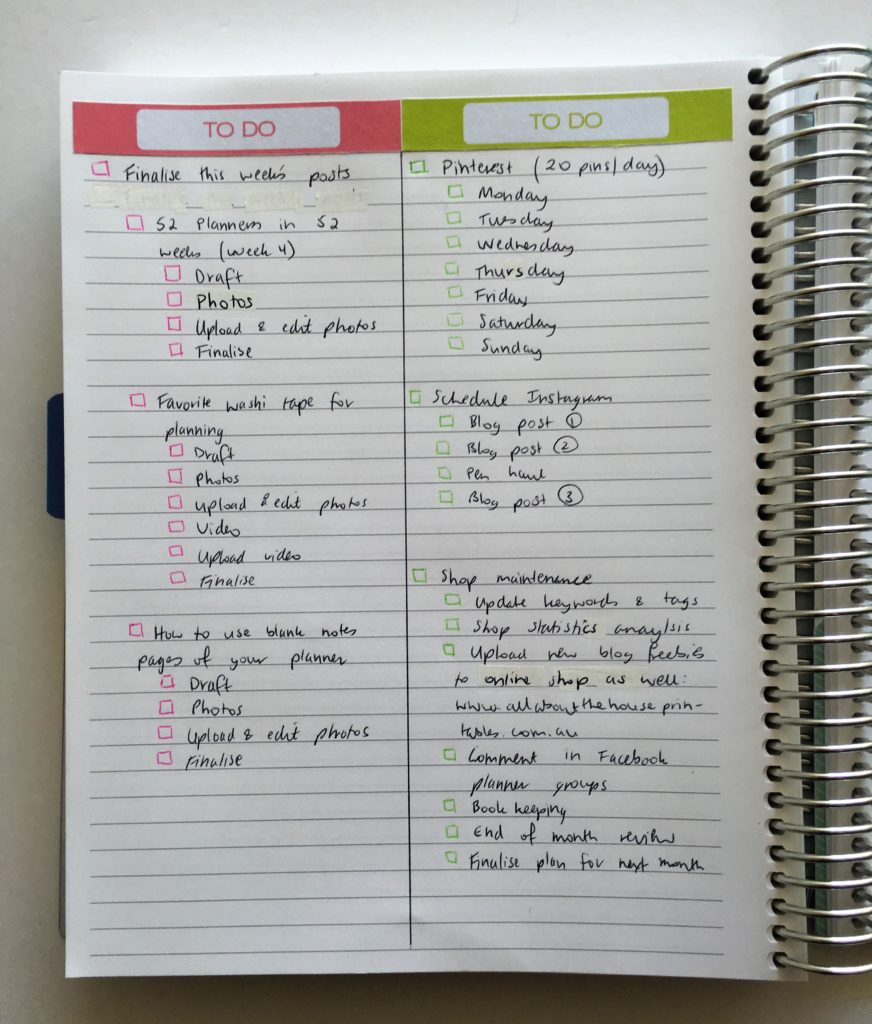
I set up my page with 4 columns and color coded:
- Blogging tasks
- Etsy shop/business tasks
- Meal Planning
- Daily to do’s and sometime this week
The to do and meal plan stickers can be found in my shop (along with 400+ other stickers!)
For the meal planning sticky notes I used 2 x 2″ sticky notes and cut them to fit the width of the lines in my Plum Paper notebook. I used cheap brand ones (from Kmart) which actually stayed stuck to the pages, probably because the notebook was shut keeping them stuck to the page, because usually the cheap sticky notes don’t last very long.
I used the Staedtler ball 432 pens.
Week 4 – Start of the Week

What Worked
- I liked not having tasks allocated to each day. Usually when I do that nothing ends up going to plan and I just end up ticking off whatever I managed to get done. I can sometimes feel overwhelmed when I allocate tasks to a specific day, and then feel like I didn’t accomplish everything when I don’t tick off everything on the list.
- I liked the simplicity of the layout being not too busy with stickers. I’ve been guilty of over-using stickers in the past :p
- Very simple and clean and easy to read layout. While it used up more potential planning space, I like that I left a white space between each task – don’t under-estimate the need for white space in your planner!
- I did color code this week but it was ‘light’ color coding where I just did colored checkboxes rather than writing the task out in the color as well.
- I liked the separate columns with no overlap of what went where, it meant my eyes immediately knew where to look to find the next task, rather than a bit of a cluttered jumbled mess like last week (where I attempted to group things but wasn’t sure how much space I needed so the weekly spread didn’t end up looking very aesthetically pleasing!)
Related: How to color-code your planner so you’ll actually use it effectively and Week 3: Plum Paper Vertical Planner – Better than the Erin Condren?
What Didn’t work
- I probably wouldn’t make the meal planning section an entire column – it took up quite a bit of the planning space considering meal planning can be condensed into 1 small sticker such as this one or this one, in the sidebar of a planner
- Using a sticky note for writing my grocery list. The sticky notes I used were the Keji brand from Officeworks (they’re cheap at only $2.50 for a pack of 100). I’ve used a few different pens on these sticky notes and the ink tends to ‘feather’ after a couple of days. I liked that my grocery list was handy and always within reach, but I think a laminated insert or using the last column of the page for a grocery list then cutting it out to take to the shops would be more functional. Overall, I think I prefer writing my grocery list on a notepad stuck to the fridge with magnetic backing, because then I can add stuff to the list straight away after it runs out. And just tear it off when it’s time to go to the shops. I ended up taking a photo of the grocery list instead of taking it with me.
- I should have put more tasks in the ‘sometime this week’ section and I think I should have done a ‘priority’ or ‘must do list’ not just a ‘sometimes this week’ as wasn’t sure what tasks to tackle first
- If I used this layout again I would convert the daily tasks into a habit tracker format like I did in week 1 of the planner challenge. I thought about doing this initially but was short on space. A way around it might be to number the routine tasks, then draw up the habit tracker and just write the number of the task rather than the entire task… Always think of ideas after the fact!

Would I Use This Layout Again?
- I wouldn’t have the meal planning take up so much space. I’d use these smaller sticky notes by Post it (my favorite sticky note brand!) instead
- I’d split the last 2 columns in half so that the top half was meal planning space on the left and then a task list on the right with a habit tracker down the bottom extending across the width of the entire page
- This was a very task focused layout. Once I had everything that needs to get done each week nailed down and if I had the same tasks each week (which tends to happen with it comes to blogging and running an Etsy shop), I think I would draw up this layout on a piece of loose paper then laminate, and write on using a whiteboard marker rather than re-writing the same stuff again and again. Although another option could be to get clear plastic covers such as these that I use for DIY Notebooks to prevent from dirt and damage, and then use a whiteboard marker to tick off tasks when completed.
Catch up on past weeks of the challenge:
- Week 1: Using a daily habit/routine tracker to plan your week
- Week 2: Planning using daily checklists
- Week 3: Plum Paper Vertical Planner – Better than the Erin Condren?
Related Posts
- Favorite black pens for planner addicts
- How to make planner printables (advice from a planner addict that’s made over 4000 printables)
- Printable budget binder/finance binder -EDITABLE
- Honest review of the Happy Planner by Me and my Big Ideas (MAMBI)
- Planner Dividers with Tabs – Photoshop Template
- How to make a personalised Erin Condren Planner Cover
- Which is Cheaper: DIY Printable Planners or Pre-Printed & Assembled Planners?
- How to make use of blank pages in your planner
- 60 Facebook groups for planner addicts
If you want to try your own version of the 52 planners in 52 weeks challenge, this printable bundle of 52 different 1 page weekly planners (you can mix and match to create 2 page spreads if you prefer), is available in my Etsy shop and online store. It comes in US letter size and Happy Planner classic page size.

Liked this post? Pin it!