How to create a DIY dot grid spacing template for any bullet journal notebook
Bullet journaling can be time consuming if you like to use a variety of layouts, and often switch between different dot grid notebooks (or is that just me?). So to save time, I really recommend using a dot grid spacing template.
If you don’t want to pay for one of the dot grid spacing guides I mentioned in this post (although I really do think they’re worth the money), or the brands don’t ship to the country you live in, then here’s how to DIY your own.
How to set up a dot grid spacing template
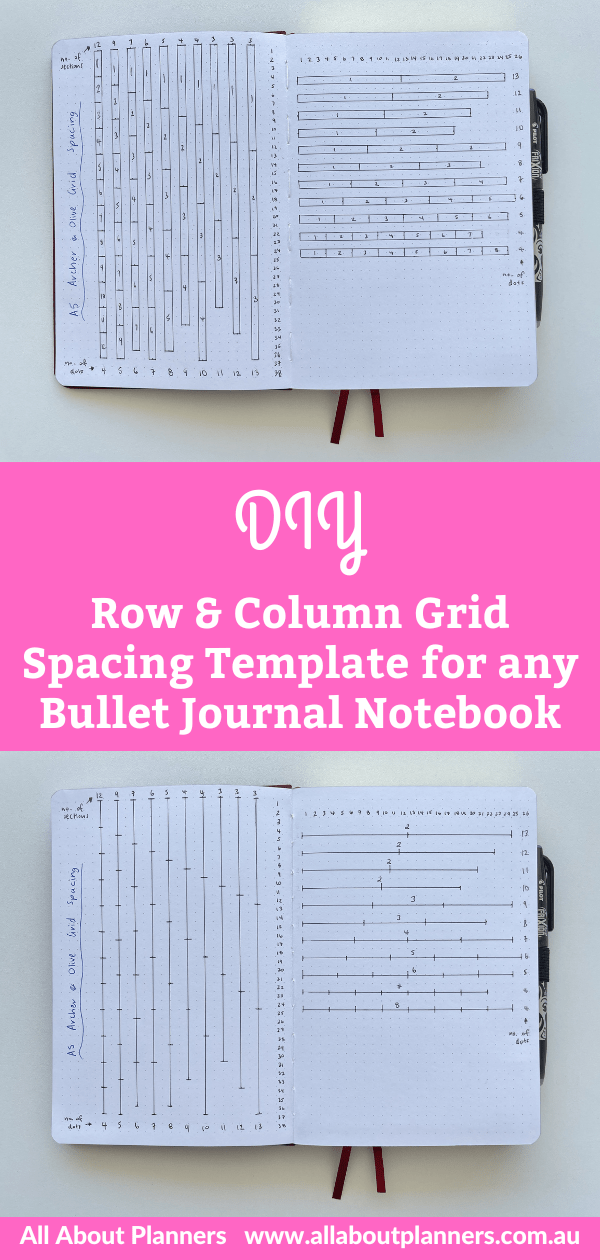
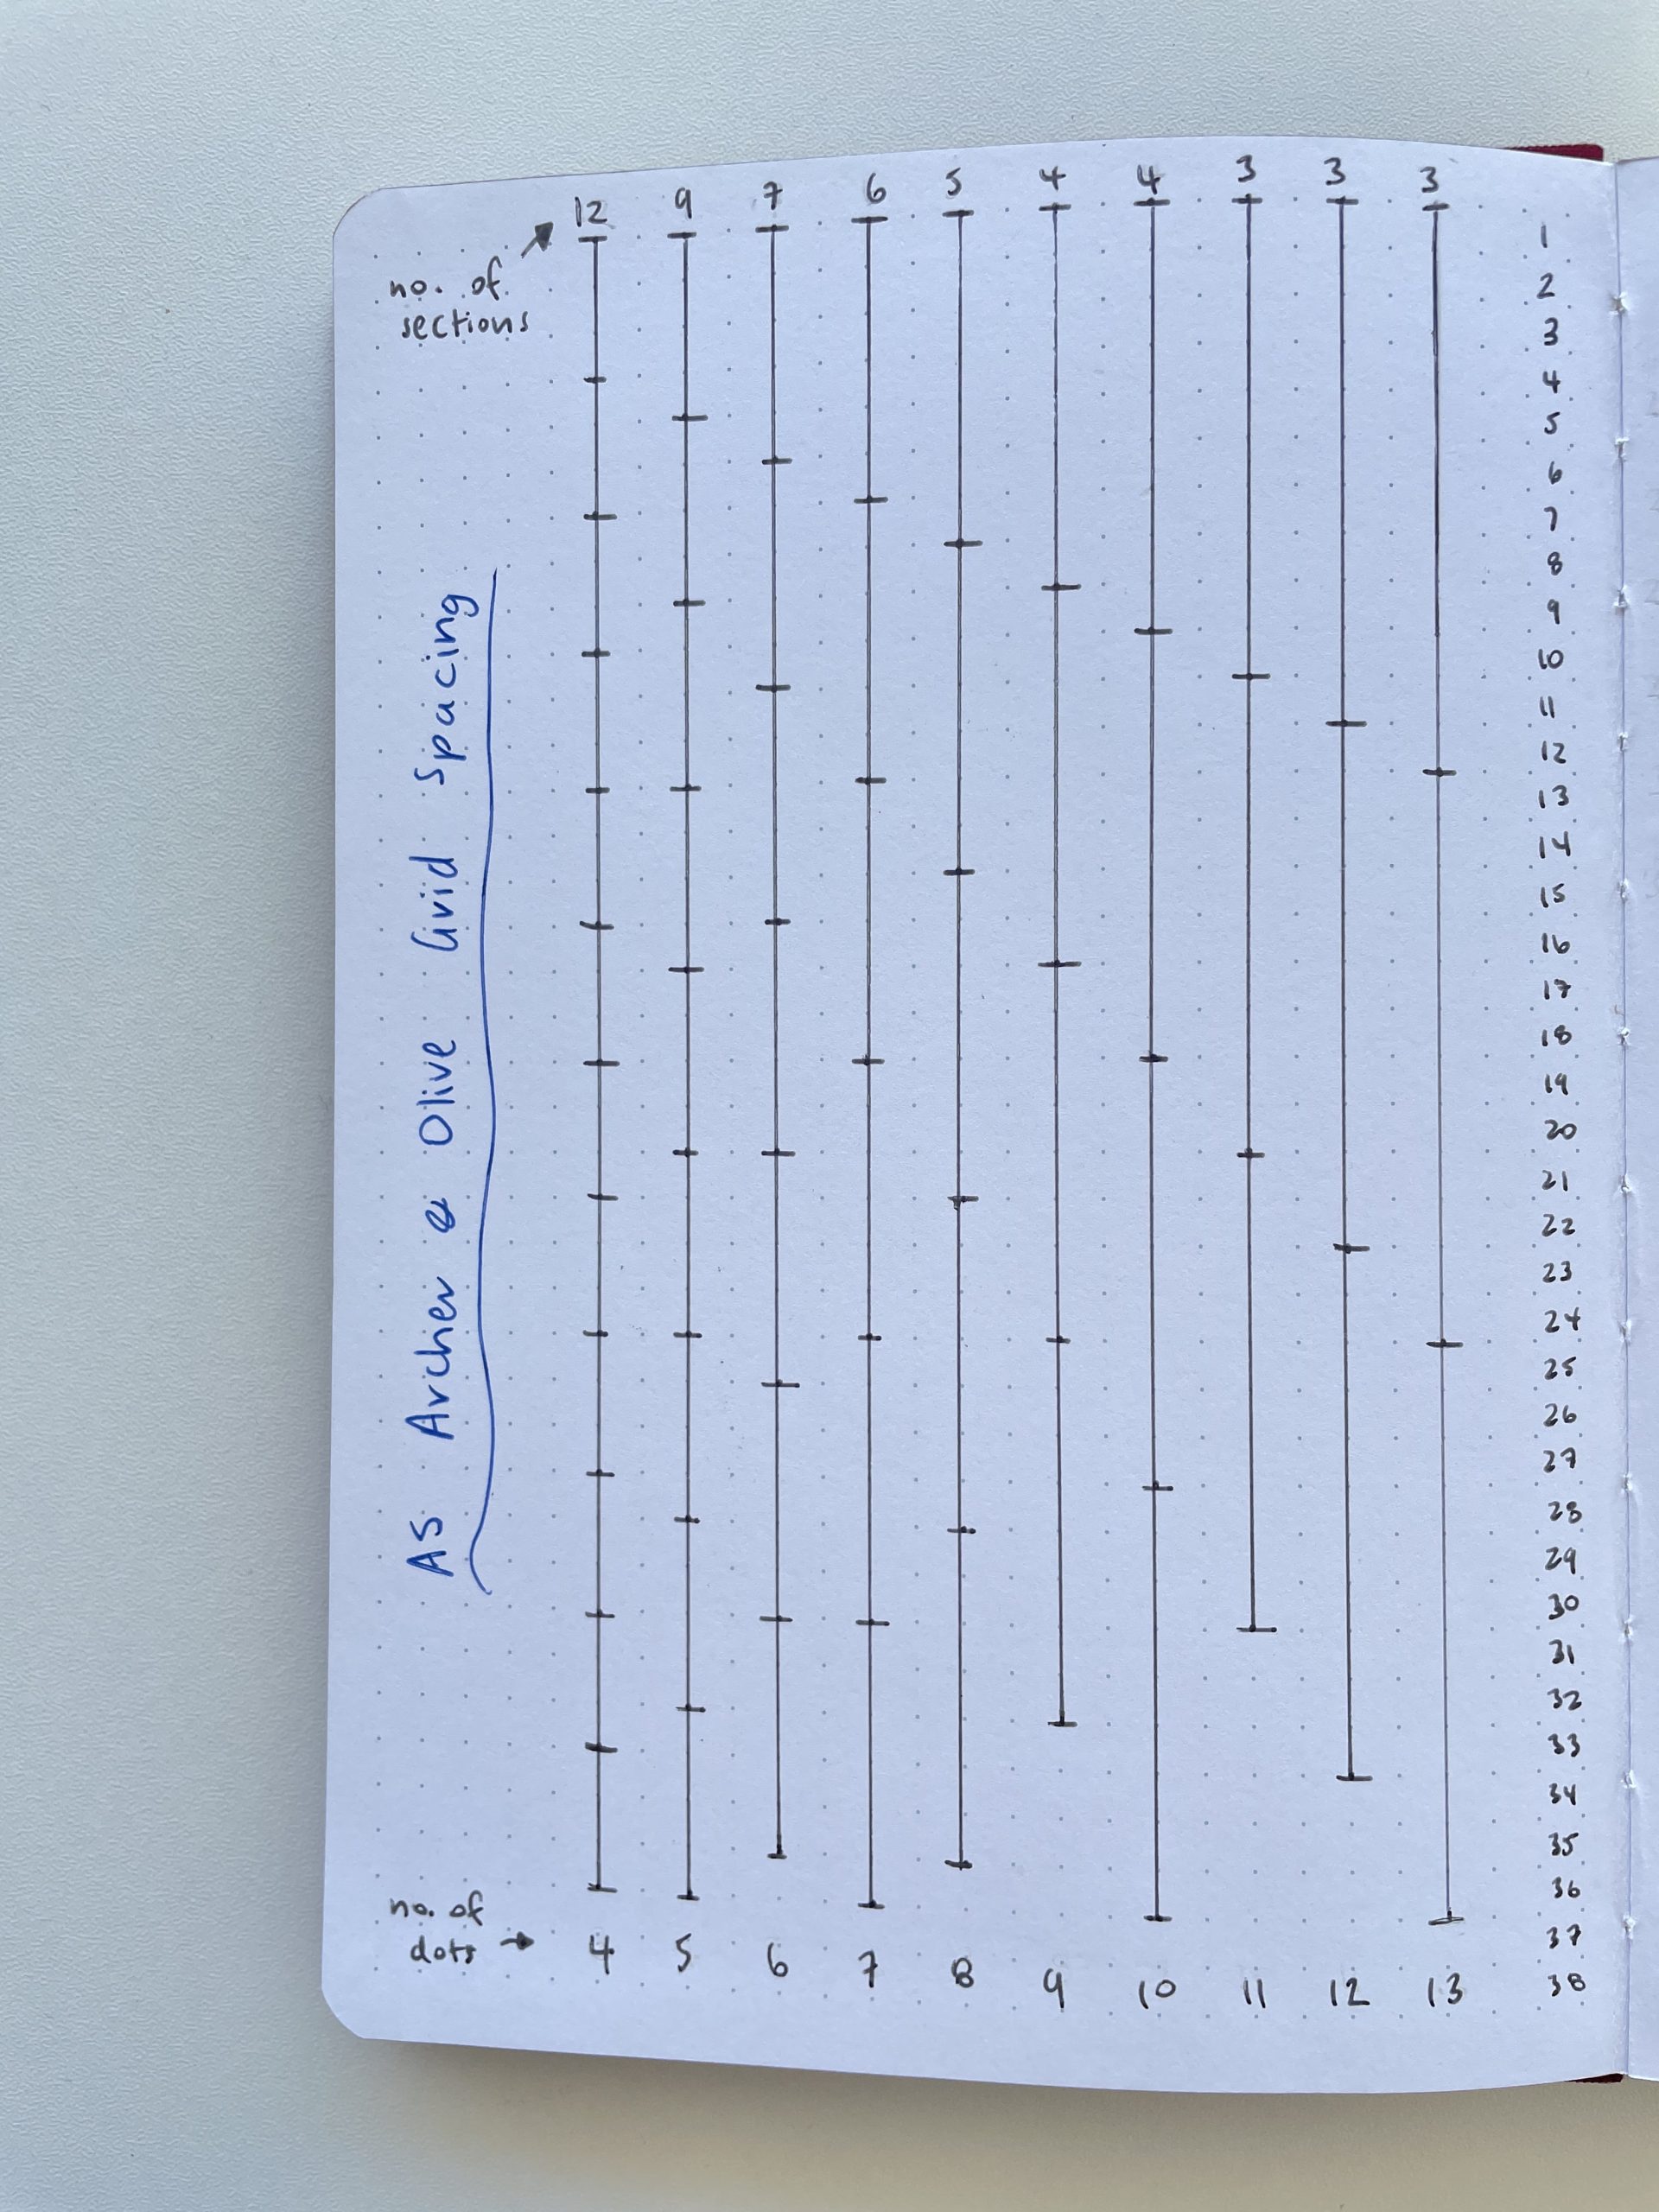
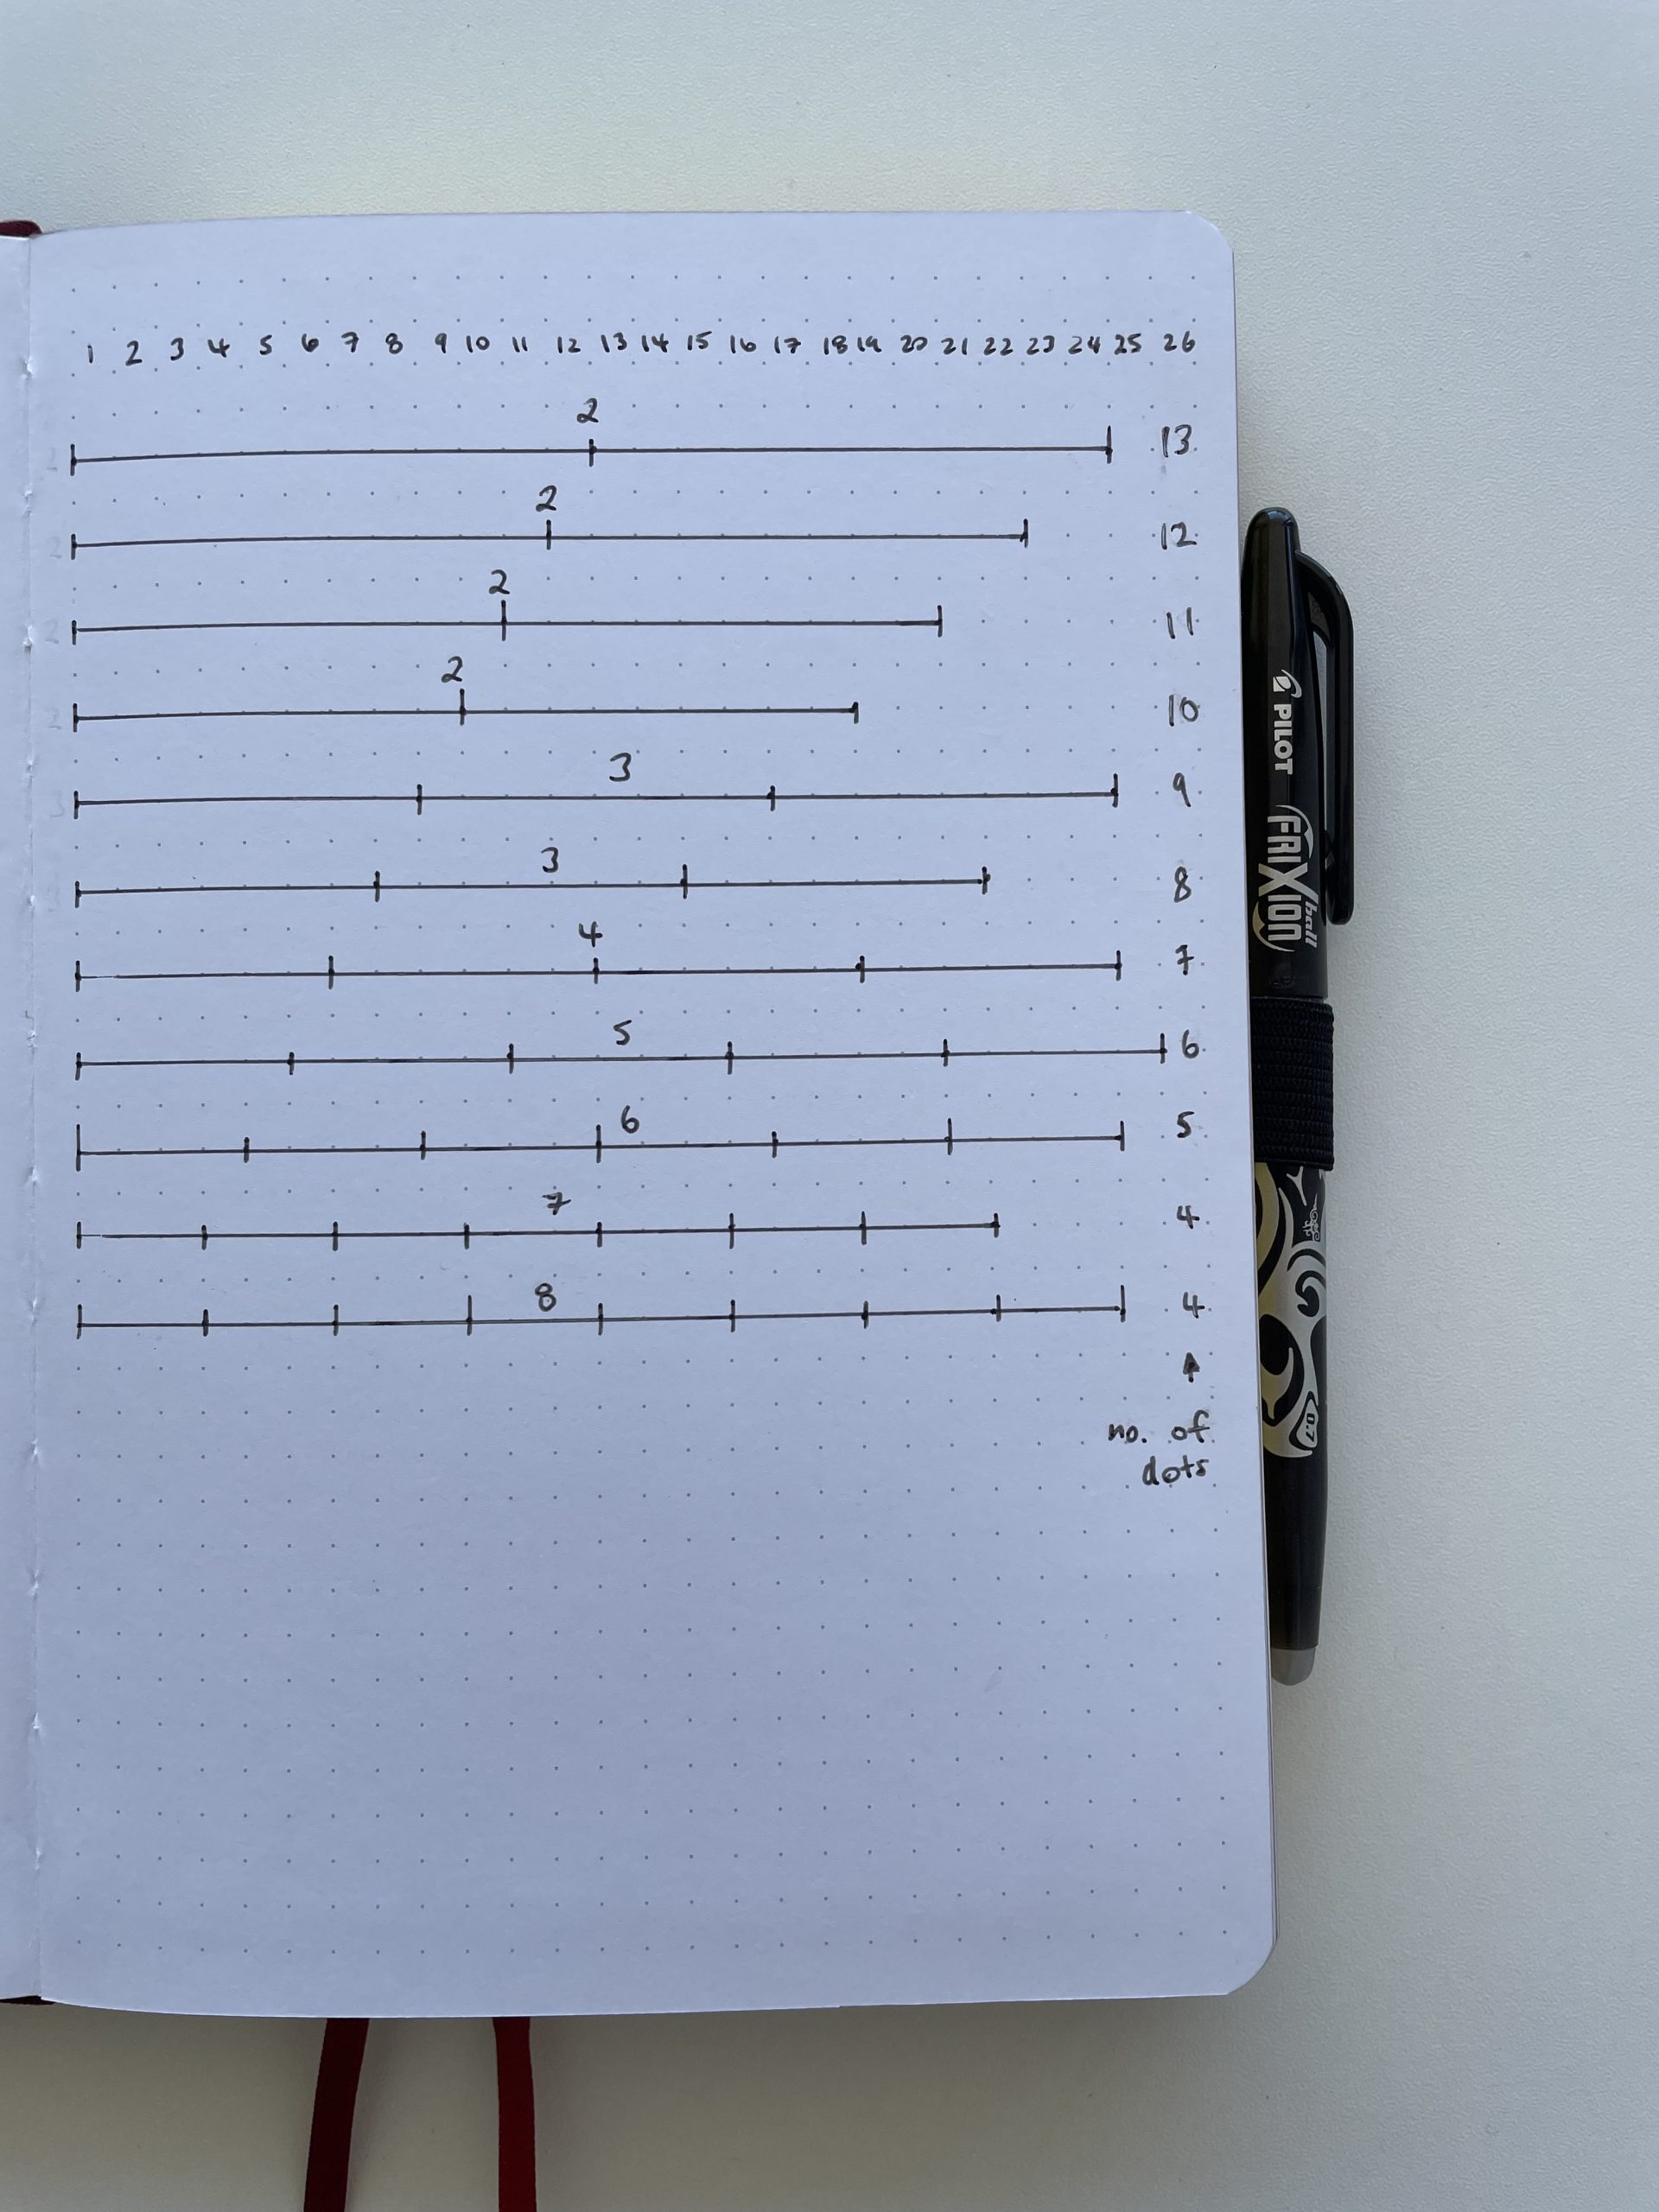
Since the Archer and Olive is quite popular, I decided to use that notebook for my row and column spacing example.
The Archer and Olive A5 notebook has 39 dots vertically and 27 dots horizontally (the same amount of dots as the SeQeS notebook if you’re looking for an alternative to Archer and Olive).
I used the first few pages of the notebook for drawing up the spreads to show you, but if you want it to be useful and a true ‘ruler’ or ‘stencil’ you’re going to have to sacrifice two pages of your bullet journal. Cut those pages out and then you’ll be able to use your ruler / stencil on any page, instead of flicking back and forth to your grid template.
I cheated and used my Ink By Jeng Stencil to help speed it up i.e. didn’t have to count the dots I could just mark where they were going based on the stencil.
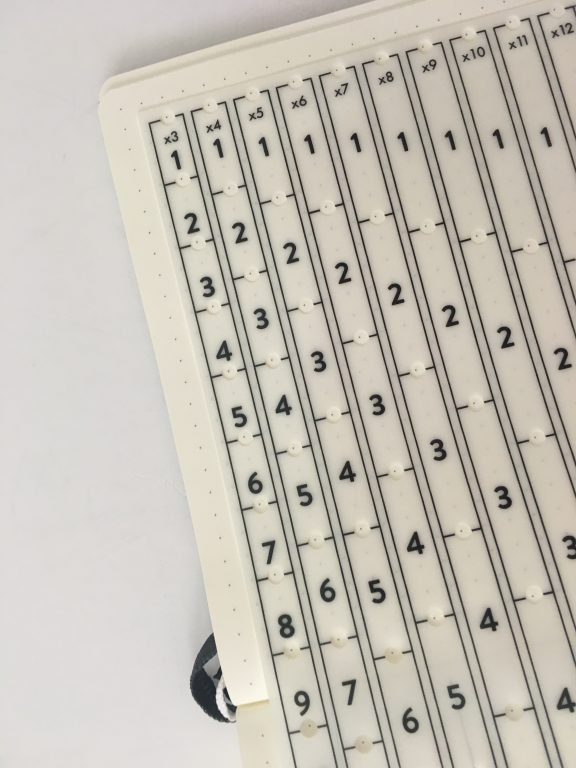
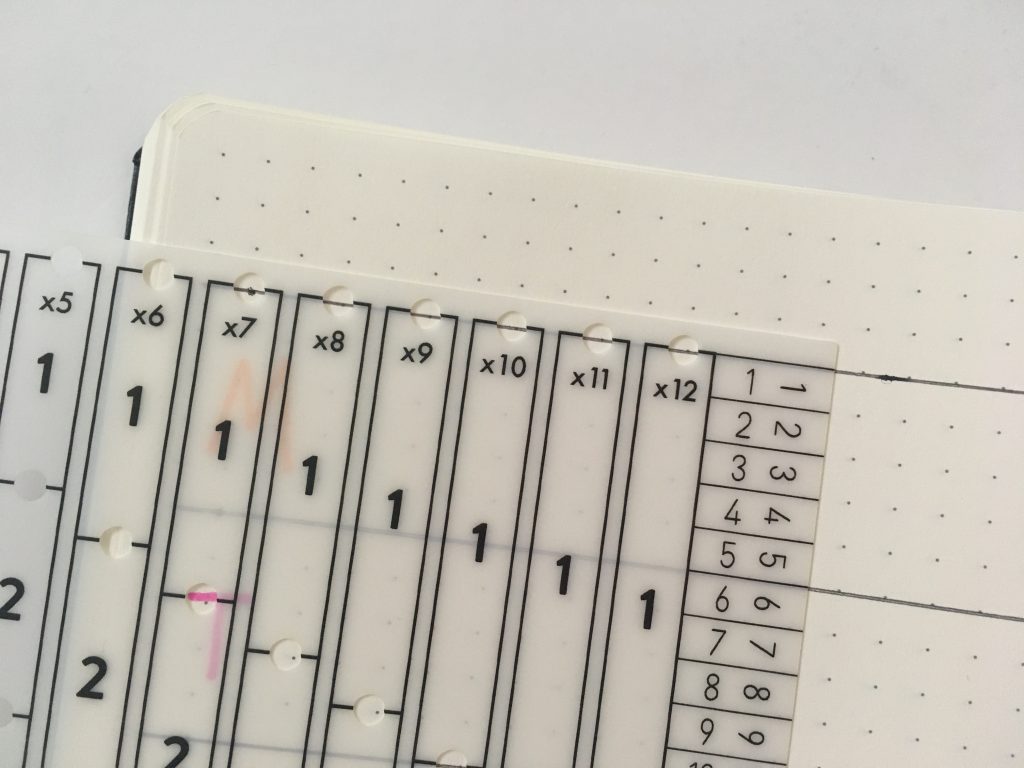
The numbers on her stencil are a bit confusing because where she has noted 12, it actually requires 13 dots including the first dot where you are drawing the line. The number 12 on the stencil refers to how many useable lines.
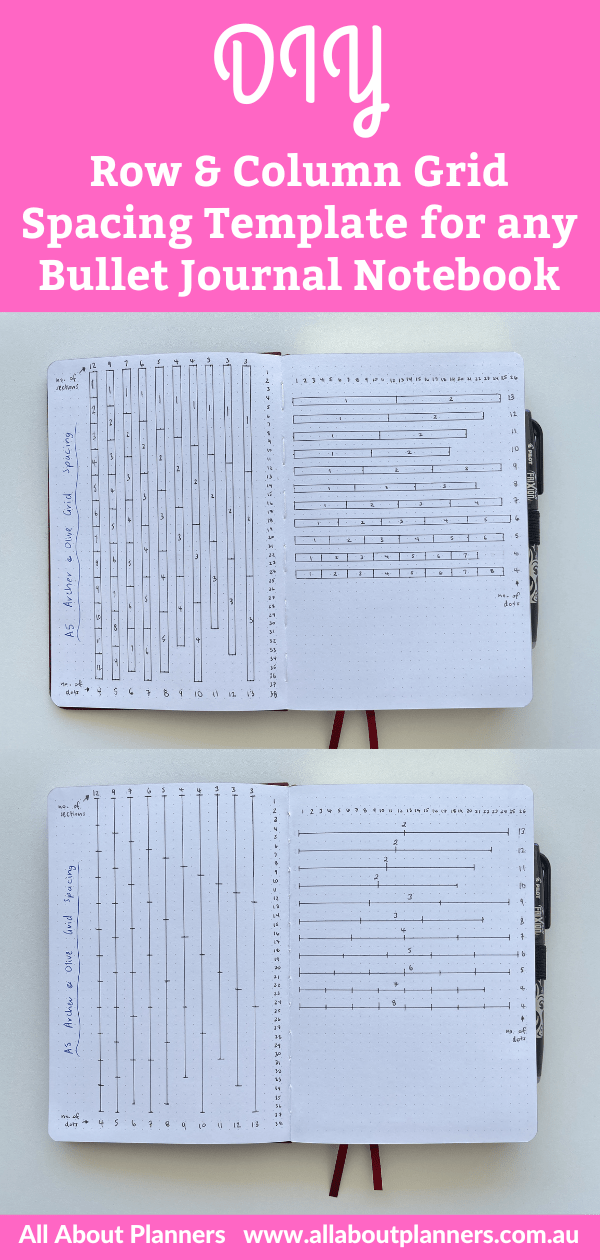
You’ll want to draw up two templates: one for your horizontal spacing and one for your vertical spacing. I’ve given 2 options below (either boxes or lines depending on your personal preference).
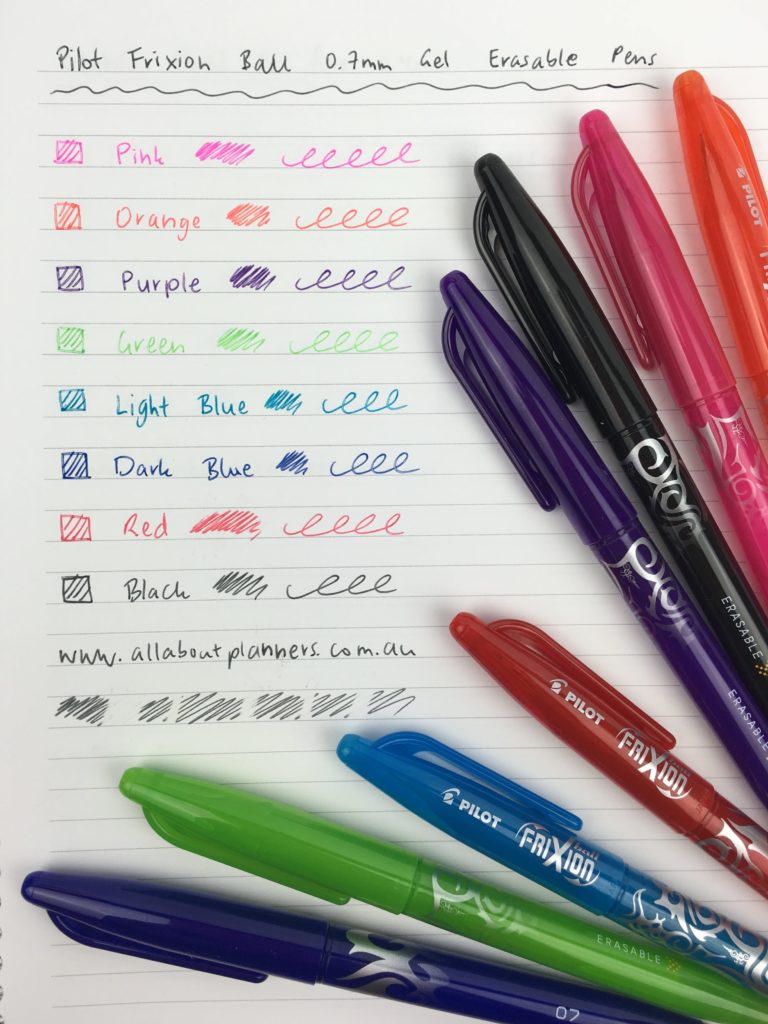
I exclusively use the Frixion erasable pens in my bullet journal notebooks as I’ve found they write and erase the best, but you will likely be writing things in small print so may prefer a needle tip or a 0.5mm or less pen tip (I used a 0.7mm Frixion).
Option 1: The boxes versions
This is the version I prefer, the borders on all sides of the boxes helps me visualize how the spread will look once finished, as I tend to do borders between sections to make it clearer where one section or day starts and ends.
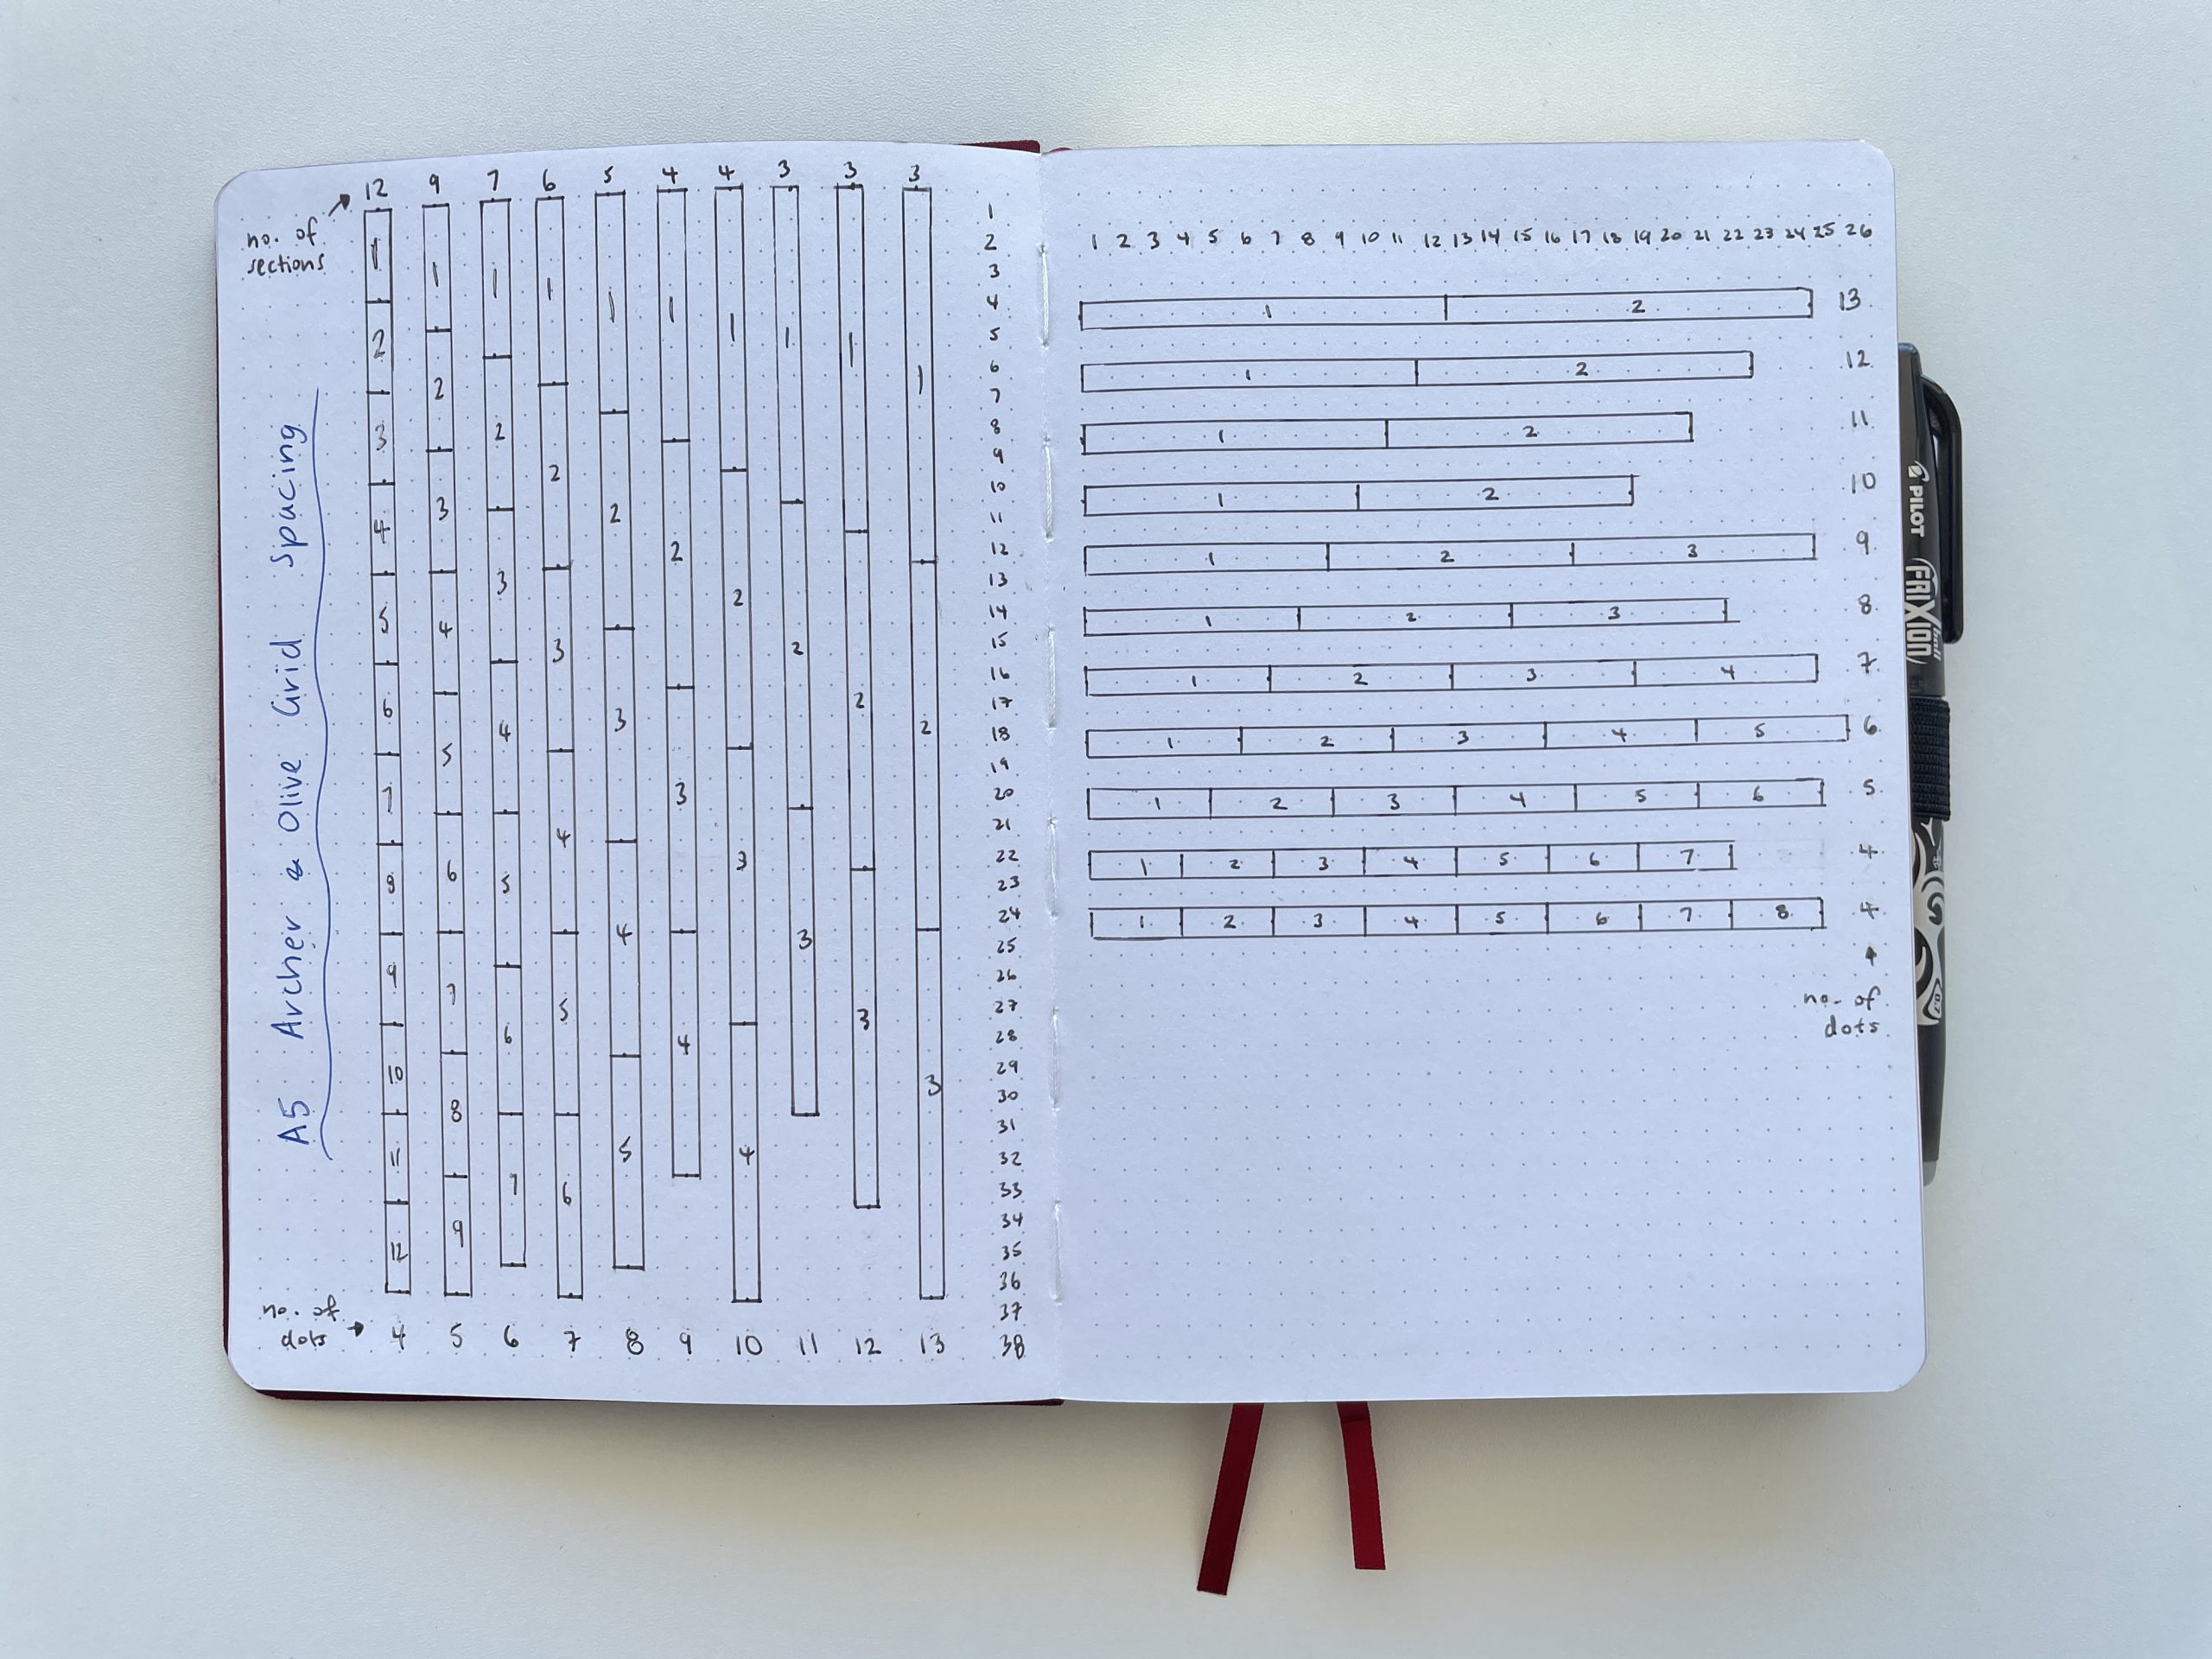
I included all possible combinations in mine but if you know you don’t have a need for 8 boxes on a portrait page orientation you could always skip adding that to your guide.
This guide is based on the boxes for each section butting up against each other, but if you like to leave a blank row in between the various sections in your bullet journal, then you may want to incorporate that into your guide.
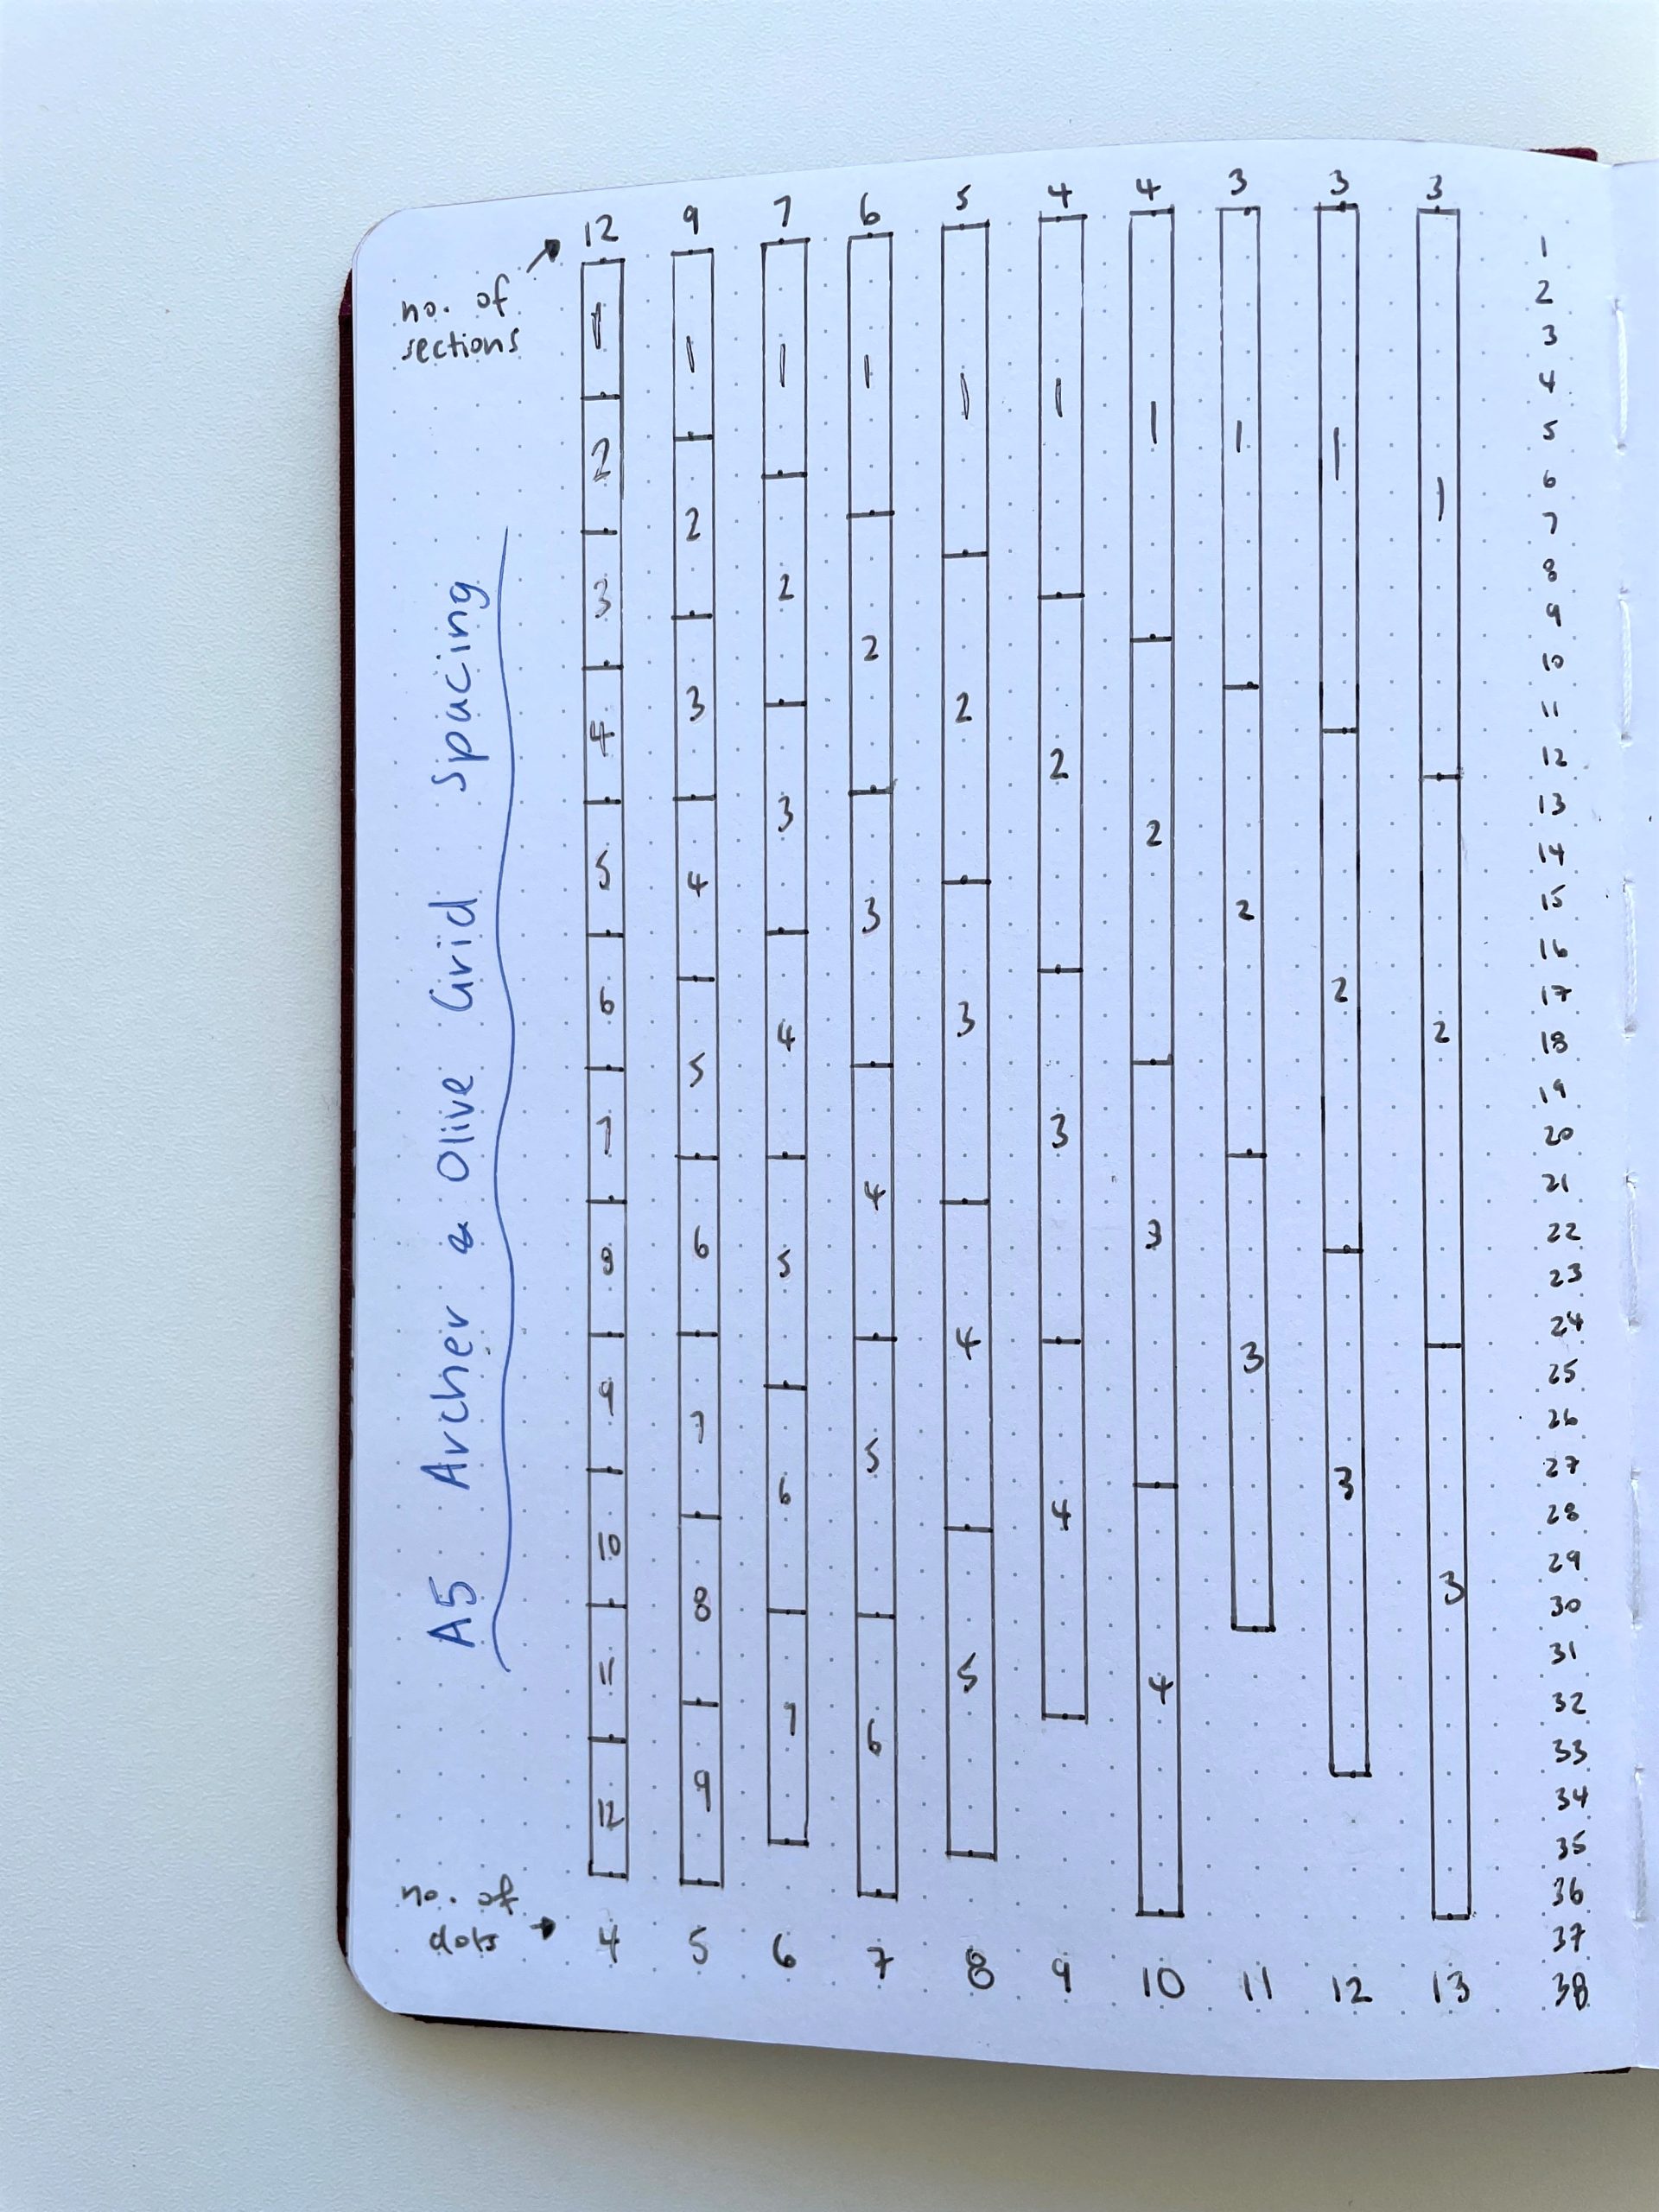
I like to add the number of dots and the number of sections that will be created with that dot spacing, for quick reference.
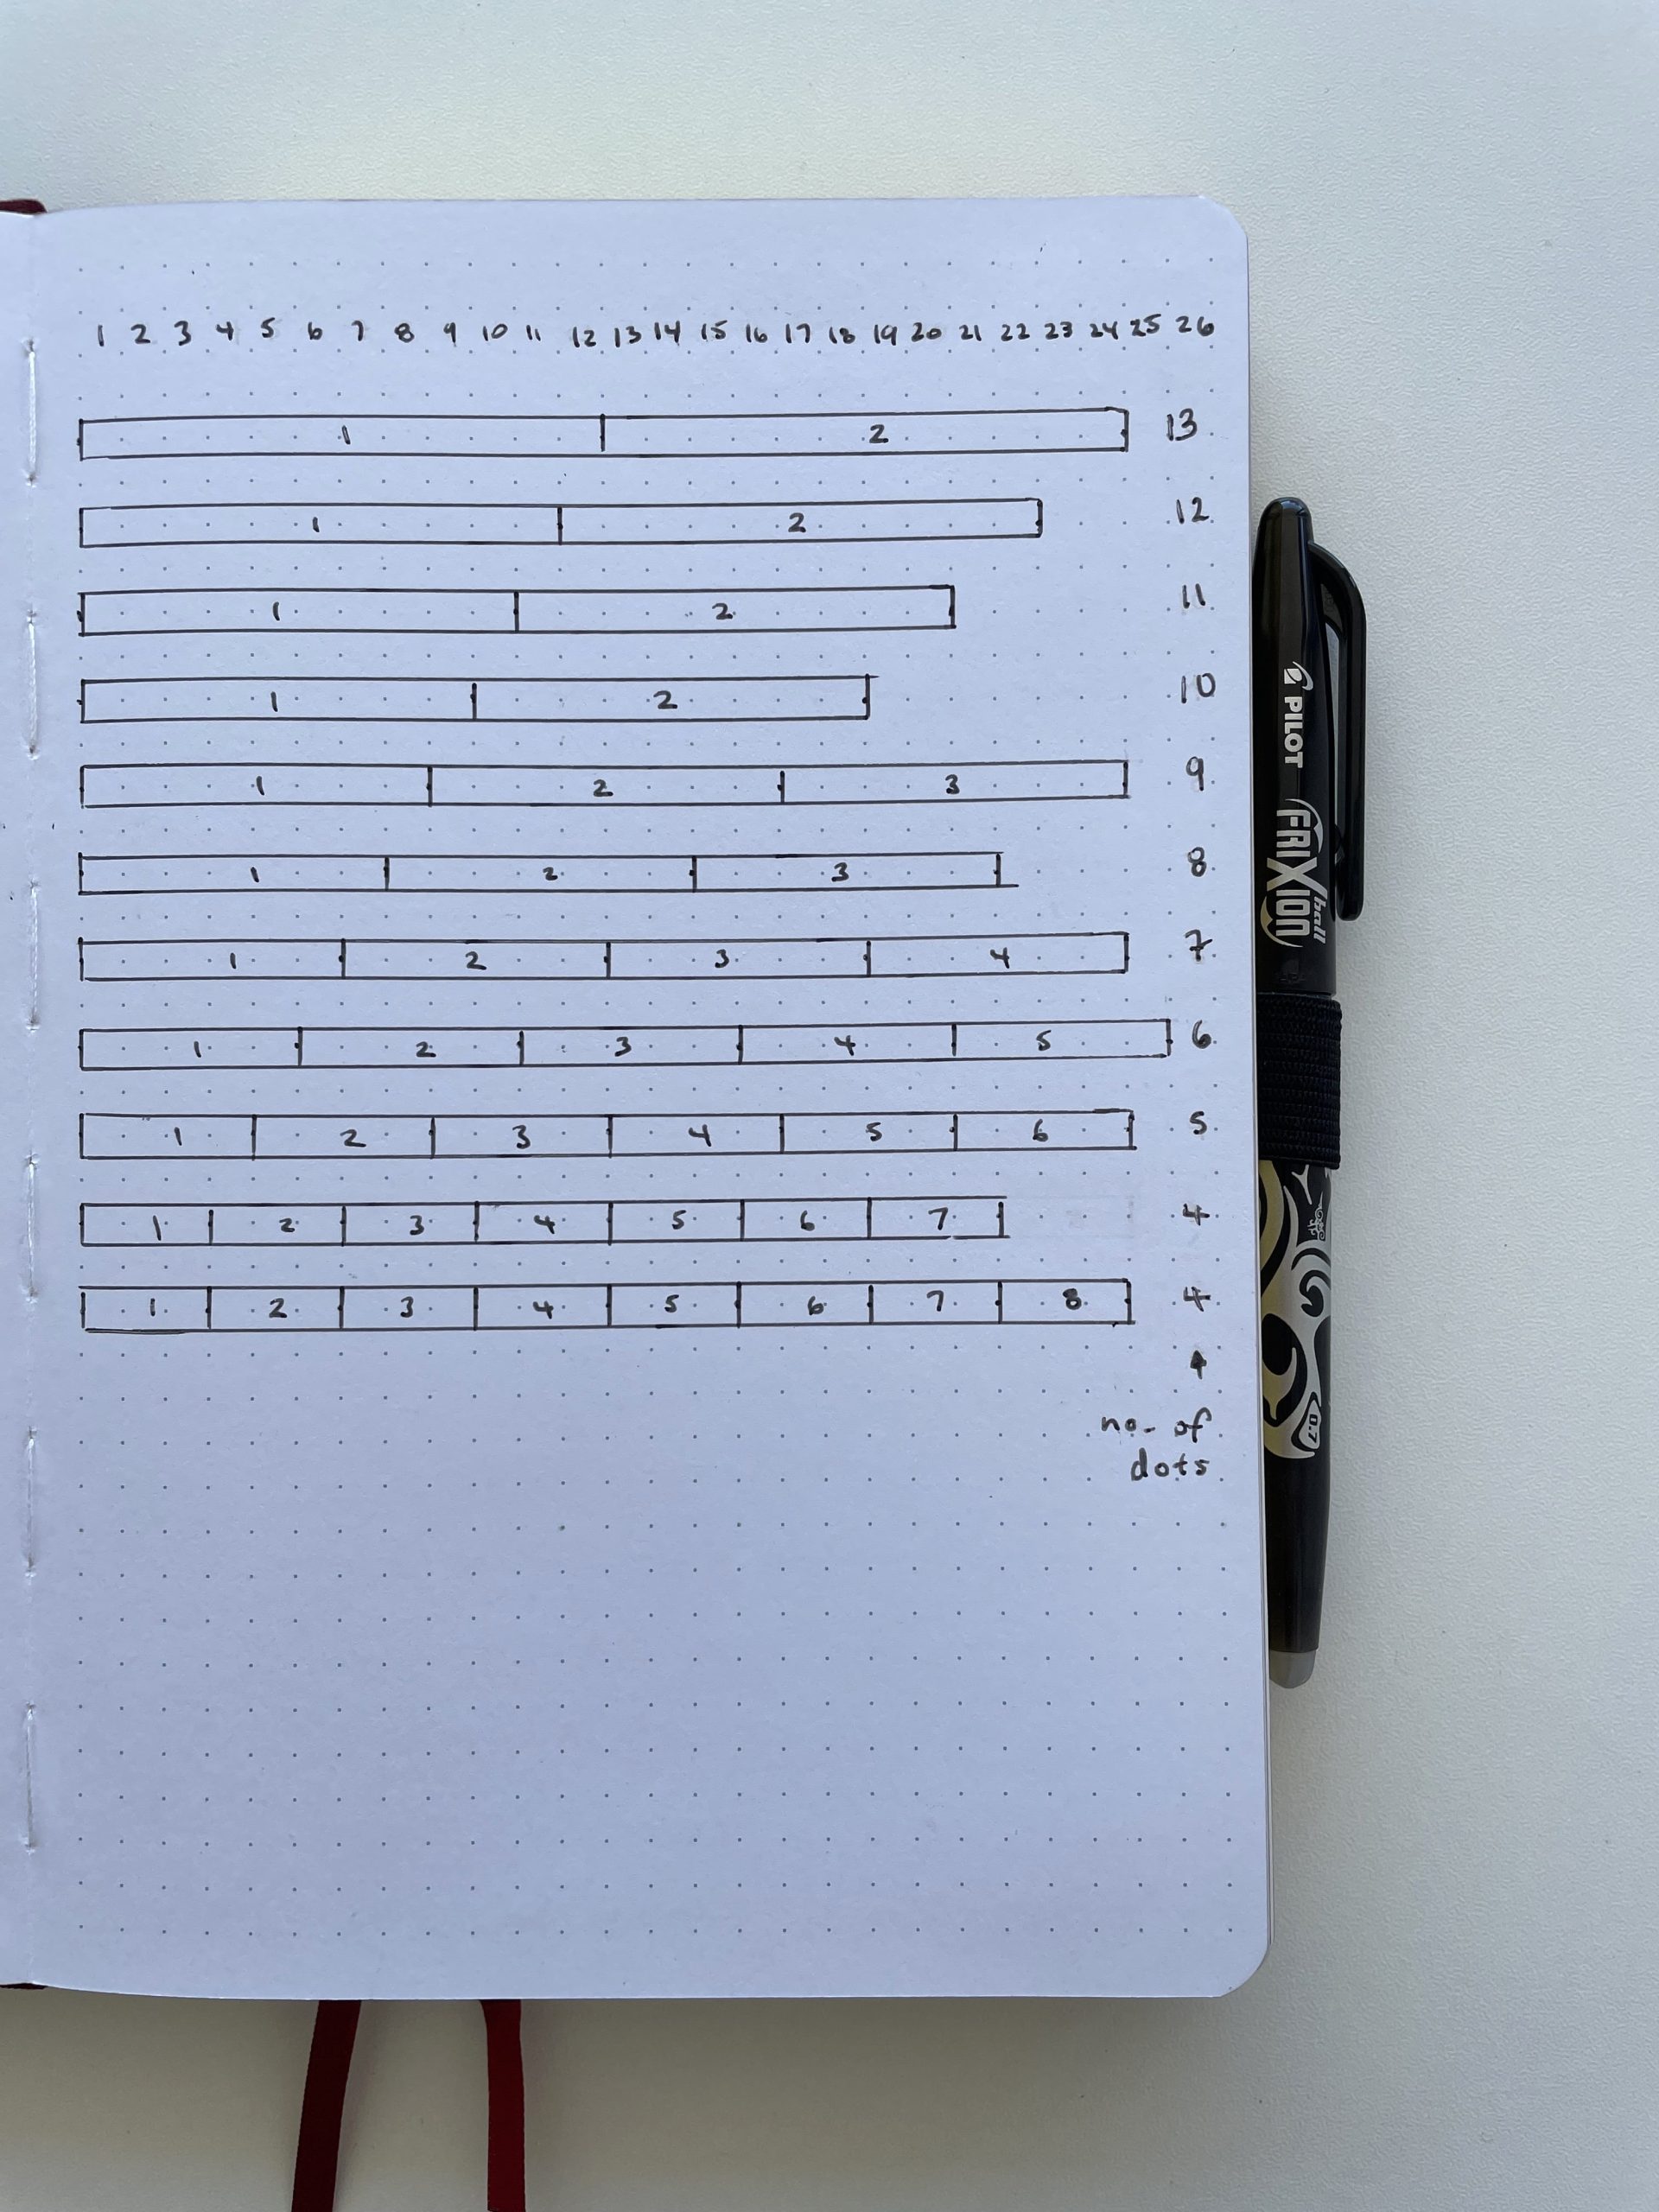
Option 2: The lines version
If you want a version that is faster to draw up, then go with this version. Instead of drawing boxes around the spacing, this one just has a marker along the line.
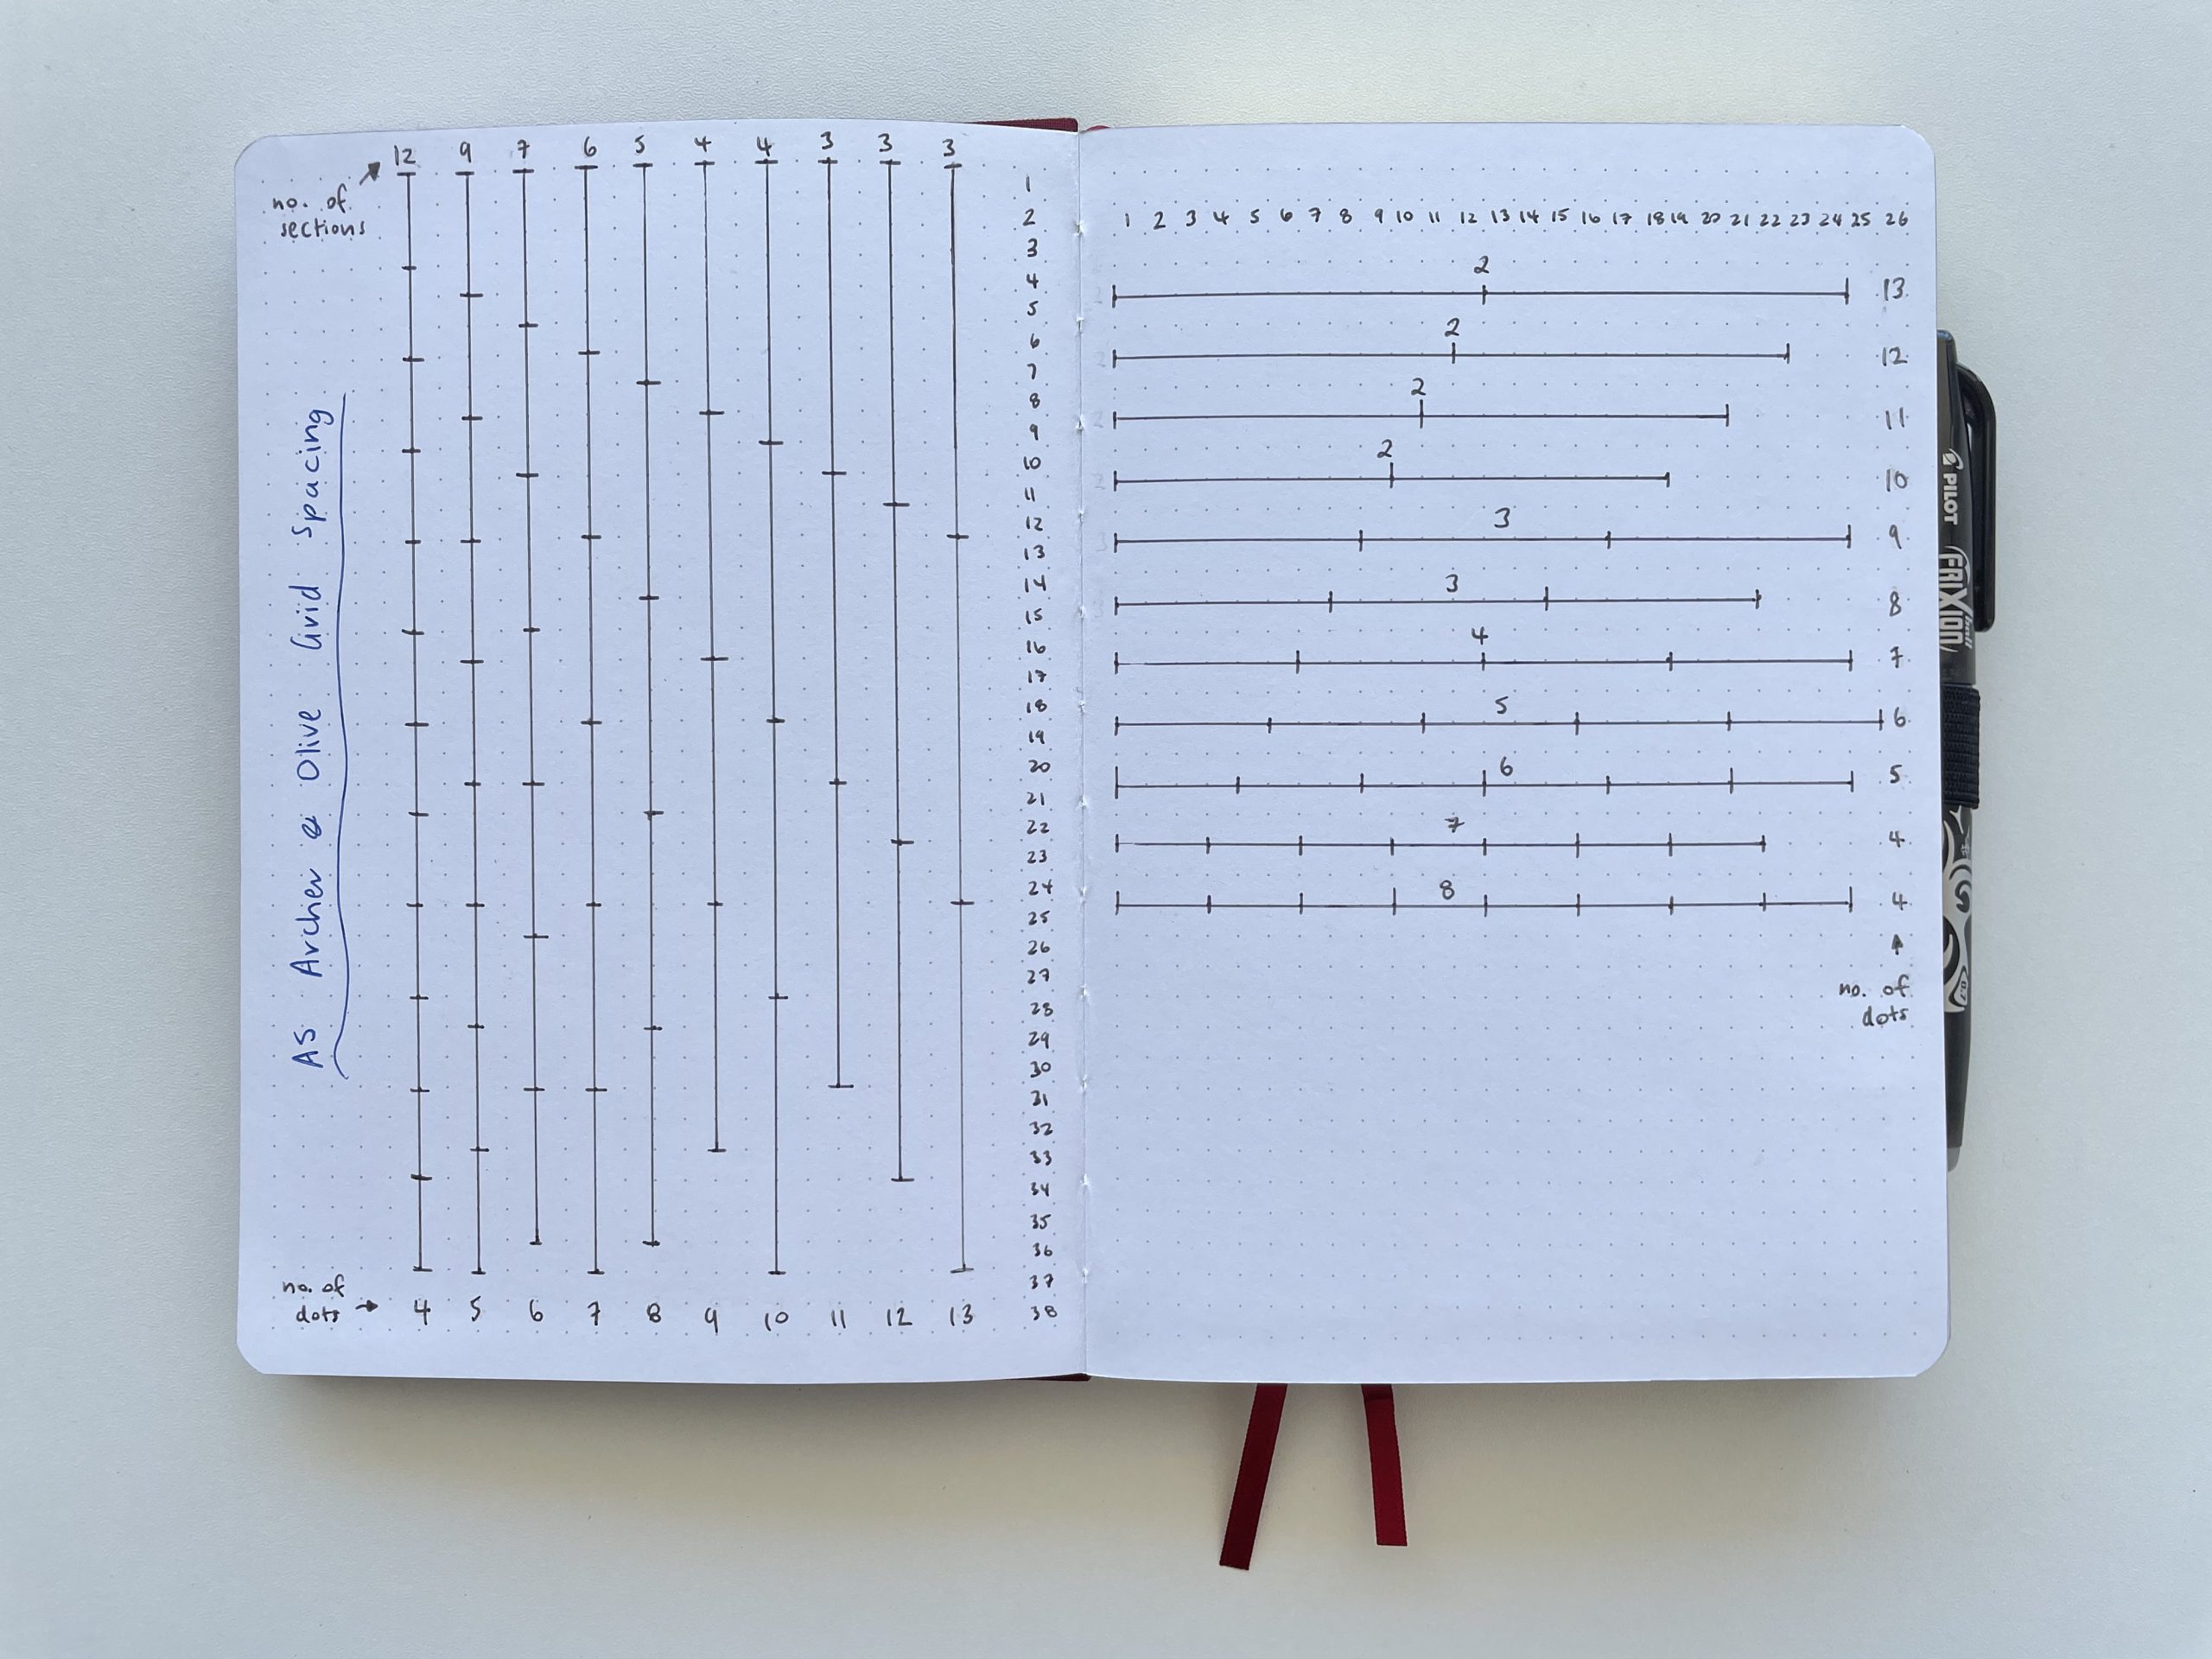
I left it out of my template but if you like to do quadrant layouts, you may want to add a dashed line or a line in a different color to signify the middle of the page.
Using the row and column grid guide
So now when you draw up a spread you can refer to this guide and know exactly how many dots you need.
Examples (if you were using the Archer and Olive and the template I made ^above^)
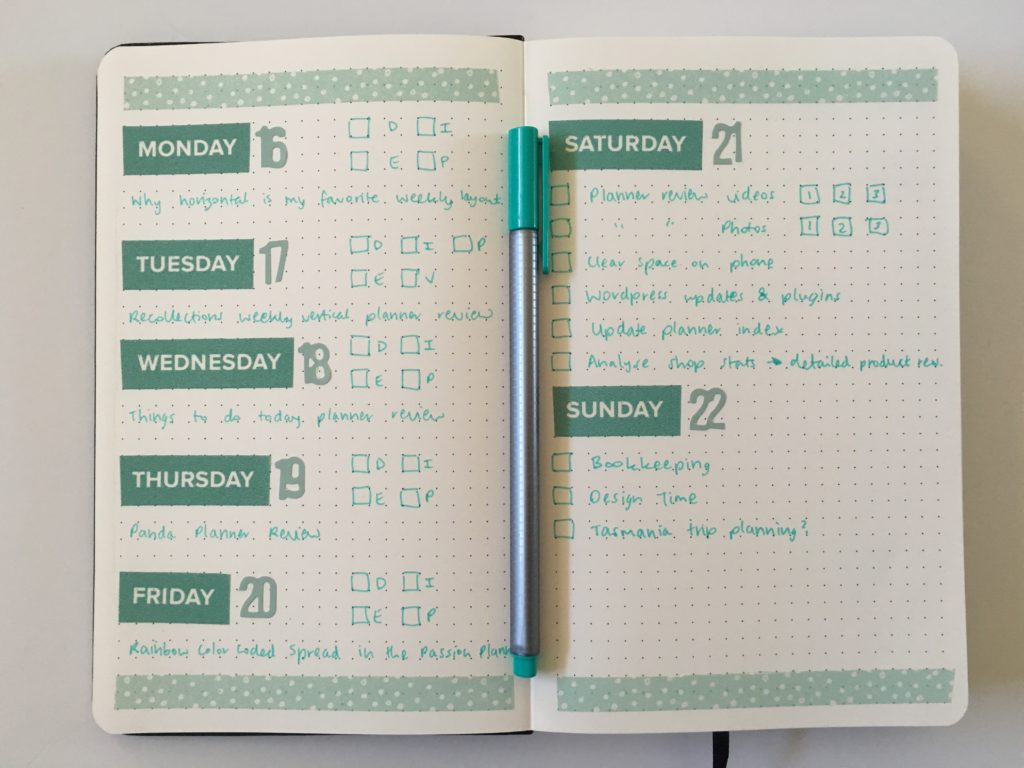
1) If you want to draw up a vertical weekly spread with 4 columns per page, each column would be 7 dots using a portrait page orientation, or 10 dots if you turn the notebook and use a landscape page orientation.
2) If you want to draw up a checklist with 3 columns per page, each column would be 9 dots using a portrait page orientation (8 dots if you want extra space leftover to decorate the margin), or 11, 12 or 13 dots if you turn the notebook and use a landscape page orientation. If you have excess space in the margin of your spreads, you could add some washi tape.
3) If you want to draw up a horizontal weekly spread with 4 boxes per page, then each box would be 9 or 10 dots using a portrait page orientation
If you cut these pages out of your notebook so they’re loose (store them in the notebook’s pocket folder so you don’t lose them), then you can place the page with the guide, underneath the page where you’re drawing up your spread (so basically tracing where to mark the page so you know where to draw the lines).
More bullet journaling tips
- How to resize any printable for any size bullet journal
- 50 Reminders to Put in Your Planner or Bullet Journal
- The best tools for habit tracking in your planner or bullet journal (my top 10)
Found this post helpful? Pin it!