How to keep track of blog post ideas on your iPhone (no paid app required!)
There are numerous ways to keep track of blog post ideas. While I do use a printable blog planner (which I bound into a notebook). I really only refer to my blog planner when I’m at my desk, I don’t carry it with me when I’m out and about. So if I’m on the go I use my iPhone to jot down blog post ideas. Specifically, the notes section of my iPhone.
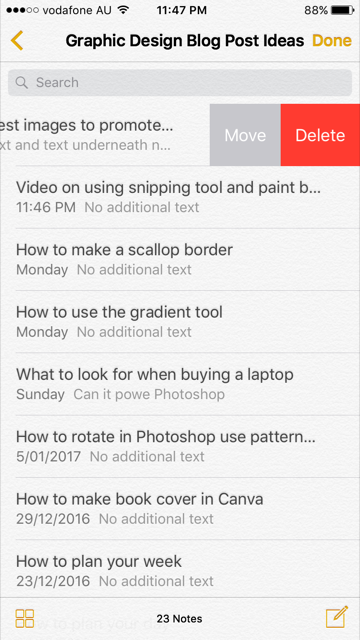
I started out creating notes each time I had an idea for a blog post or a product etc. but there ended up being a lot of notes and it was time consuming to find a post idea I was looking for. Since I blog about 3 main things: planners, graphic design/Photoshop and online business & blogging, I categorised everything into folders.
Related post: 101 Blog Post Ideas (for any type of blogger)
Using folders in the notes app on your iPhone
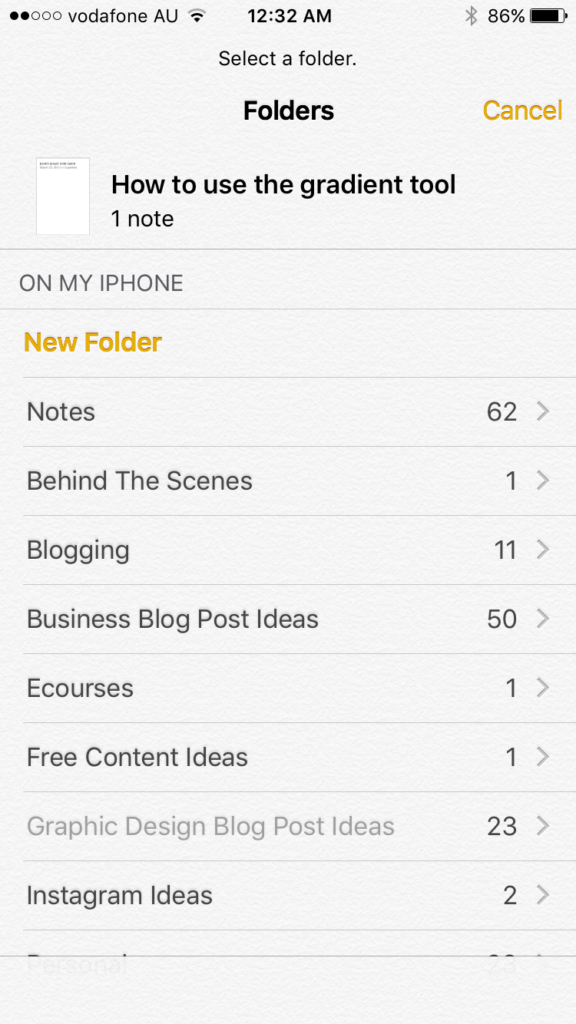
To create a folder just click ‘new folder’ in the bottom right hand corner of your screen when you have the notes app that comes with the iPhone open.
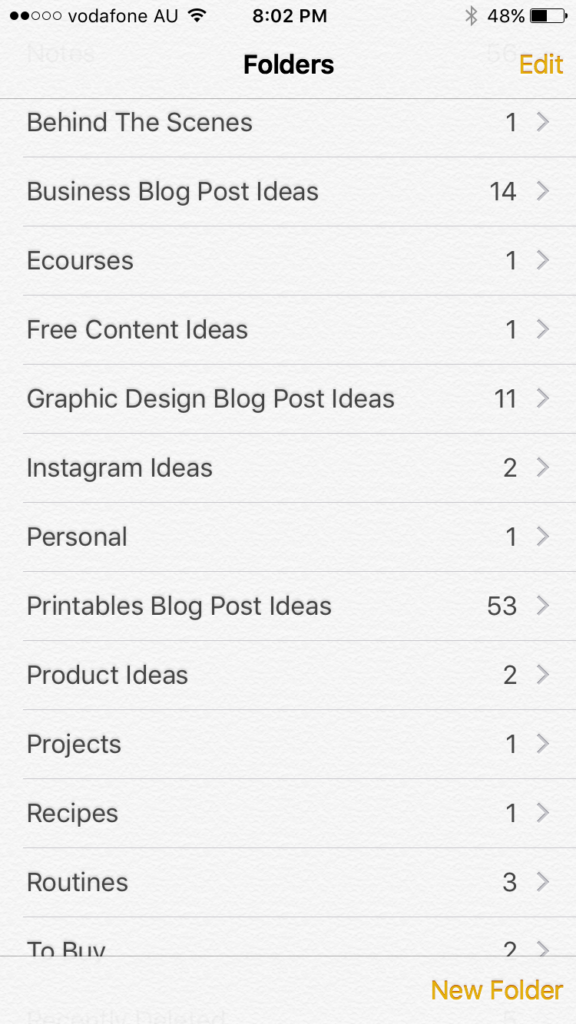
My folders are:
- Graphic design blog post ideas – Photoshop, pattern design tutorials etc.
- Ecourses – notes about future lessons & tutorials to record for my existing ecourses, as well as ideas for new ecourses
- Free content ideas – there is some overlap in this section with the printables blog post ideas & the graphic design blog post ideas e.g if I give away a Photoshop template such as this polka dot pattern overlays or printable planner bookmarks. The reason I ‘double up’ is because I like to maintain a good mix of free content, informative content as well as promoting my own products on this blog. So when it’s time to share free content again, I can consult this folder for ideas
- Projects – things to make e.g. craft projects
- Instagram ideas – ideas for Instagram posts. If you haven’t already, follow me!
- Product ideas – I am intending to split this into separate folders for each type of product I create i.e. separate folders for printable planners, planner stickers etc.
- Personal – things like shopping lists etc.
- Recipes – I want to make, favorite recipes – I keep a master list in my recipe binder but if someone recommends a recipe to me when I’m at a friends place or at work then obviously I won’t be carrying my recipe binder around with me to write it down.
- Routines – I keep separate notes for: daily routine, weekly routine and monthly routine although I’m going to make a printable planner page for these and move them back into my planner. I really think to do’s need to be checked off in person as I find they get lost among digital planning tools. I also want to be able to track my progress and what I’m working on during each week and month to help better schedule my days – with the notes app you can only tick it off once, then you need to undo for each new day, week or month.
- To buy – a wish list of sorts of things to look out for when they come on sale, as well as supplies I need to purchase for the project ideas
I then transfer the blog post ideas into my blog planner when I’m ready to schedule them & draft them.
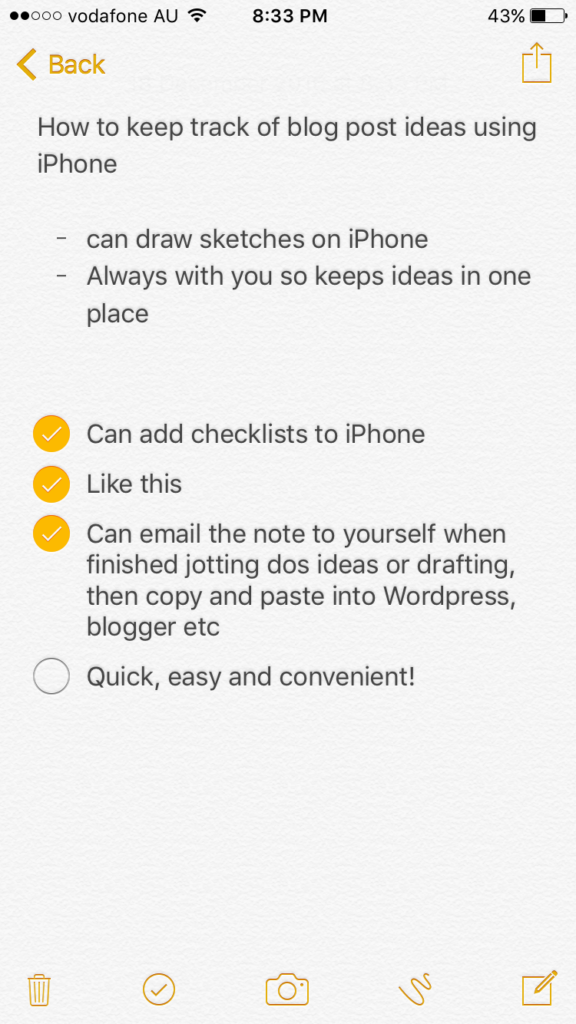
One of the reasons I like the notes app is that it not only lets you jot down the title, but it also allows you to record some ideas/notes about the post idea. Considering most of my ideas are usually when I am on my commute to and from my day job or while I’m out walking during my lunch break, it’s much more convenient to quickly jot them down while I’m waiting for traffic lights to change for example, than it is to pull out my planner, find a pen, find a blank page etc.
I also found that when I had blog post ideas scribbled everywhere on the notes pages of my planner not only did they fill up really quickly, but I had trouble making sense of what I had written afterwards (I don’t have the neatest writing!) By using the notes app the font/typing is neat and easy to read, plus I can email the outline to myself.
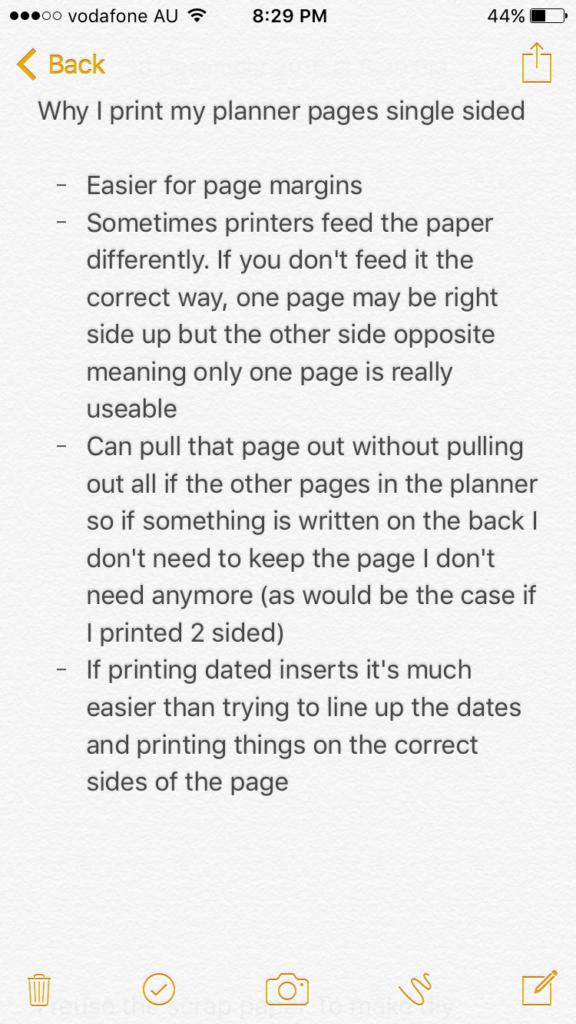
Here’s an example of an outline for an upcoming post:
 Related Post: 7 Tips for Creating Blog Post Titles
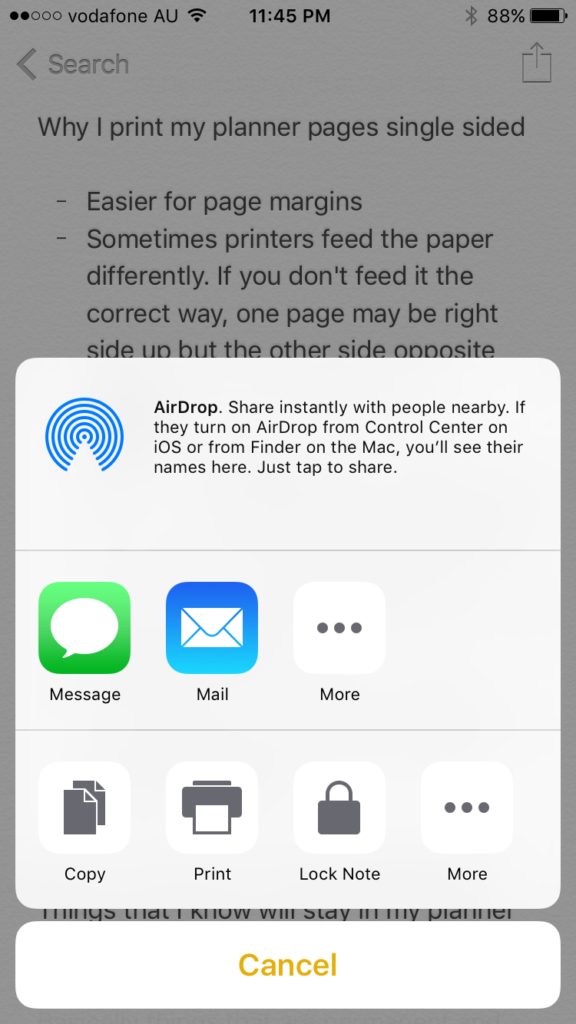
Emailing notes to yourself
Click on the icon at the top right hand side of your screen (with the arrow pointing upwards) and choose the mail icon from the popup menu. You can then email it to yourself, and copy and paste it straight into Wordpress (or Blogger, Squarespace or whatever platform you use for your blog).
Or, if you have a slow internet connection like I do, I copy and paste the post from the email into a Microsoft Word document where I finish fleshing out the outline and then copy and paste it into Wordpress.

How to move notes to different folders
I also have another folder set up where I move the note to another folder called ‘ready to publish’ .
To move a note, swipe left on on the note and select ‘move’
Pick the folder you want to move the note to. The folder the note is currently a part of is shaded in grey.
Drawing Sketches in the iPhone notes app
Another reason I like the notes tool on my iPhone is the ability to ‘draw’ a note. I typically do this if I get an idea for a new planner sticker layout, or a printable page layout etc.
For example, when I had the idea for my list planner flags stickers, I drew a sketch (refer to the screenshot above – to draw a sketch you click the squiggle tool, the second icon from the right). You can also choose different colors for the sketch.
So this is my blog post drafting process:
- A blog post idea pops into my head
- Jot it down in my blog planner if I’m at my desk. If I’m away from my desk, jot it in the relevant categorised notes section of my iPhone
- When it’s time to write a blog post I will usually have an idea of what I was to post about, if not, I’ll consult either my blog post planner or my iPhone.
- If I still can’t think of a post idea, I’ll consult my 1200 blog post ideas or 200 blog post title prompts ebooks
- Then I draft the post
So I don’t end up with blog post ideas scattered here, there and everywhere, I typically transfer them to a Word document I have with all of my blog posts that are more than just a one line item idea (i.e. they are outlined) which I’ll be sharing more about in an upcoming post.