• Home
  • Planning
    • Blog post index
    • New to planning? Start here
    • Planning Tips & Inspiration
      • Planning with Highlighters
      • Planner Newbie
      • Planner pens
    • 52 Planning Systems in 52 Weeks
    • Planner Reviews
      • Planner Comparisons
      • Happy Planner (MAMBI)
      • Horizontal Weekly
      • Horizontal 1 Page Weekly + Notes
      • Categories Weekly
      • Hourly Planners
      • Budget Planners
      • Daily Planners
      • Student Planners
      • Discbound Planners
      • Planner Roundups
    • Resources & Tools I Recommend
    • Rachael’s Favorites
    • Bullet Journal
      • Bullet Journal Reviews
      • 160GSM Dot Grid Notebook Reviews
      • Bullet Journal Spreads
      • Bullet Journal Tips
    • Digital Planning
    • Stationery Shopping
    • Recipe Organisation
  • FREE Printables
    • FREE Printables
    • Free Printables Library – Subscribers Login
  • Graphic Design
    • Affinity Publisher
    • Photoshop Tutorials
    • Microsoft Word
    • Microsoft Excel
    • Silhouette Studio
    • Canva
  • Learn
    • ECOURSES
      • Printables in Affinity Publisher
      • How to Make Planner Stickers
      • How to Make Printables
      • Digital planners and notebooks in Microsoft PowerPoint
      • How to Make Labels in Photoshop
      • Printables in Microsoft Excel
      • Printables in Microsoft Word
      • How to Write Product Descriptions
      • Learn How to Make Printables
      • Free Graphic Design Video Tutorials Library
      • Make Patterns in Photoshop
      • Party Printables
      • Ecourse Bundles
    • Ebooks
      • 1200 Blog Post Ideas (Exclusive Download Content)
      • 200 Blog Post Title Prompts (Exclusive Download Content)
      • 54 Mistakes Etsy Sellers Make (And How to Fix Them)
      • 200 Blog Post Title Prompts (For Any Type of Blog)
      • 1200 Blog Post Ideas
    • Blogging & Online Business
  • SHOP
    • My online store
    • My Etsy store
    • Shop my favorite planner supplies on Amazon
    • Planner Supplies (my sister’s shop!)
  • FAQ
    • About
    • Downloading Files
    • How to Open Zipped File Folders
    • Printing Tips
    • What does EDITABLE mean?
    • Printable Planner Stickers
    • Why printables? Do you sell printed versions of your products?
    • What is a Printable? What happens when I purchase a printable from you?
    • I’ve purchased printables from you – how should I set up my planner?
    • Feedback & Testimonials
    • Disclaimer and Privacy Policy
  • Travel
    • Australia & New Zealand
    • Japan
    • Europe
    • Itineraries

All About Planners

Printable planners to organize your home, business and life!

July 12, 2016

How to create a new file and resize anything in Photoshop (without distorting!)

How to create a new file and resize anything in Photoshop without distorting, maintain proportions, beginner, video tutorial

I realized I’ve shared a few tutorials on how to use the various tools in Photoshop but I’d never actually done a tutorial on how to set up a new template in Photoshop or how to resize something in Photoshop! #mybad.

Written instructions are below, or you can just watch the video 🙂

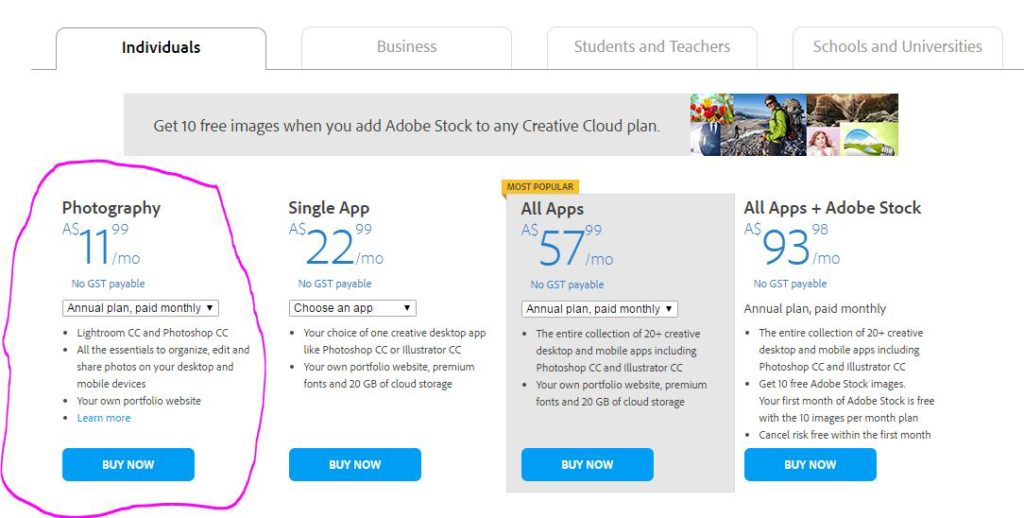
If you don’t have Photoshop installed on your computer (or laptop!) already, you can download/ sign up for by clicking the image below (my affiliate link).

Choose the ‘Photography’ plan – it includes the latest version of Photoshop – Photoshop CC/Photoshop Creative Cloud). The price below is in AUD, so it’ll be a bit cheaper if you live in the USA.


adobe photoshop creative cloud replace version cs6, how to download photoshop

To enlarge the screen of the video, click the square icon in the bottom right hand corner of the video (it will say ‘full screen’ when you hover your mouse over the icon).

For more tutorials, subscribe to my YouTube Channel

To set up a new file in Photoshop

Go to file > New (or press CTRL and N on your keyboard) that will bring up this menu:

file new, photoshop, how to resize something in photoshop, resize clipart, change page size, canvas size, beginner, video

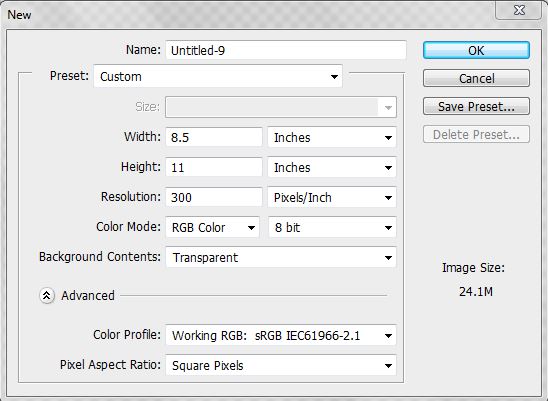
You can enter the page size, resolution (always choose 300 as this will create a high quality image file) etc. The above settings are the ones I always use (I just change the size if I need to and leave all other settings as shown in the photo above).

If you’re going to be using the page size again in the future, click ‘save preset’ to save it to the present menu (so you don’t need to enter all the specifications such as resolution, color mode etc. – Photoshop will automatically save this for you)

To resize something in Photoshop:

1. Click the layer you want to resize in the layers menu (or press CTRL and ALT and click on the object, pattern, text etc. that you want to resize on the template and this will automatically find and select that layer in the layers menu)
2. Press CTRL and T on your keyboard, choose one of the corners (not the squares in between the corners, either the top or bottom left/right corners)
3. Left click with your mouse and hold down shift on your keyboard at the same time. Holding down shift is so that the shape, object, graphic etc. maintains it’s proportions when you increase or decrease it’s size
4. Then drag your mouse inwards (making sure you are pressing the SHIFT key at the same time) to make the object smaller, or drag your mouse outwards (away from your computer) to make it larger.

Warning: Don’t enlarge graphics too much as they can become ‘pixely’ and the file quality will reduce/become blurry and fuzzy.

To change the canvas/template/file size in Photoshop:

1. Go to the image menu at the top of Photoshop
2. Choose ‘canvas size’
3. Enter the dimensions you want the canvas/template/file to be
4. If you’re reducing the size (making it smaller), choose proceed when the warning message about clipping appears
5. If your object has disappeared (you can’t see it anymore), click on the object/clipart/graphic/pattern layer in the layers’s menu (or press CTRL and ALT and click on the object, pattern etc. on the template) then press CTRL and T on your keyboard – it will show that the object is outside the boundaries of the document. Left click on the object and hold down the left button on your mouse, then drag it back onto your template

You can do this with multiple objects if you select all of the layers at once in the layers menu (by holding down CTRL on your keyboard and left clicking to select all of the layers you want to move or resize at once), or by clicking the first layer you want to resize, holding down the SHIFT key (instead of CTRL) then clicking on the bottom layer i.e. all of the layers are stacked one on top of each other you don’t need to select them all individually using CRTL. By pressing the SHIFT key instead it automatically picks up all of the layers between the first/top and last/bottom layer. You can then resize it as per the instructions above.

Note that I am using a PC/Windows, the keyboard shortcuts may be different for MAC. I am using Photoshop version CS6 – the same techniques should work with any version of Photoshop. If you don’t have Photoshop you can download a FREE 30 day trial here, otherwise it’s only $9.99USD/month.

Share this:

  • Click to share on Twitter (Opens in new window)
  • Click to share on Facebook (Opens in new window)

Related

Posted In: Graphic Design, Photoshop Tutorials · Tagged: adobe photoshop, beginner, how to make a perfect circle in photoshop, how to make a perfect square in photoshop, how to prevent squished clipart in Photoshop, how to resize in photoshop, how to resize in photoshop without distorting, how to save preset in photoshop, how to use the shape tool in photoshop, new photoshop file, Photoshop, photoshop CC, photoshop CS6, photoshop custom shape tool, photoshop elements, photoshop shape tool, photoshop tutorial, photoshop tutorials, photoshop tutorials for beginners, tutorial, video tutorial

Leave a Reply Cancel reply

Your email address will not be published. Required fields are marked *

This site uses Akismet to reduce spam. Learn how your comment data is processed.

Hello

Welcome to All About Planners! I’m Rachael, a 20-something Australian planner addict. On the blog you’ll find more than 1,000 posts about all things planning including planner reviews, tips, favorite supplies and some of my past weekly spreads.

Subscribe and join 60,000+ others on the quest to find planner peace!

If you have a question or there is a planner you’d like me to review, I can be contacted via [email protected]

Subscribe

free printables library sign up all about planners blog image graphic subscribe

Search

Shop At Etsy

The photos and content on this site are the property of All About Planners. They are not allowed to be used without permission from All About Planners.

Categories

Recent Posts

  • 7 Tips for creating rainbow themed spreads in your planner or bullet journal
  • ZenArt Bullet Journal Notebook review (7′ wide x 10″ high notebook)
  • Using ChatGPT to create a travel itinerary – time saver or waste of time?
  • What dot grid size is best for bullet journaling?
  • The best budgeting sticker books for your planner or bullet journal

Follow Me

  • Instagram
  • Pinterest
  • YouTube

Disclaimer

All About Planners is a participant in the Amazon Services LLC Associates Program, an affiliate advertising program designed to provide a means for sites to earn advertising fees by advertising and linking to amazon.com.

Printables

  • Learn How to Make Printables
  • How to Make Planner Stickers
  • Resources & Tools I Recommend

Follow Me

  • Instagram
  • Pinterest
  • YouTube
Privacy

Copyright © 2023 All About Planners · Theme by 17th Avenue