A behind the scenes look at my design process for making planner printables
In today’s post I’m showing you a behind the scenes look at my workflow for making printables.
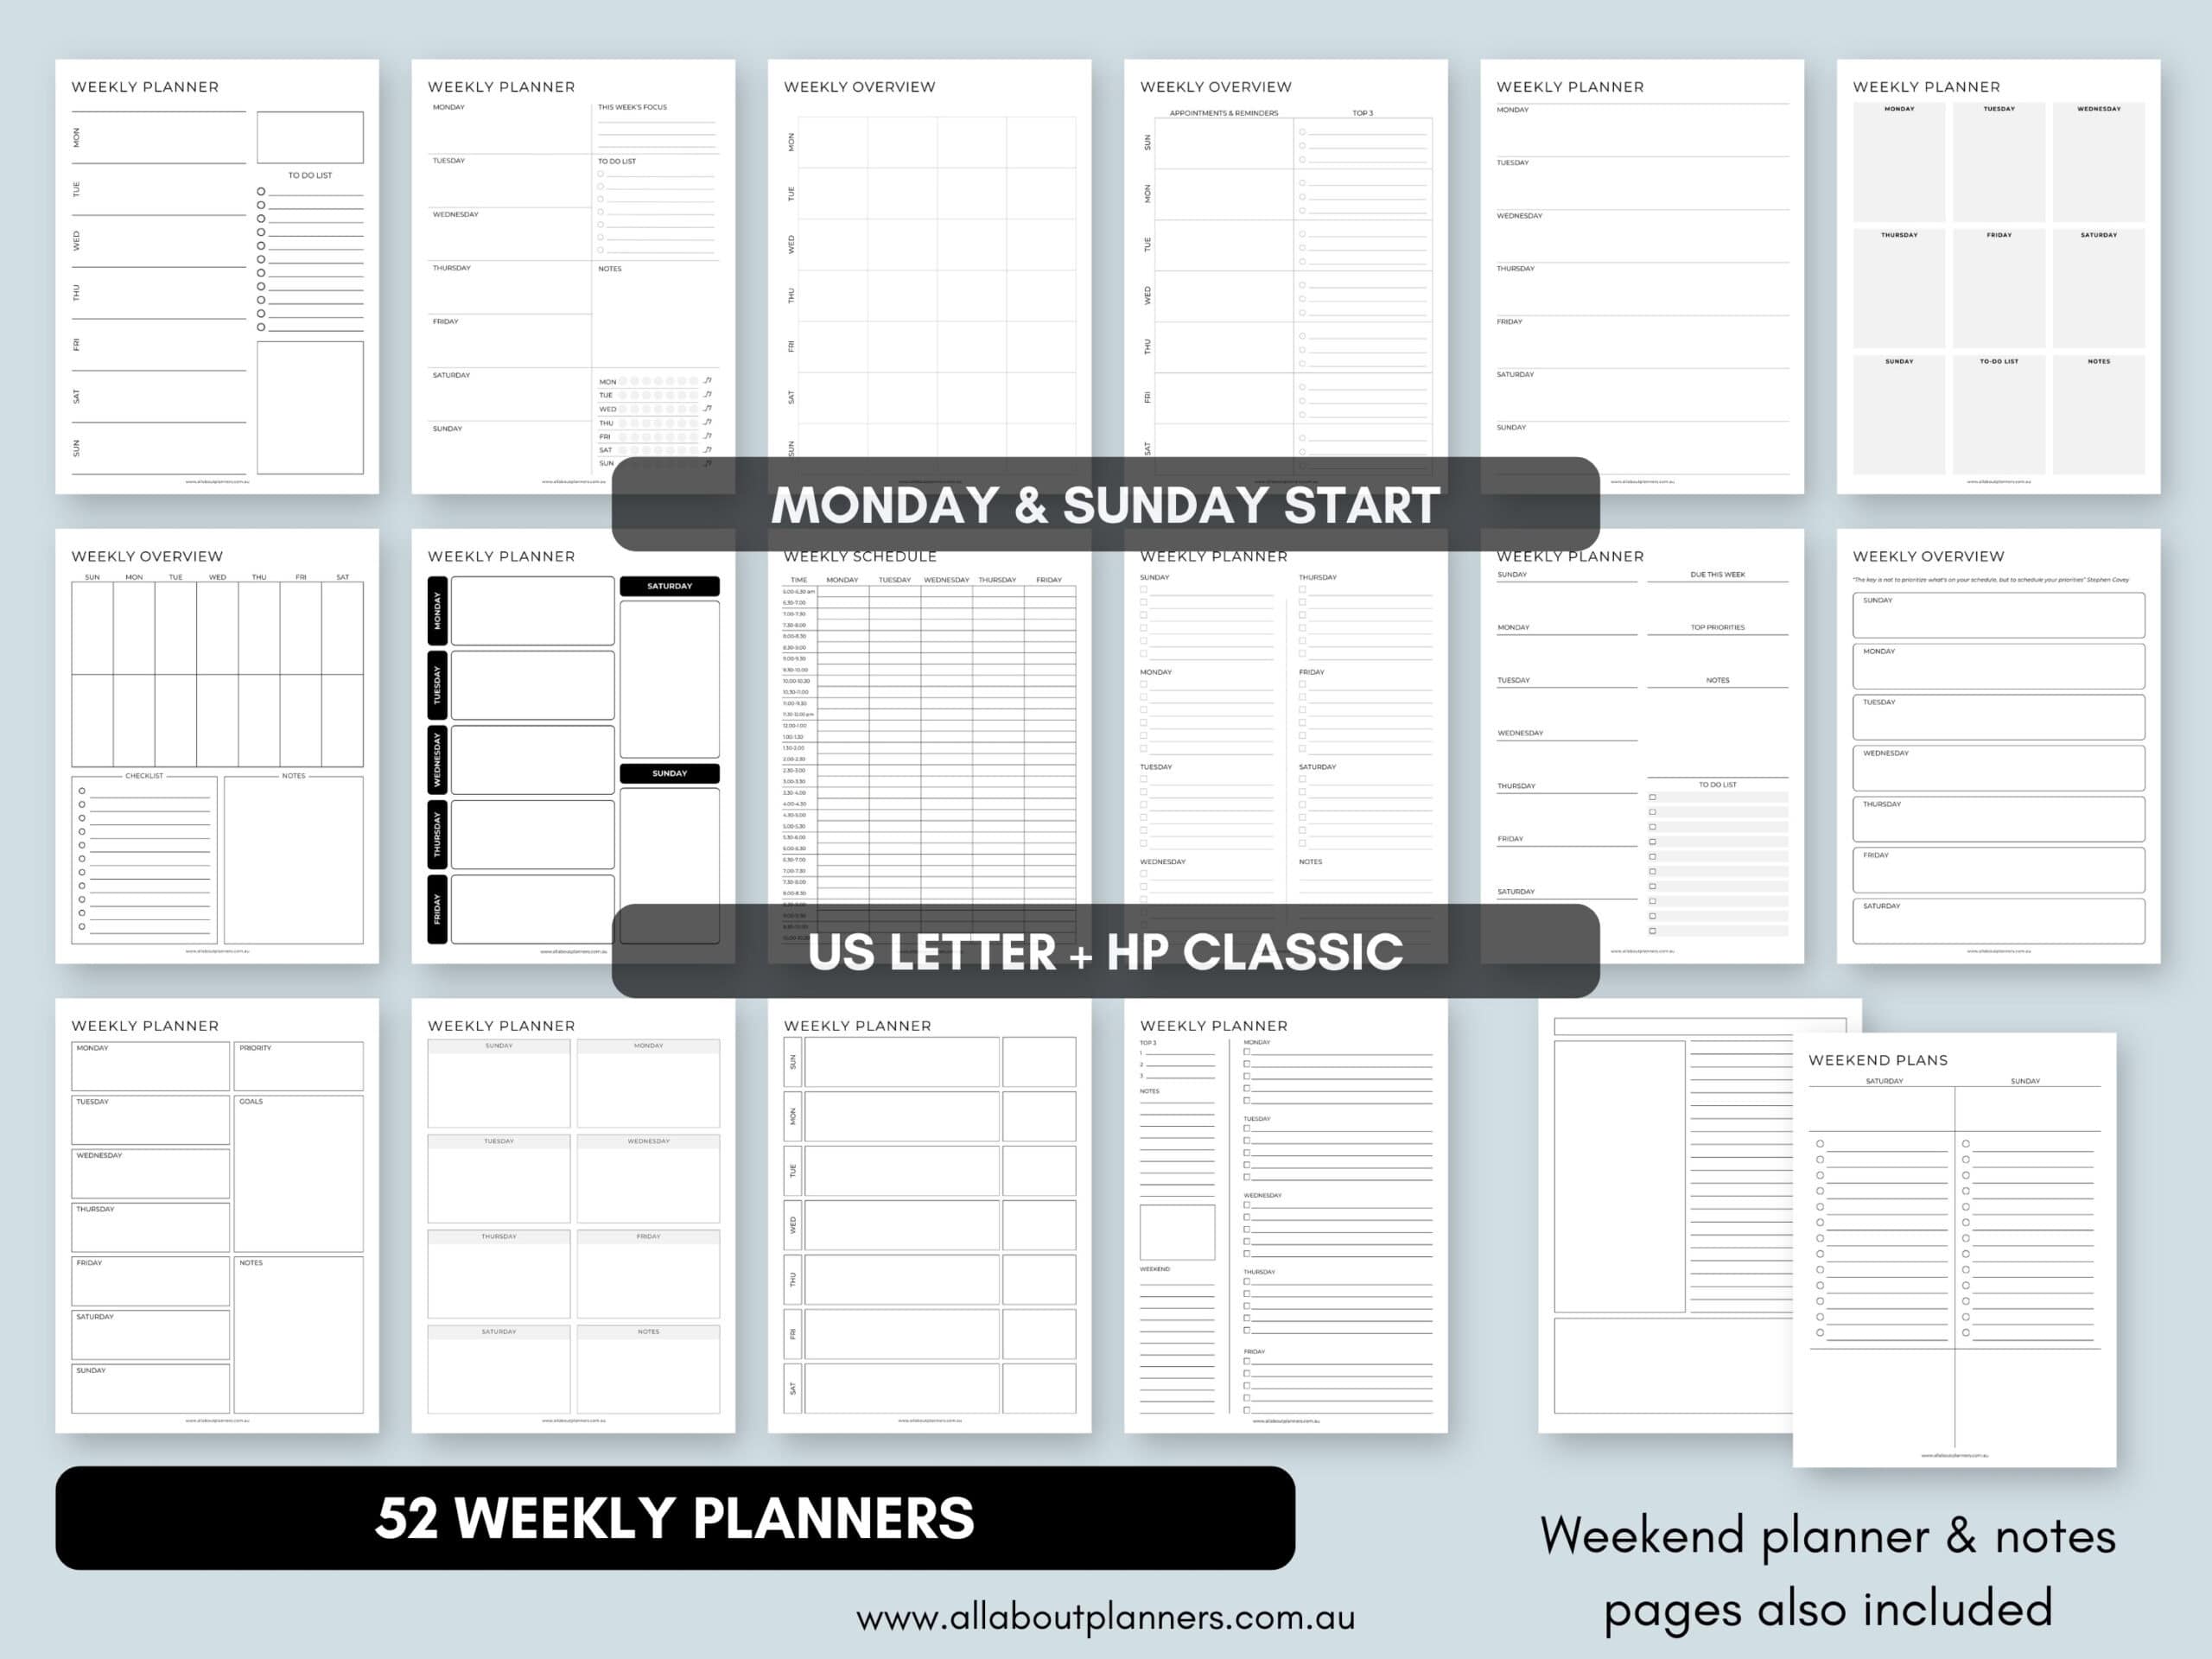
I just released a new collection of 52 different one page weekly planners you can mix and match. I’ve shared snippets of how I make printables on the blog over the years, but not the entire process from start to finish.

This set is available in my Etsy shop and online store.
Step 1: Decide what to make
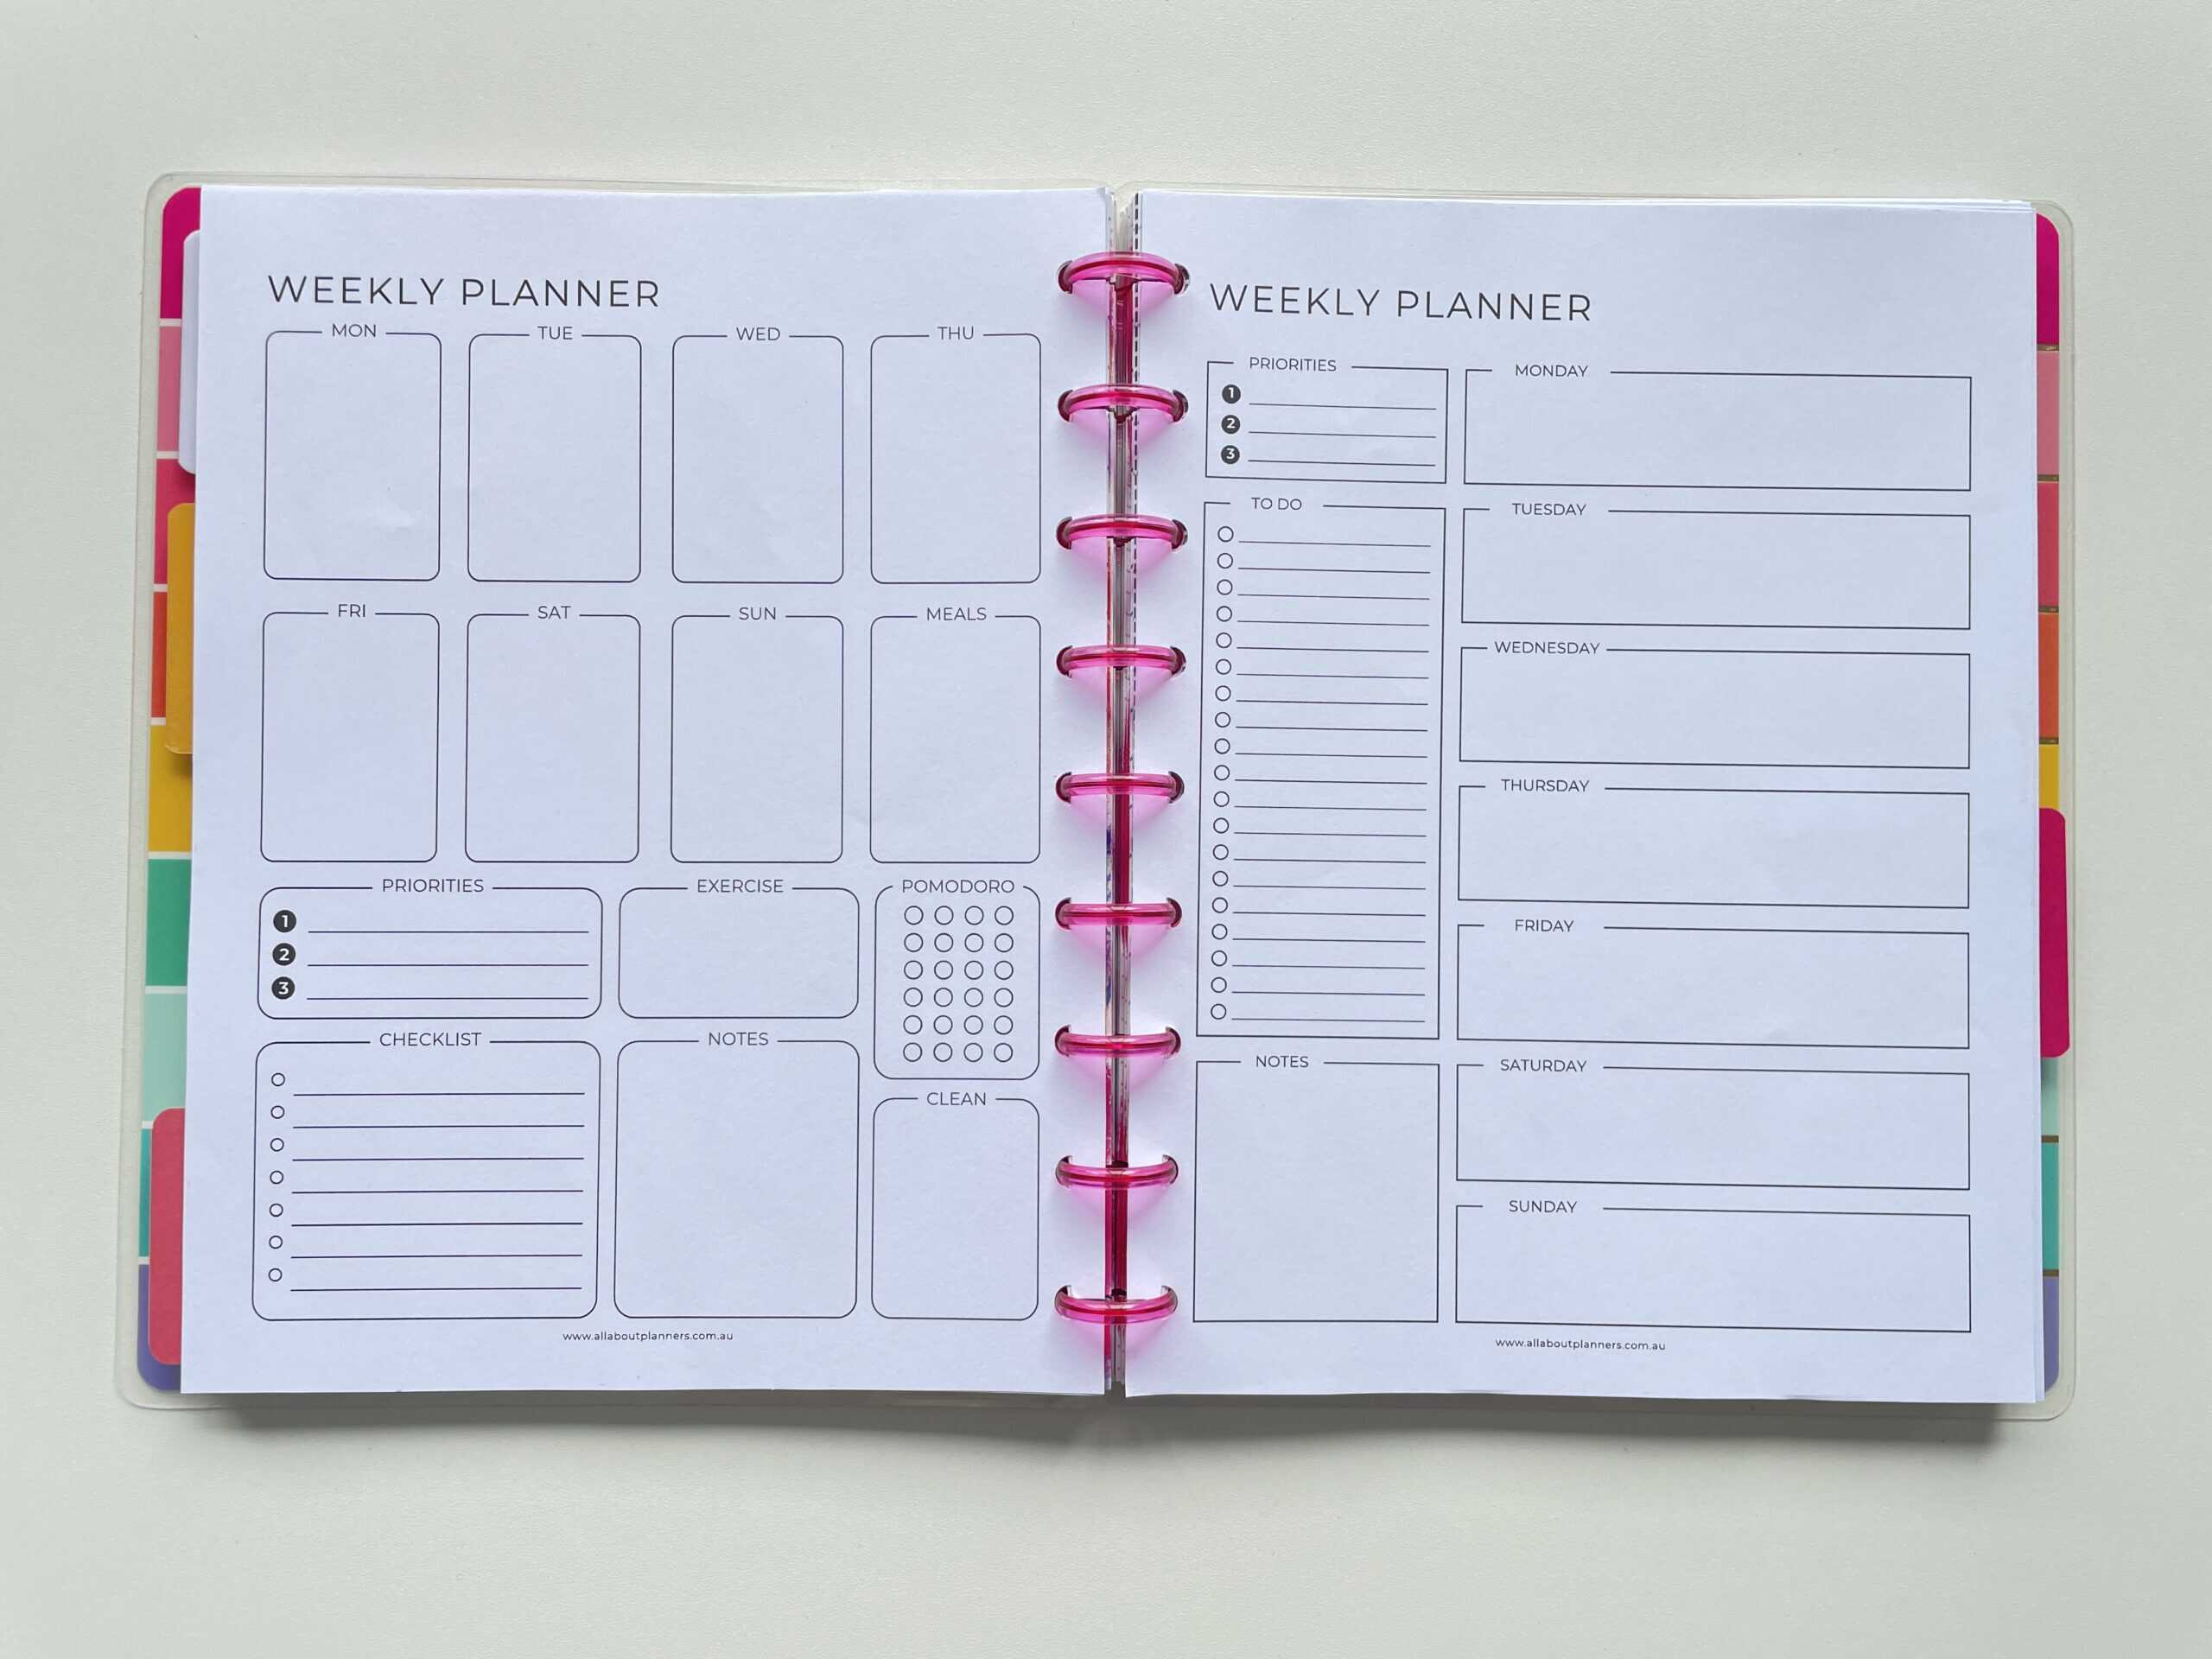
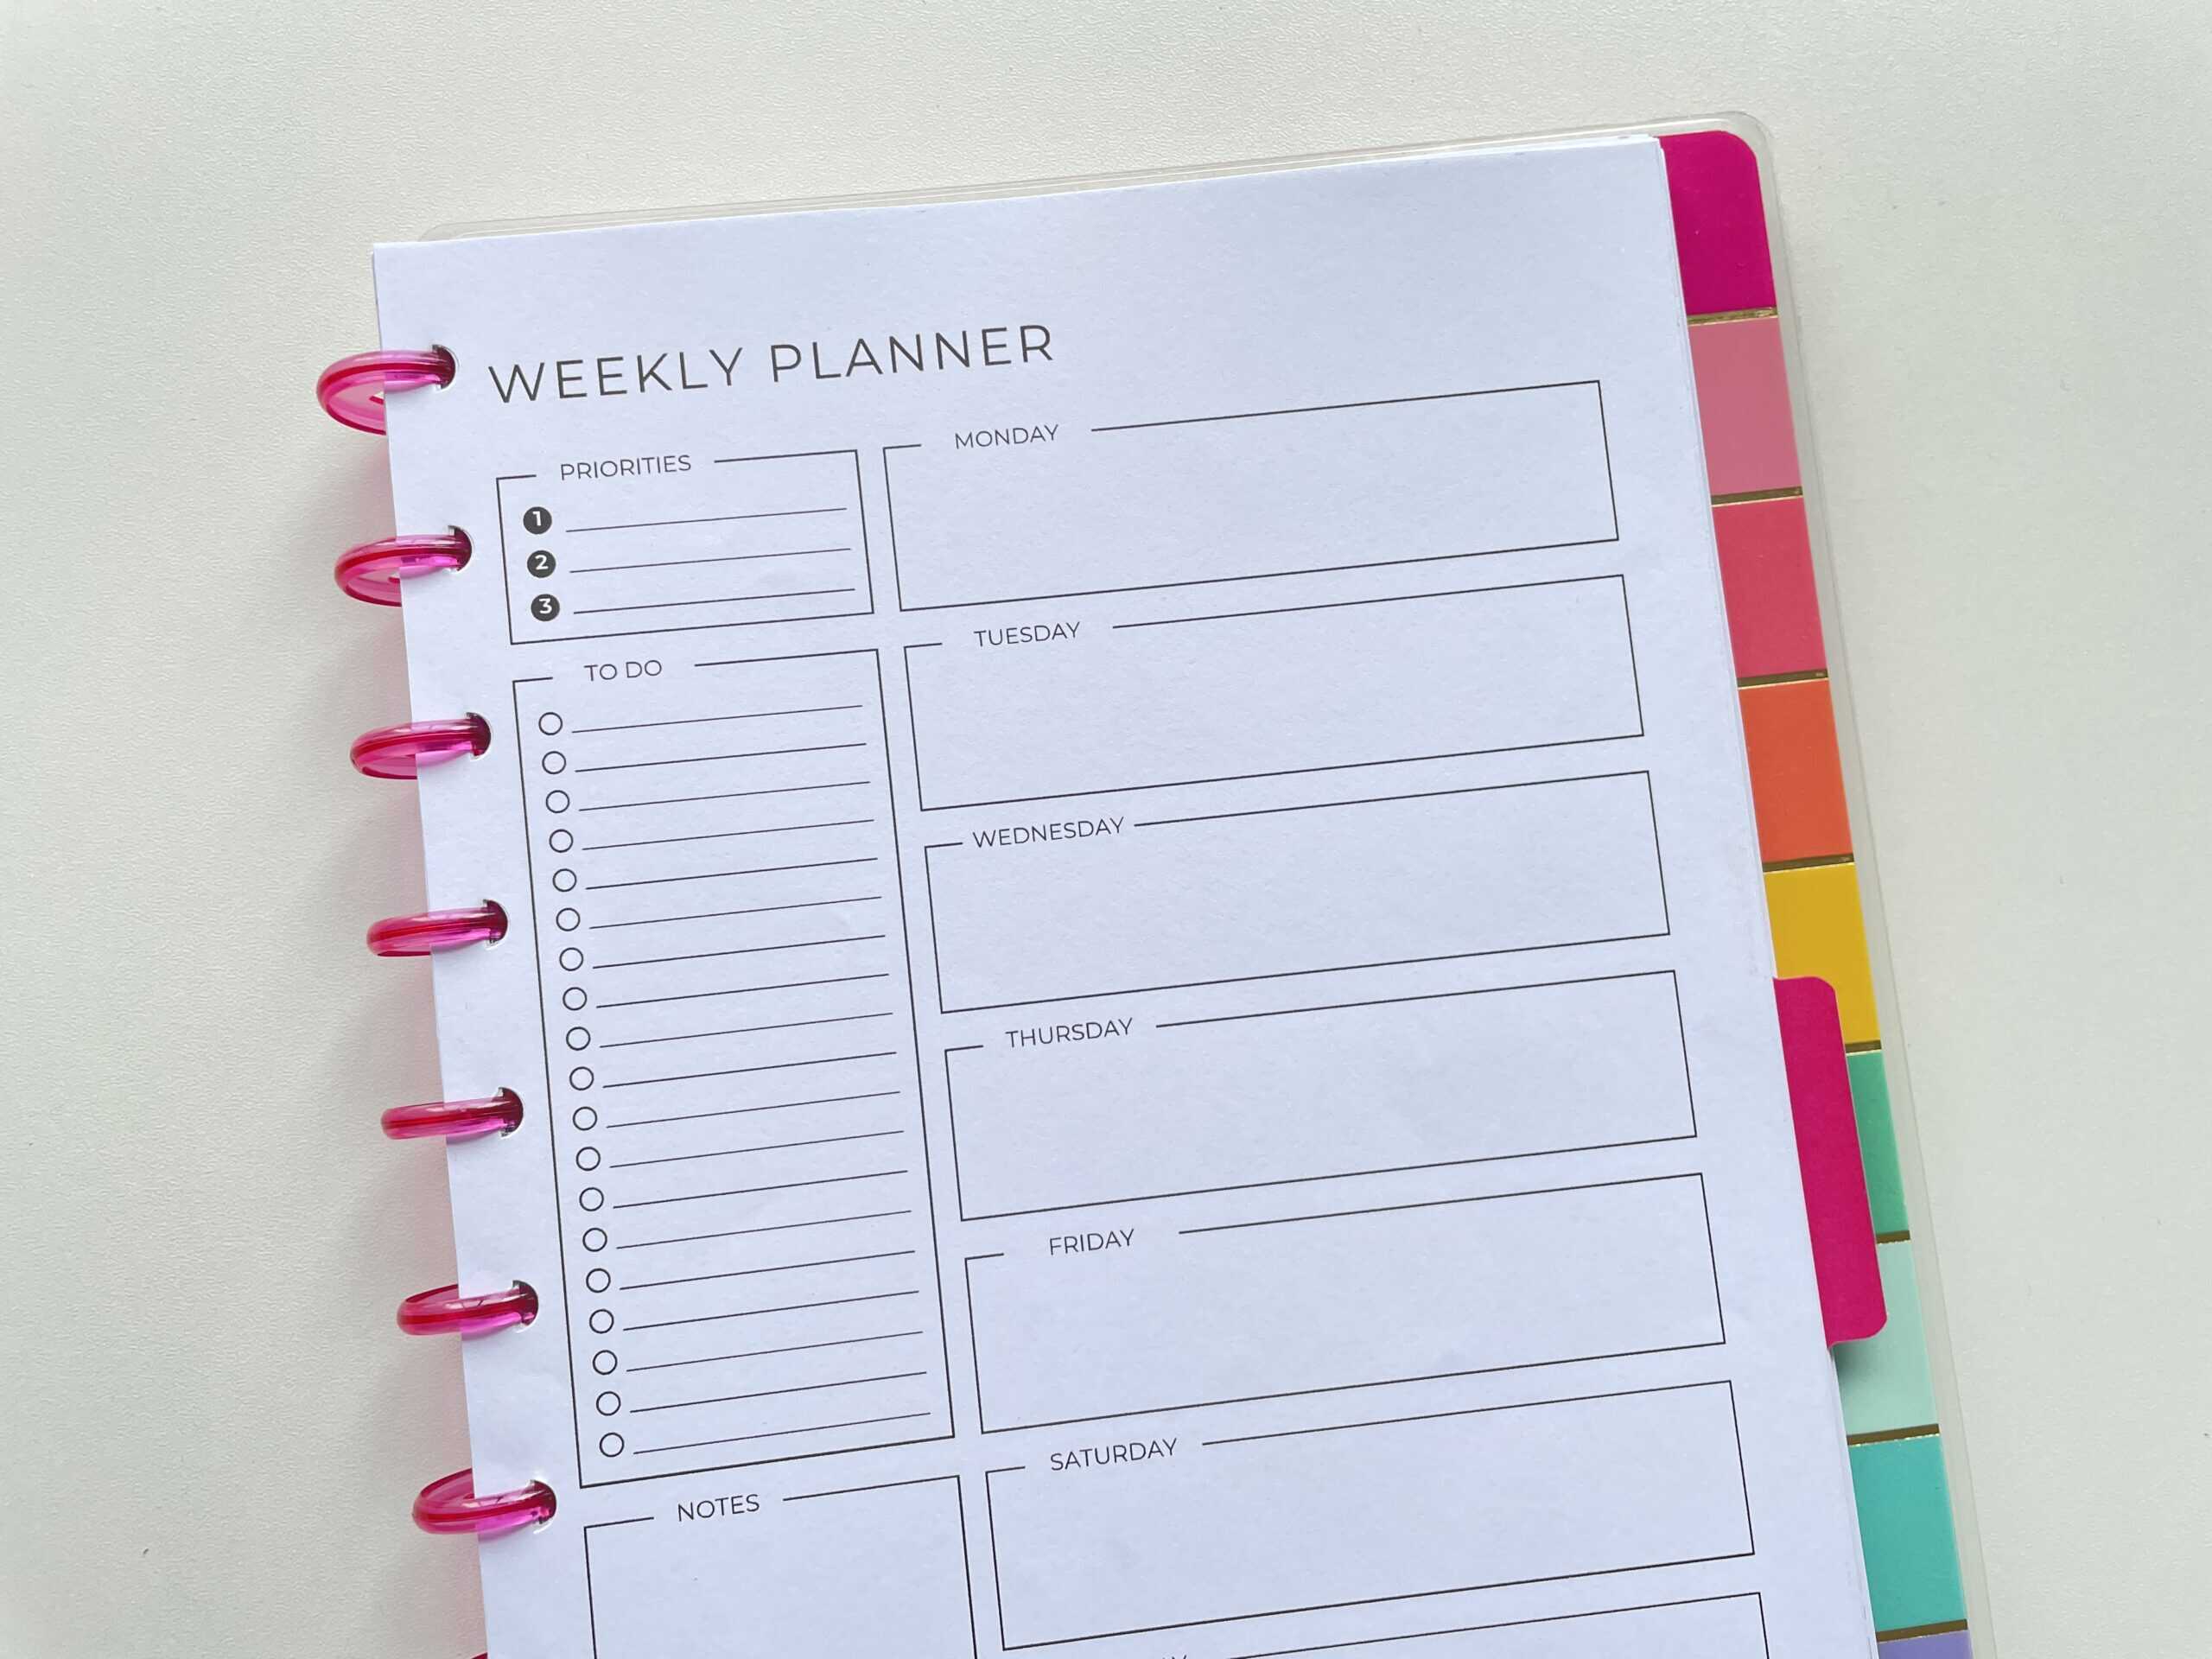
If you’ve been following my blog since the beginning then you may remember the 52 planners in 52 weeks challenge. That experiment helped me realise that using different planners every other week is my version of planner peace, and also that dashboard is my favorite weekly layout.
I prefer less space for the days of the week and more space for notes and checklists. Not many planner brands offer 1 page weekly planners, which means I mostly gravitate towards using a printable to plan my week.
I’d been using the same printable weekly planners for a while and found myself gravitating more towards drawing up bullet journal spreads (which I don’t mind doing but it does get time consuming doing it every week, especially when you just want to use the same layout over and over again). It was time for a refresh!
So I decided to digitise a lot of the layouts I’d been using, as well as refresh some of the classics with a new font and design tweaks.
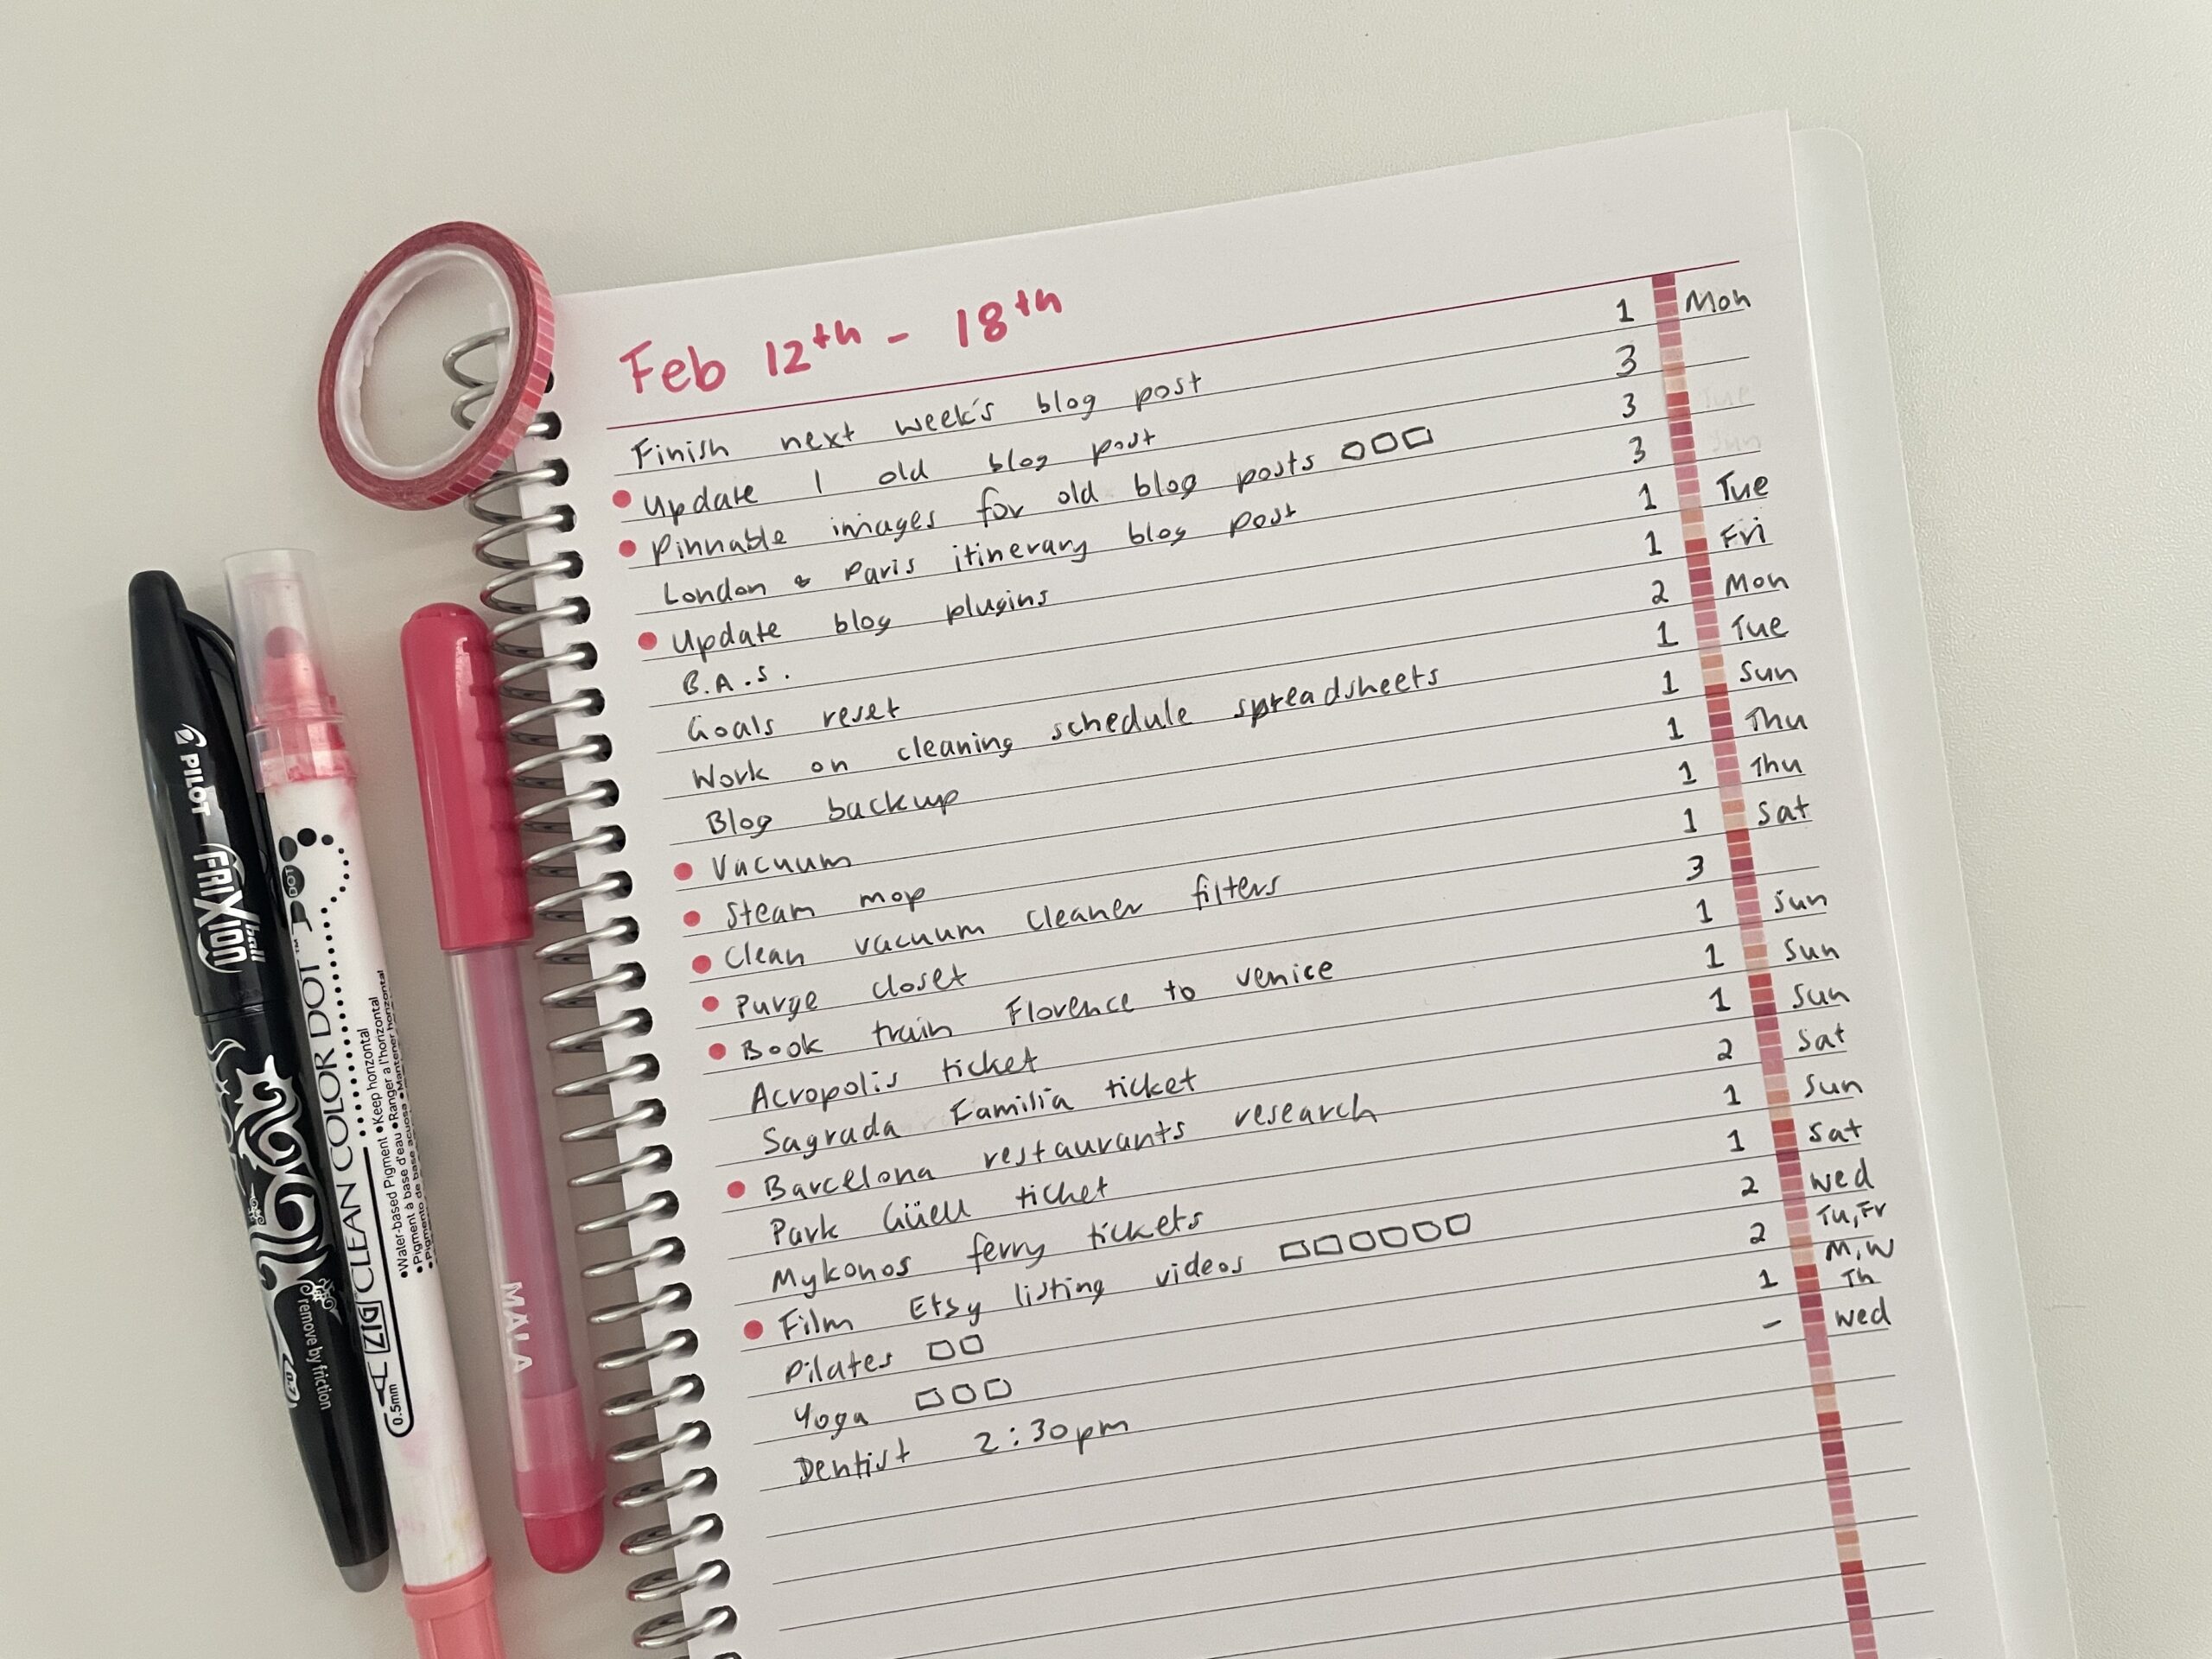
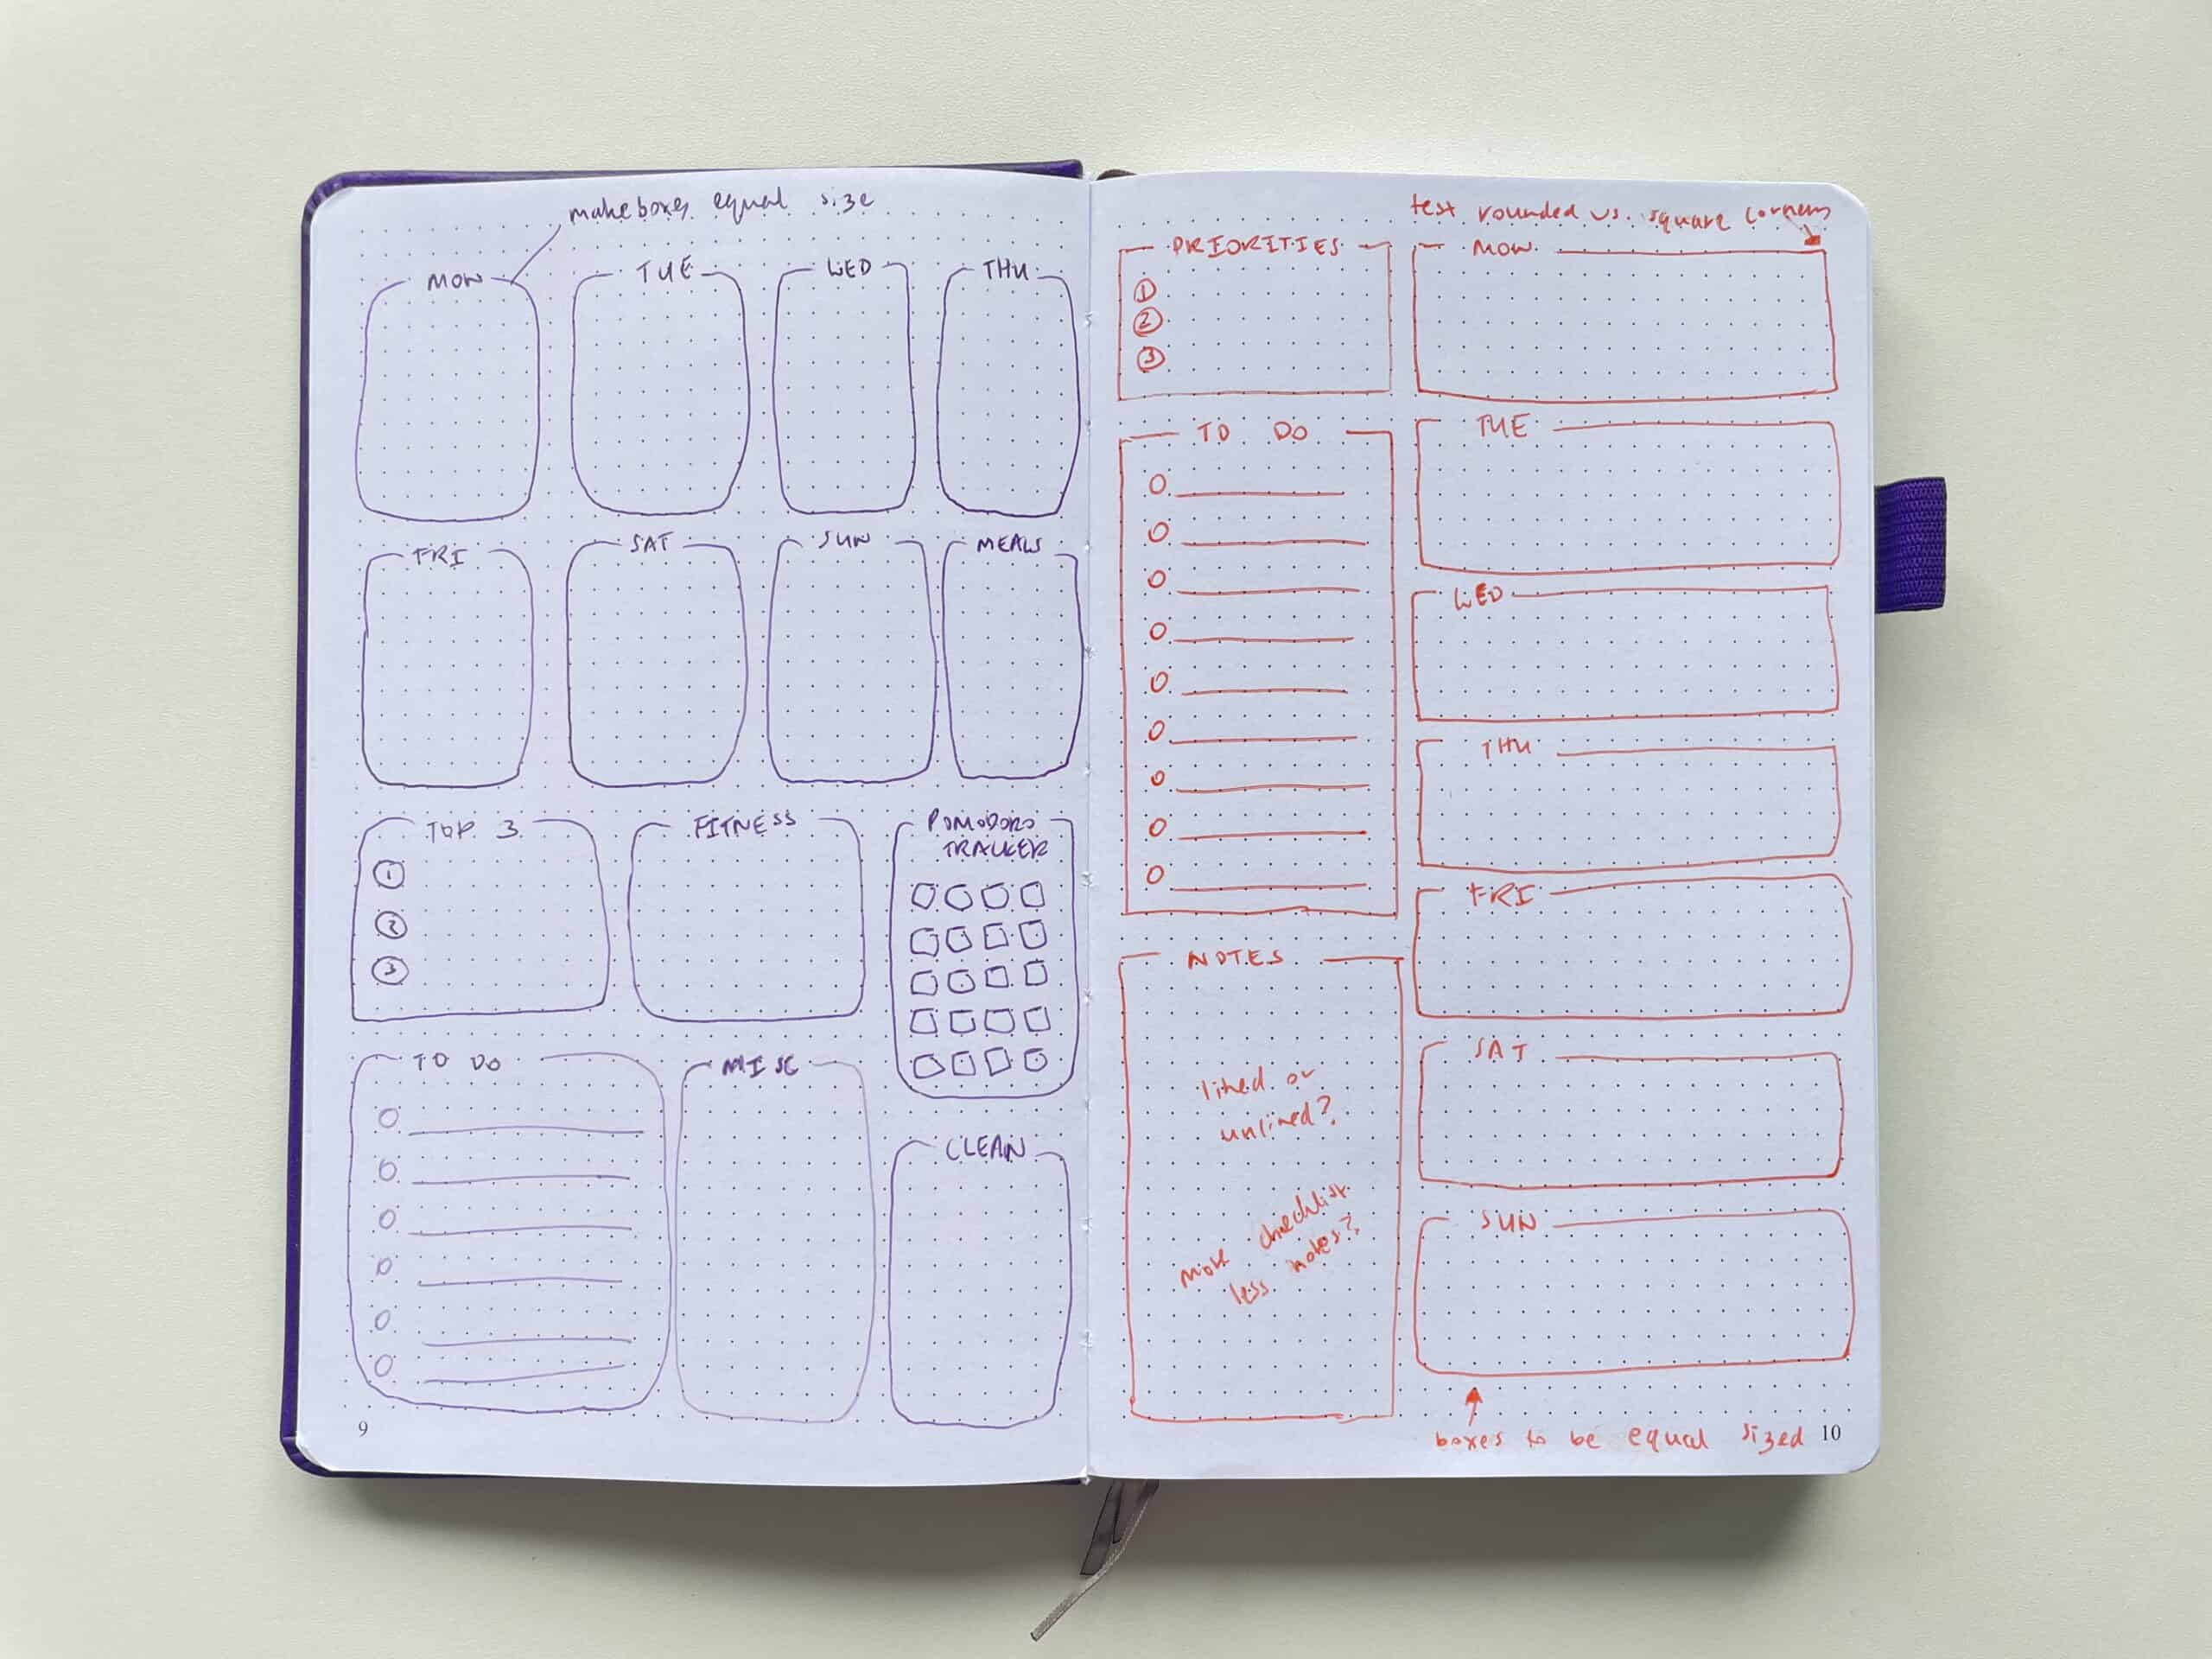
I’ve tried many dot grid notebooks over the years. I use the ones I don’t really like for design ideas. I try and keep one type of design per dot grid notebook so I can easily find designs later on (so one entire notebook dedicated to one page weekly spreads, one entire notebook dedicated to monthly overview designs etc.).
The original Clever Fox dot grid notebook has only 4mm dot grid spacing. I’m used to 5mm since most brands offer that, and the Clever Fox 2.0 has way better paper quality and features, so the original Clever Fox notebook is one of the notebooks where I’ve kept weekly spread ideas such as these:
Step 2: Choose a page size
When I first started making printables way back in 2012, I made them at A4 page size as I live in Australia (A4 is our regular size printer paper). But since the majority of my blog readers and Etsy customers are from the USA where 8.5 x 11″ (US letter size) is more common, I switched to making printables at US letter size a few years back.
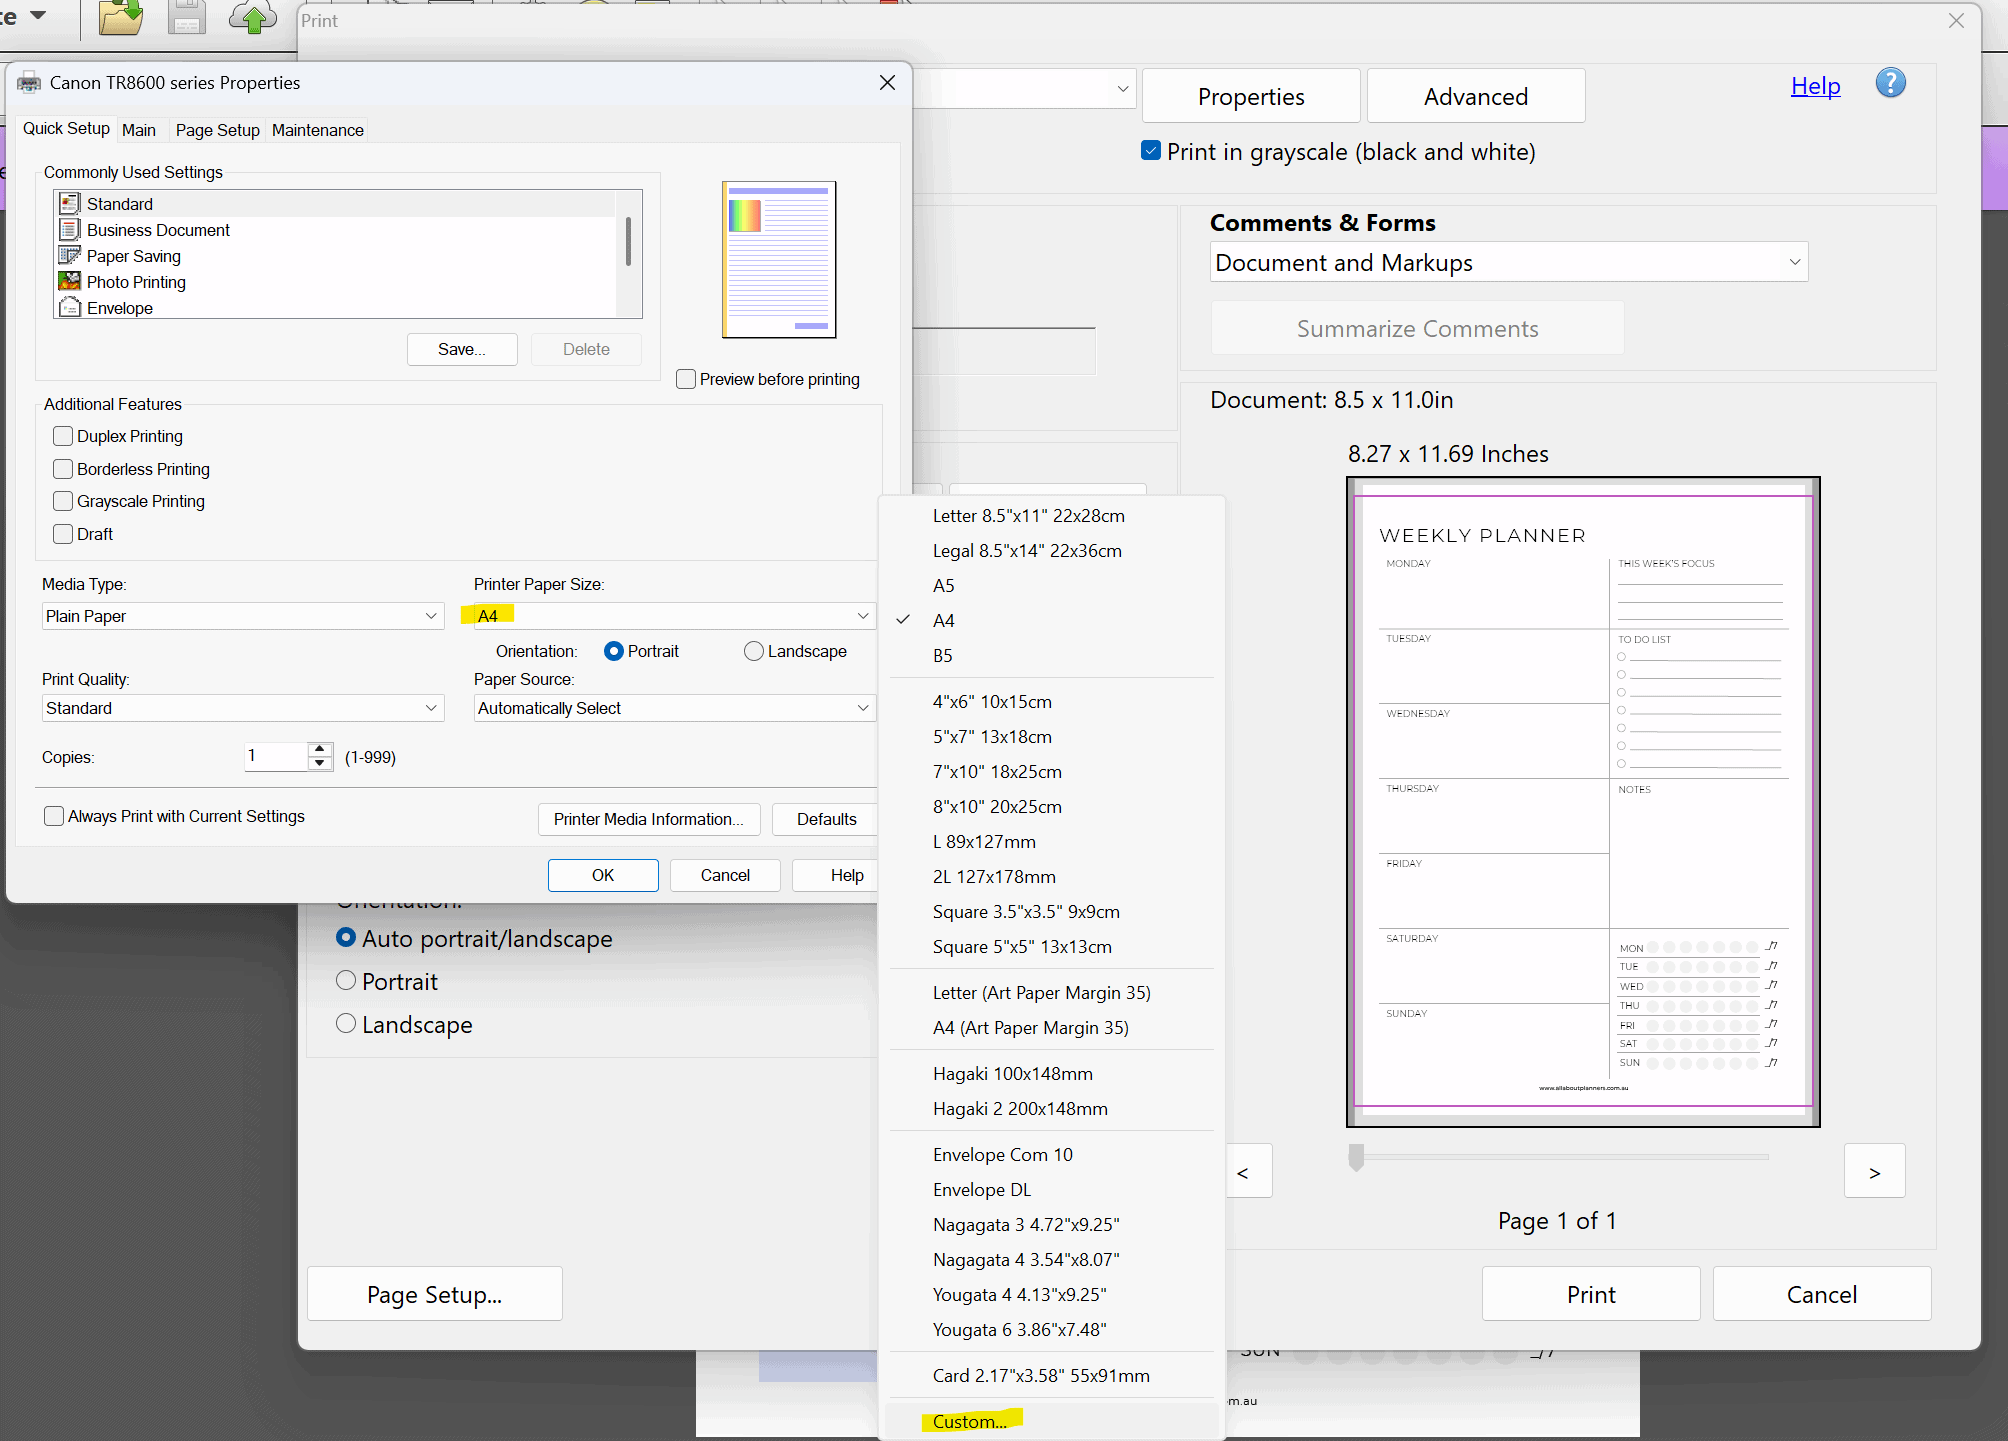
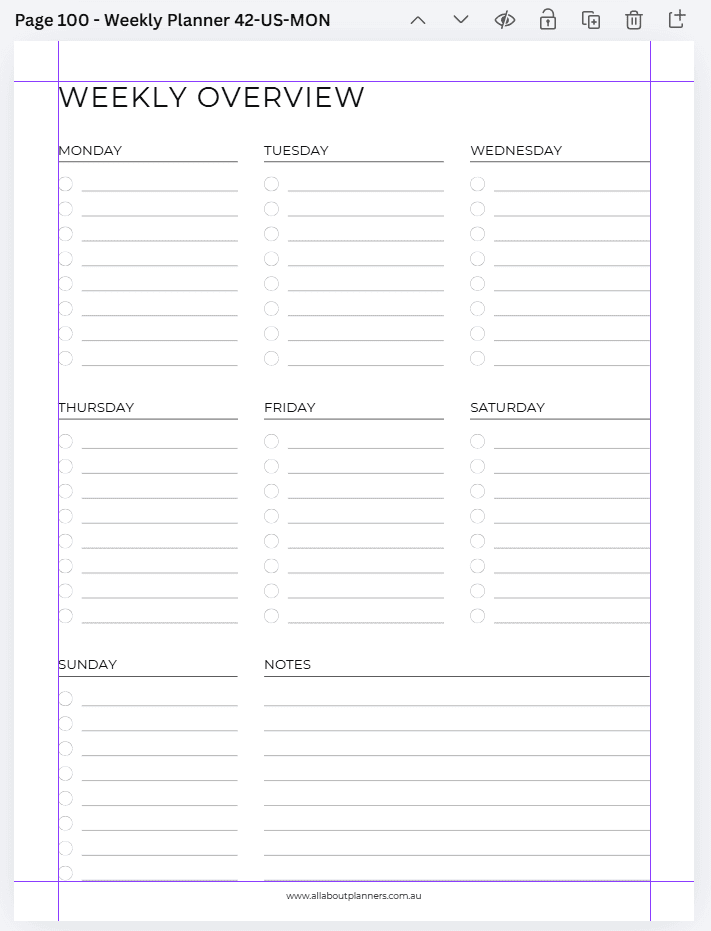
US letter size is ideal as people in the US can print per normal, and I can just select A4 paper size and ‘fit to page’. Doing this adds a little extra white space to the top and bottom of the page (refer preview photo from my printer menu in the image below), nothing gets cut off the page and there’s still room to punch holes.
With the rise of Happy Planner, personal size planners, traveller’s notebooks and various other sizes, I’ve had many requests for different size printables over the past few years.
I never really understood why people were so fussy about having inserts at a particular size. I just get my printer to resize the page and off I go. It takes 2 seconds to enter a custom page size in my printer menu, versus spending the time tweaking each design. But I should point out that I don’t use anything smaller than A5 size so that’s probably why I don’t see the point of resizing the designs.
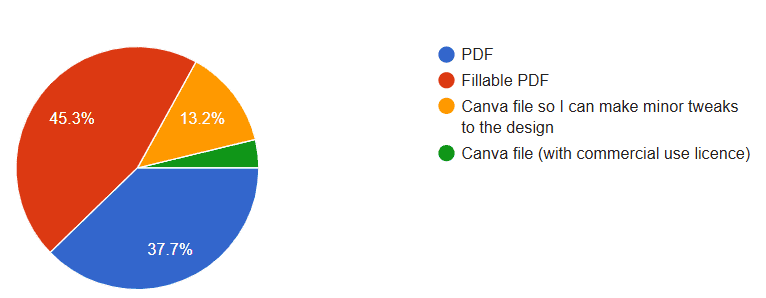
I sent out a survey asking you all what page size you preferred. The results were.. somewhat helpful:
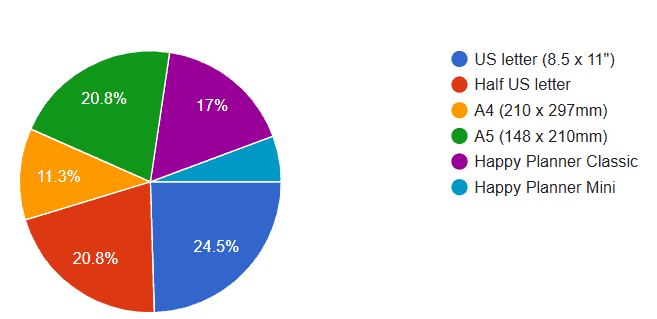
I thought there would be a clear winner… but it was a fairly even spread between US, half US letter, A4 and A5.
I don’t use the mini Happy Planner (the page size is too small), looks like a lot of you don’t use it much either as it was the least popular page size.
Instead of only doing US letter size printables, I decided to challenge myself and see if it really is so time consuming to resize printables to the correct page size before printing using a software that is known for it’s resizing tool: Canva.
I’ve made printables in Microsoft Word, Microsoft Excel, Google Sheets, Adobe Photoshop, Adobe Indesign, Adobe Illustrator (well I tried but I never mastered that software), Affinity Publisher (my favorite) and Canva. I know some people swear by Canva but when I tried it years ago it was extremely clunky and time consuming to use. To achieve the same result as Affinity Publisher, sometimes took 3 times as long in Canva!
Rather ironically, Canva purchased Affinity a while ago. They discontinued Affinity Publisher and merged the Affinity Suite (Affinity Photo, Affinity Publisher and Affinity Designer which were all basically Adobe knock offs at a much cheaper price and far easier to use), into one program that’s now just called Affinity … and (crazy to me), they made it free!
Ever since I tried Affinity Publisher when it was released in 2019, I just purchased that software and used it for making printables, so have avoided making printables in Canva. However, I do like using Canva to create Pinterest pins for the blog and as I’ve been using it for that over the past few years, I’ve gradually seen it’s capability and functionality improve. It does have one crucial tool: the automatic resize function.
So when I set out to design some fresh printables, I decided I’d try making them in Canva this time.
Step 3: Creating printables in Canva
It took about 5 hours to create these 2 printables, in 4 different sizes.
Yes that may seem insane and yes I know I can make them much quicker. I do have a habit of overthinking and I’m a bit of a perfectionist. Keep in mind that I was also setting up a template to use for creating a bunch of other printables, so I wasn’t only thinking about those 2 layouts as I was designing.
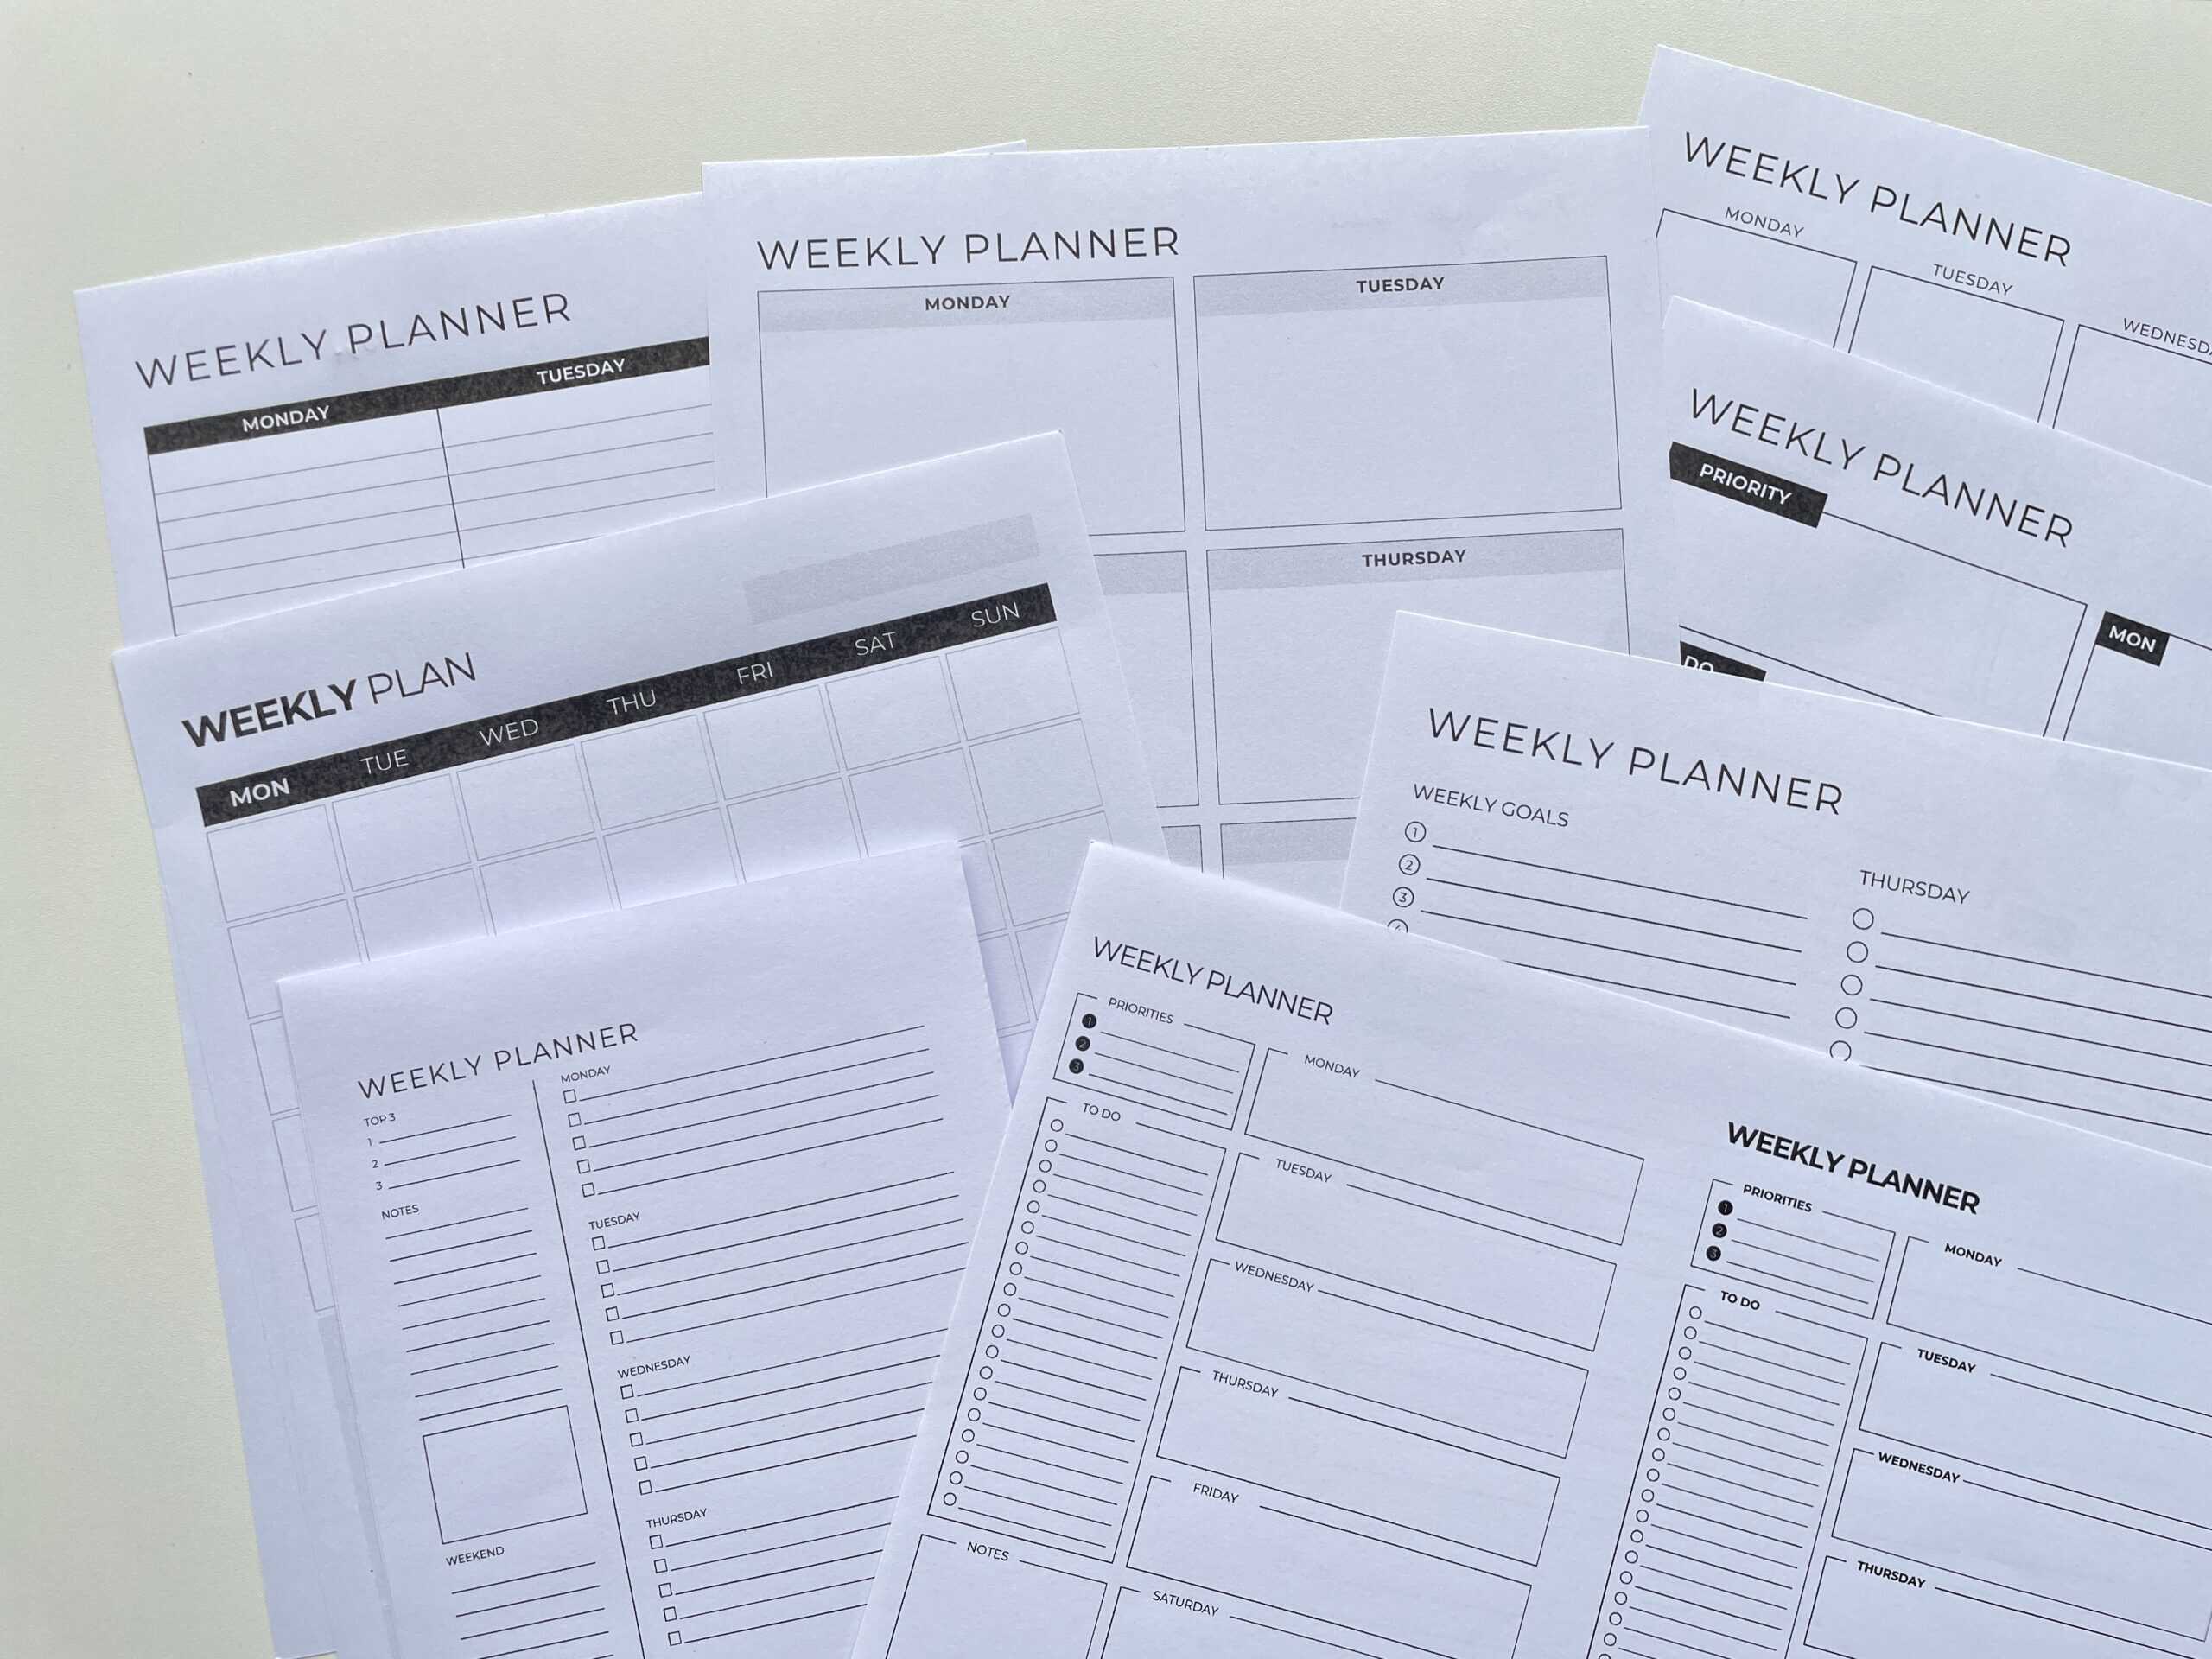
A few of the test prints for this collection
I may film a tutorial in the future where I show the steps in Canva of how I make printables – but for now here is some of the design tweaks and testing I did (and why it took 5 hours):
- Fonts (I easily spent an hour just trying to choose a font)
- Colors
- Margins for hole punching
- Line spacing
- Cut lines versus no cut lines
- Design elements – dot grid, square versus round checkboxes etc.
- Different page sizes
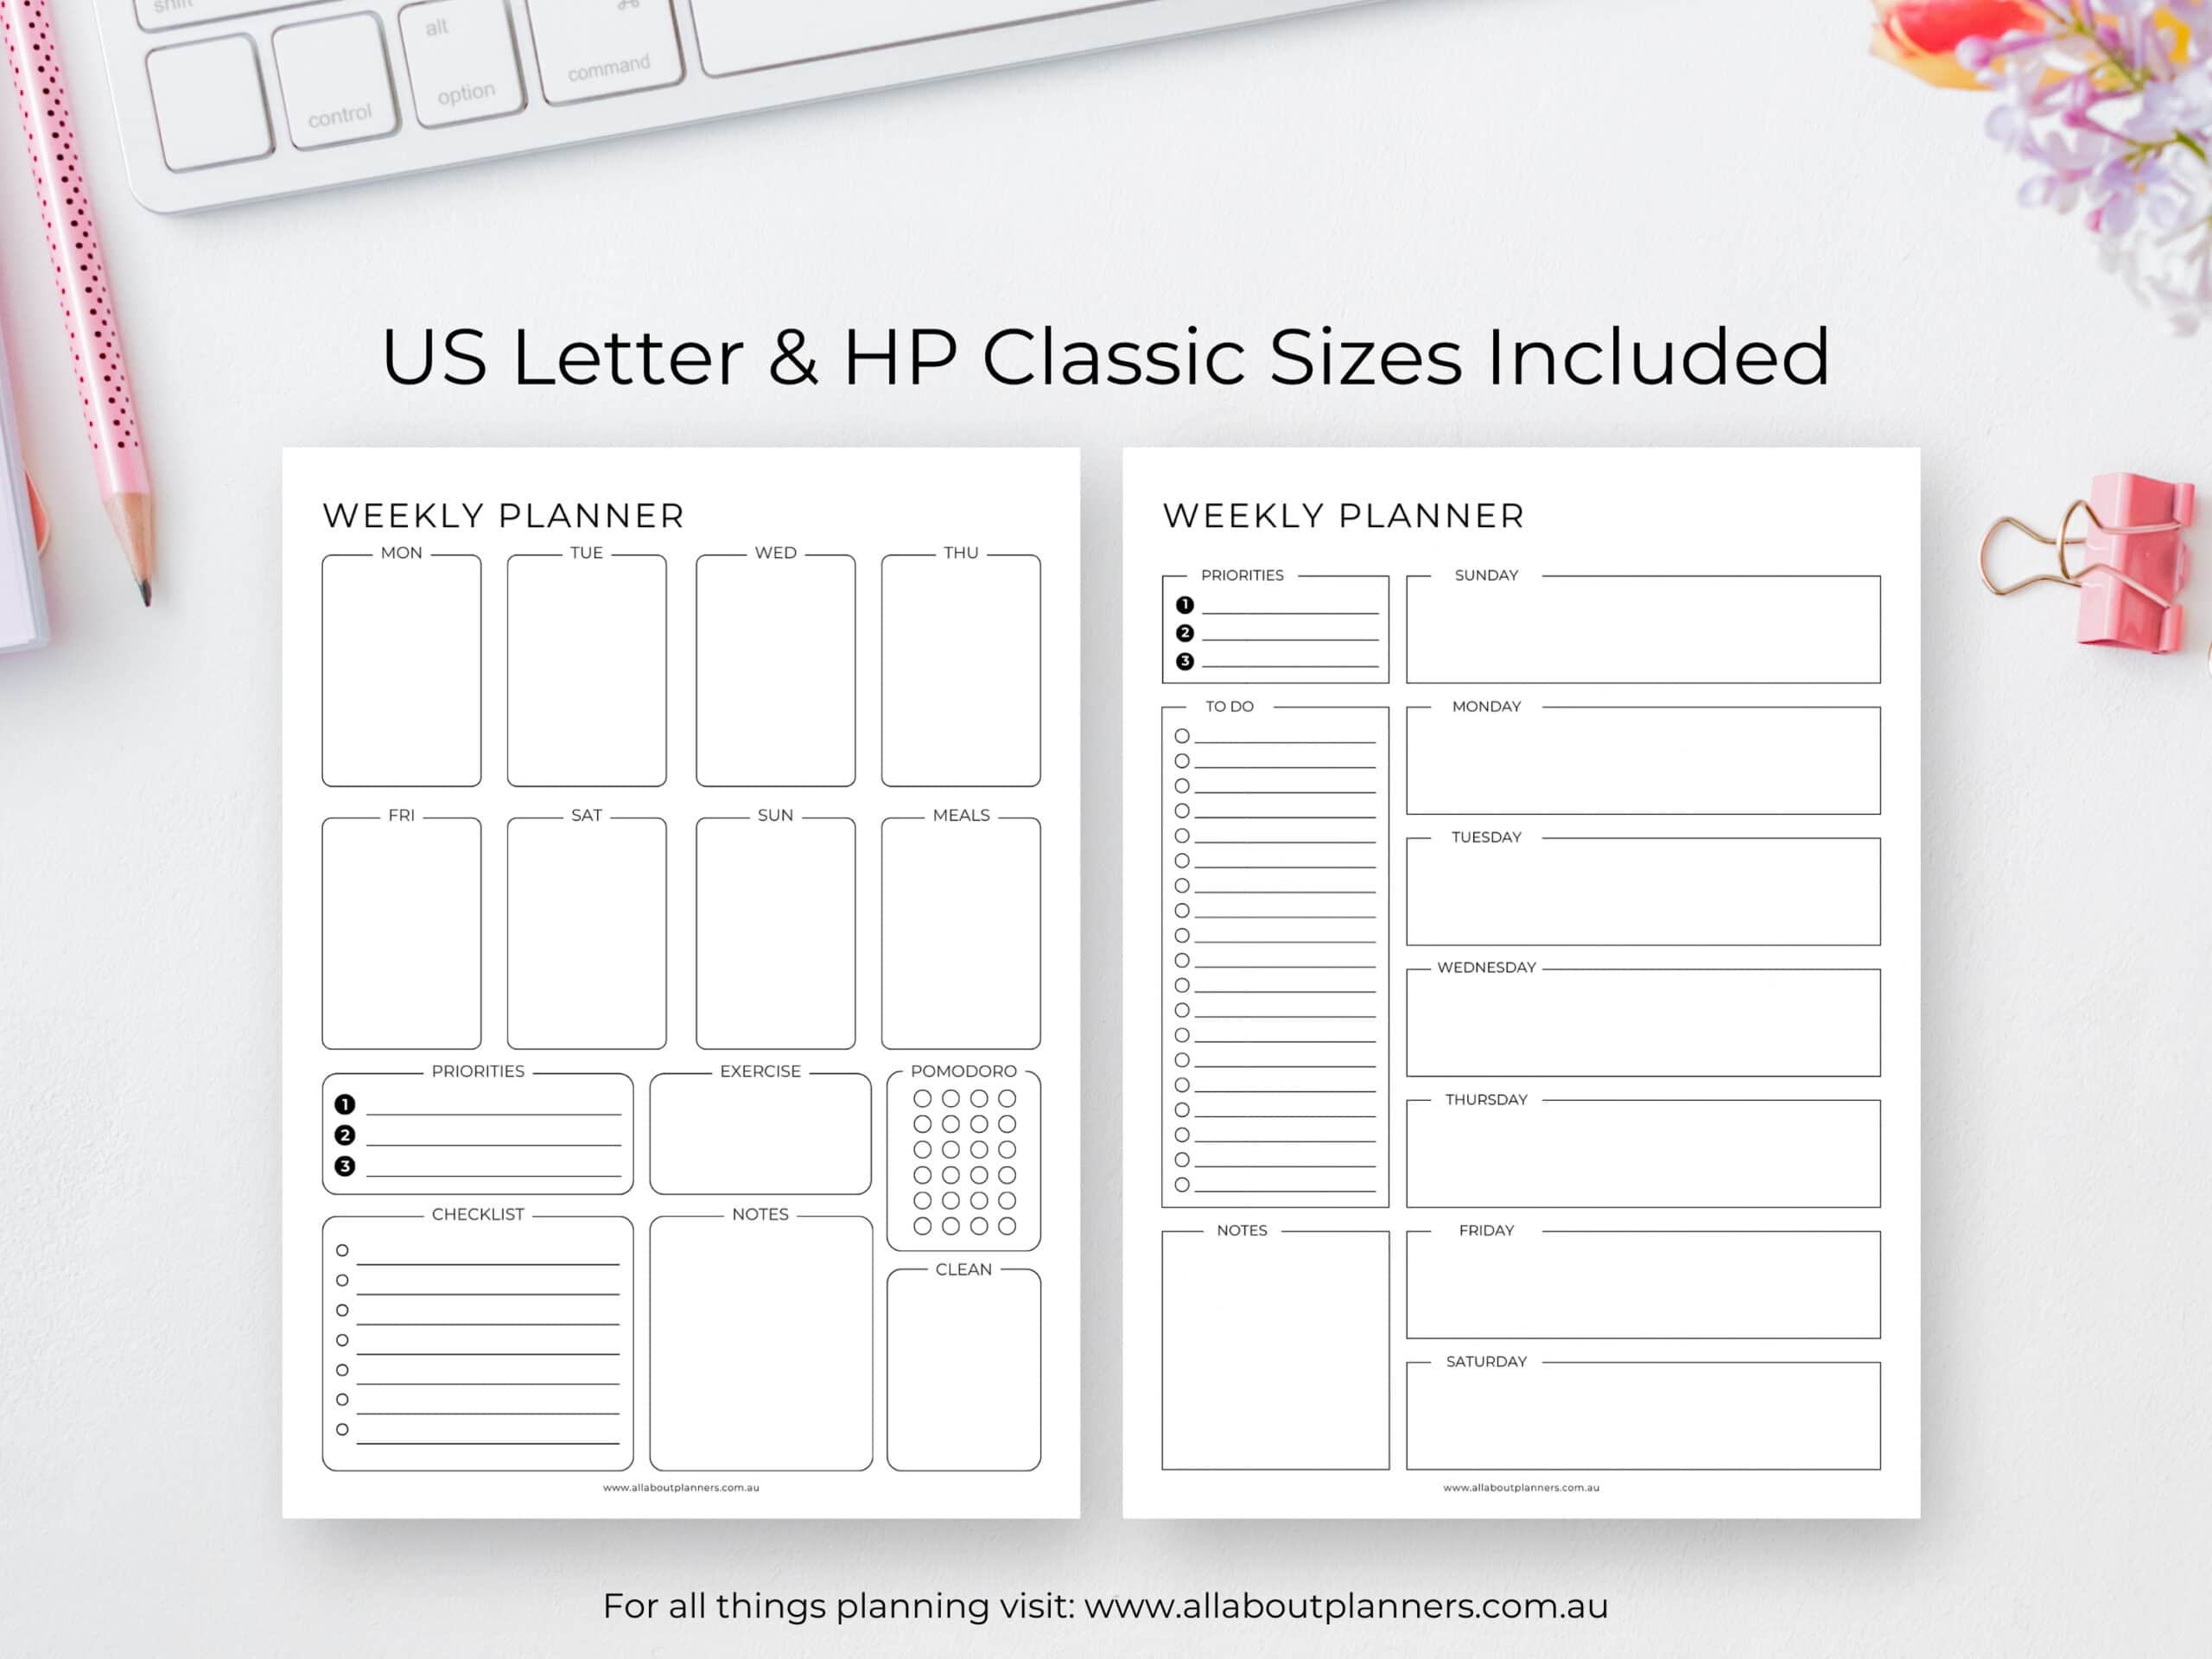
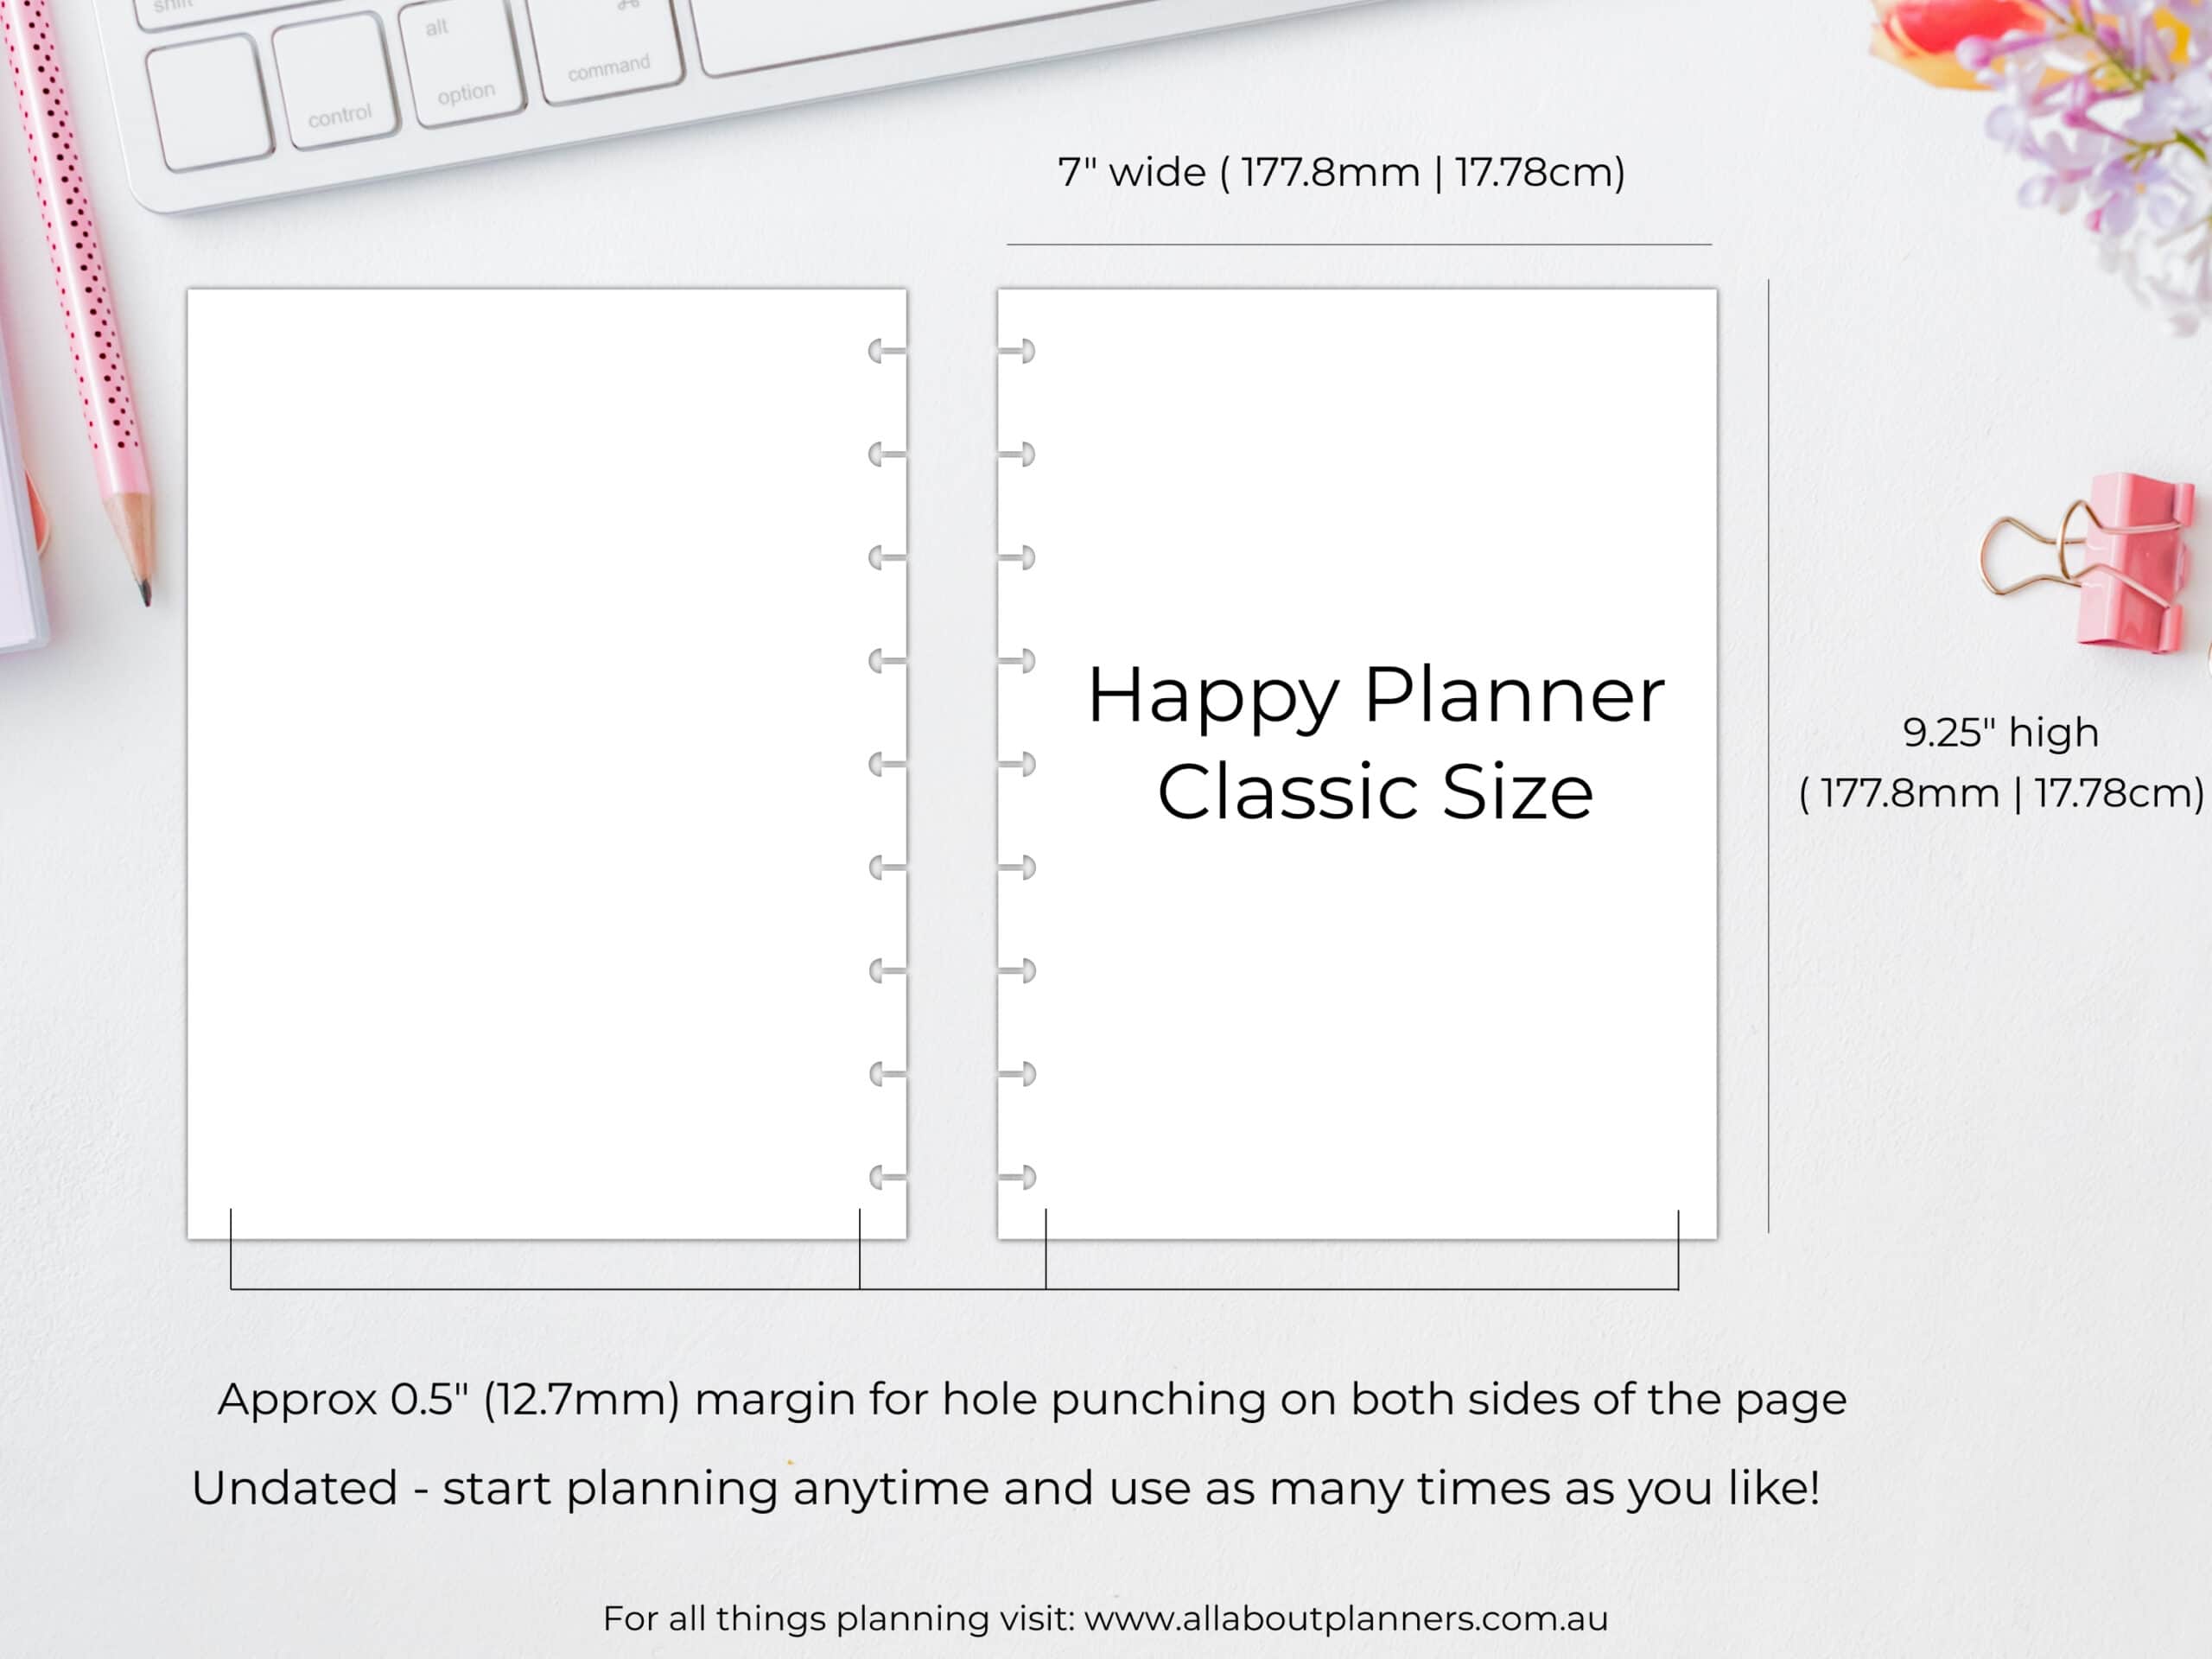
Ultimately I decided it wasn’t worth the time to create each of the designs, in both Monday and Sunday start, in each of the page sizes. I settled on just US letter size as that can easily be resized to A4, half US letter and A5. As well as the Happy Planner classic size since Happy Planner is a discbound system so people who use that are most likely to be looking for different layouts they can interchange (it’s the main reason why I use the classic Happy Planner).
I’ll go into more detail for each on how I went from sketch to finished design:
Making printables: Choosing Fonts
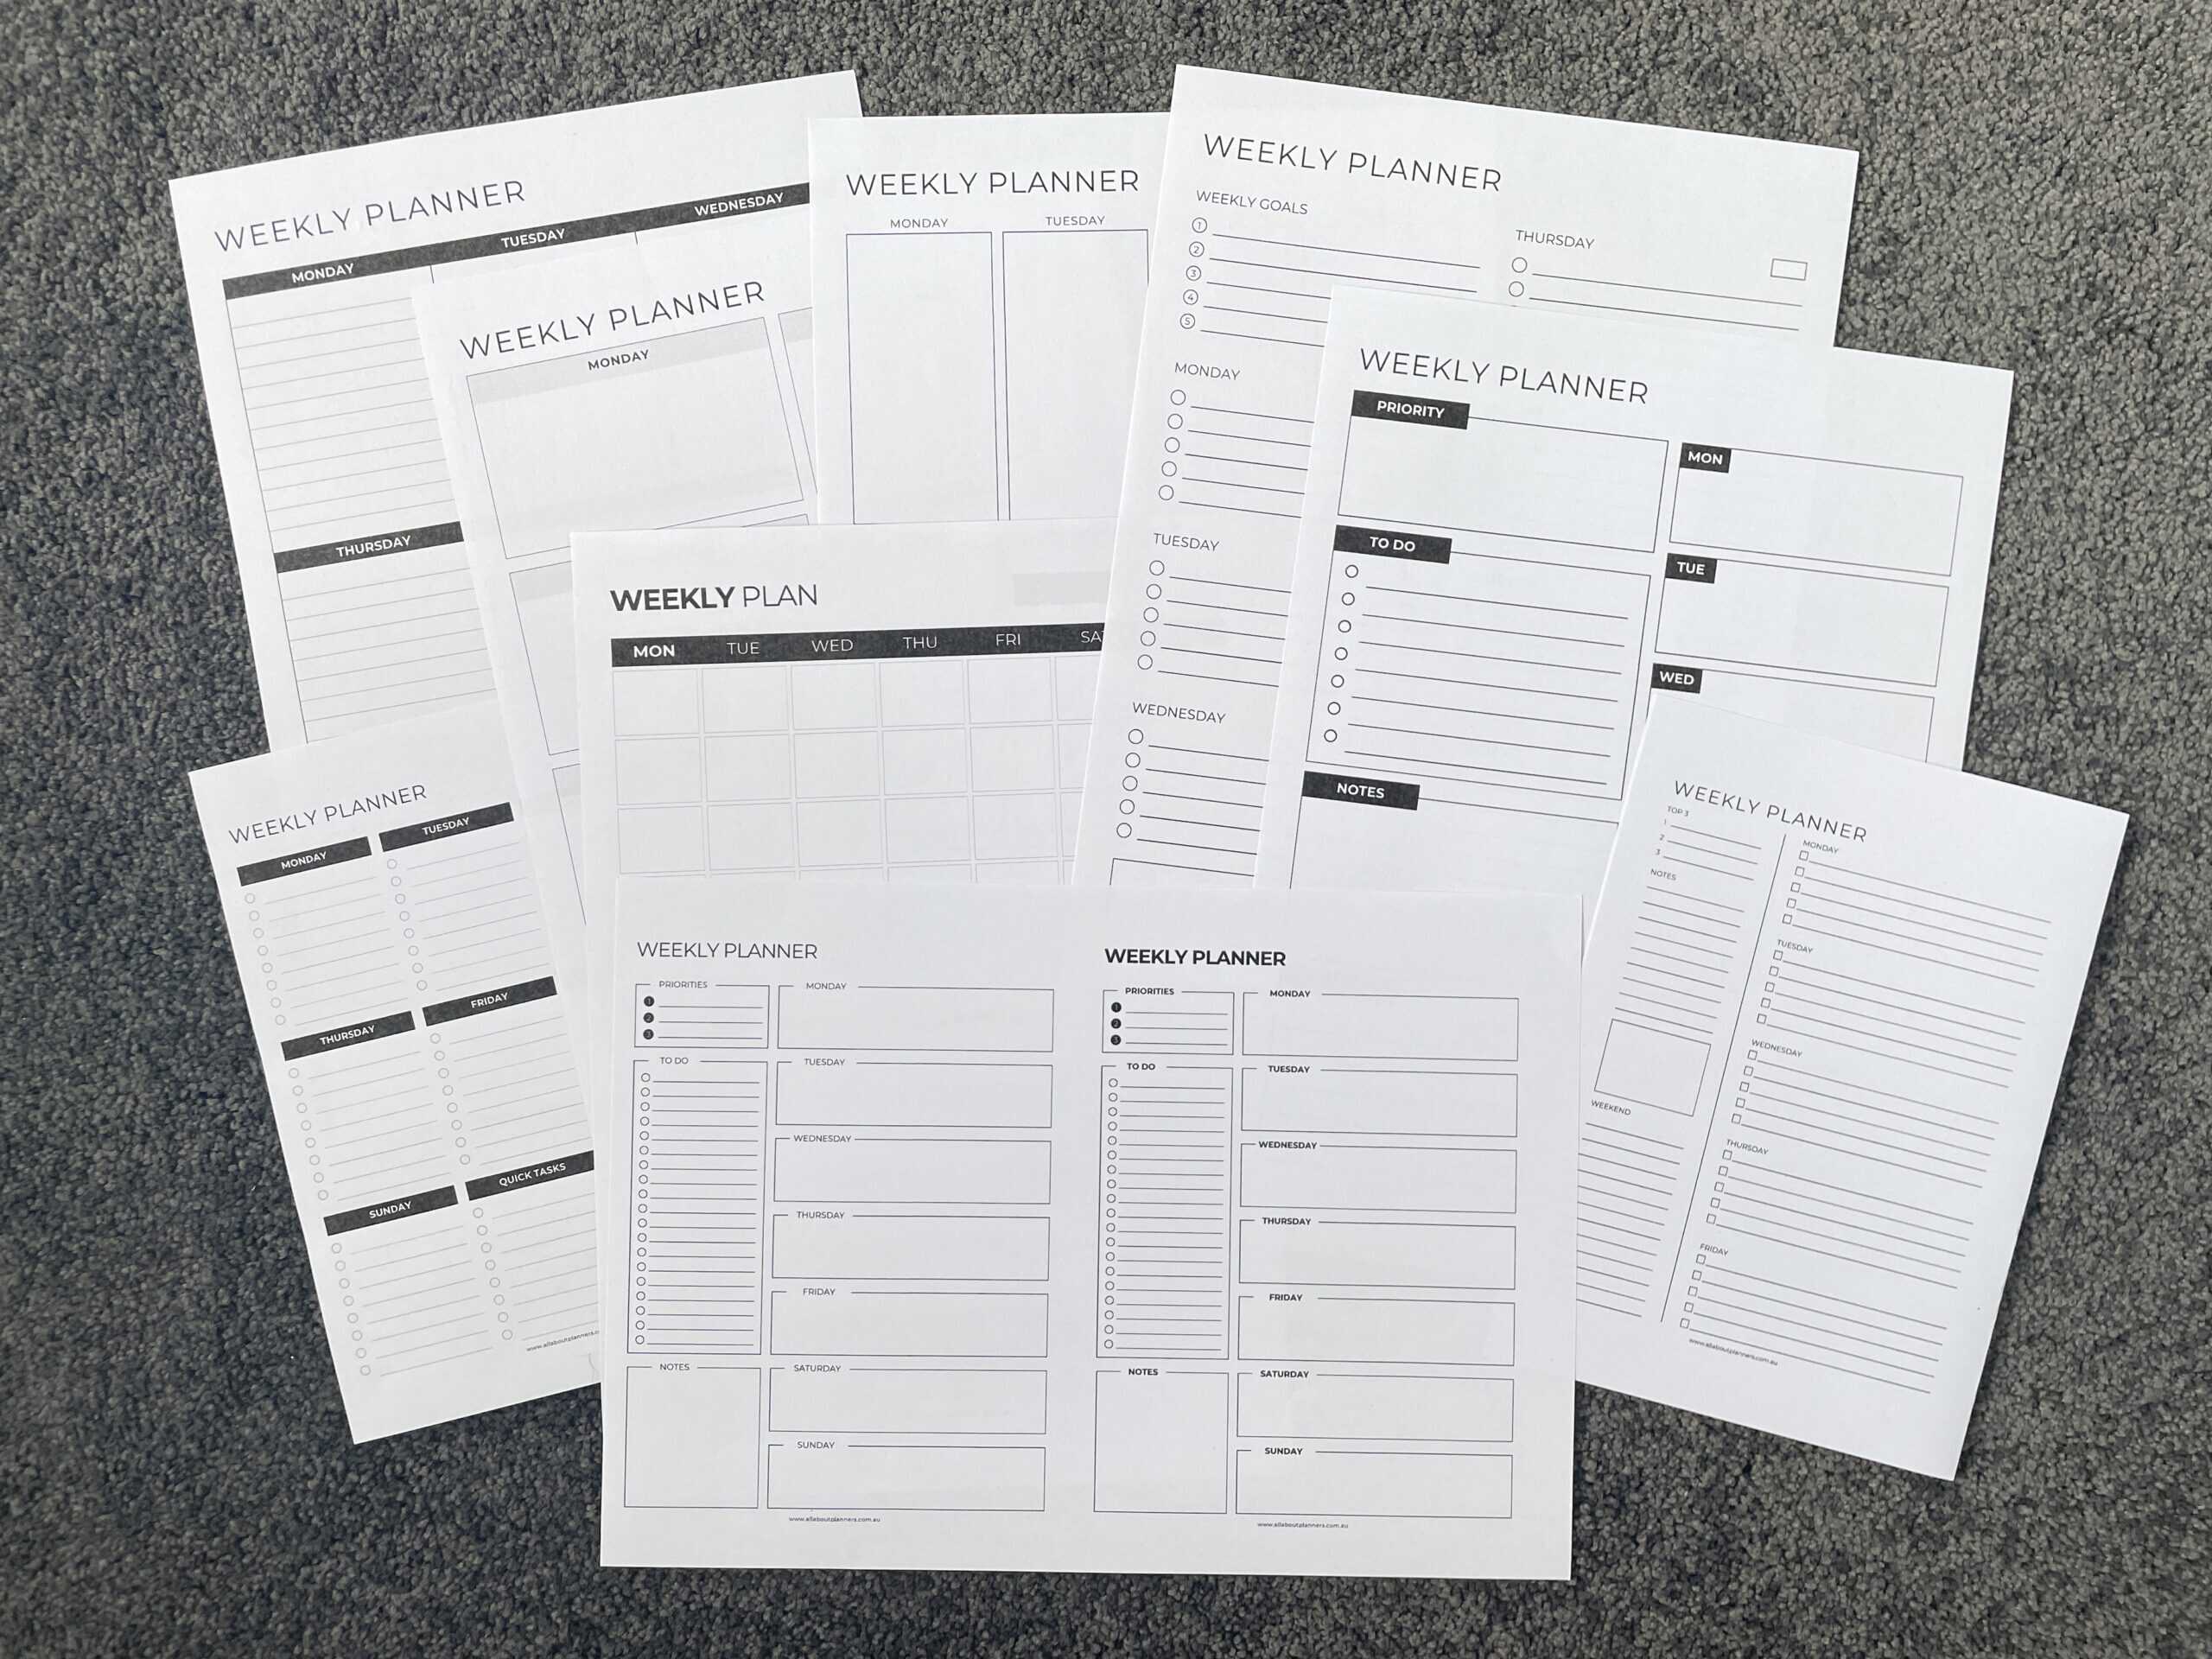
I found about 20 different fonts I liked, then narrowed it down to the top 5 minimalist style fonts.
To test them out I typed out the days of the week, to do, meals, weekly planner, the months of the year and any other text that would likely end up on a planner so I could see how they looked.
Some of them had subtle differences liked more rounded edges of the letters, some required wider letter spacing as the P and L in ‘Planner’ were too close together / joined if the letter spacing was set to zero. Some of them were too bold and didn’t look good on smaller page sizes, and others were too thin and didn’t have an option to add a bold style to the font.
Having so many fonts to choose from is a good problem to have, but picking one is more time consuming than you think!
Making printables: Choosing Colors
Some of the testing I did:
- Different color variations – black, grey, multi-colored, one color page page, pastel, bright
- Brighter colors for the divider lines, with lighters shades of the same color for the writing lines
- Black lines and grey lines
- Testing different shades of grey for the lines and checkboxes – some were too feint, some were too dark, I wanted to get one that was just right – a shade of grey that you see but isn’t super prominent after you’ve written on the page
I tested out my signature rainbow color scheme that I’ve been using for using and I’m still obsessed with, but ultimately decided against it. There are 8 colors in my rainbow color scheme, sometimes some colors have to be repeated and others aren’t. I figured most people prefer simple black and grey these days so they can add their own colors anyway.

I lost track of how many test prints I did for shades of grey
Making printables: choosing margins
Some of the testing I did:
- Margins – tried a 0.75″ margin but it was too big
- So reverted back to a 0.5″ margin (what I typically use)
- I thought that margin might be too big so tested a 0.3″ margin – but that seemed too small
I contemplated using a 0.25″ margin on one side and a 0.5″ inch margin on the other side (where the hole punching would go) as that seems to be a popular style. But there’s a major flaw with that – when you hole punch and turn the page, the mushroom holes will cut into the next week’s planning space which is printed on the backside. So you’d have to print single sided and have a lot of wasted pages if you did this.
I ended up choosing a 0.5″ margin on both sides which is what I typically use for my printables anyway.
Making printables: choosing line spacing
I compared the line spacing of some of my favorite planners I’ve used over the years – Plum Paper, Happy Planner etc. and used that as my base when spacing the lines.
But ultimately that got tweaked because it all depends on the page size. If you push the lines slightly closer together on some page sizes and for particular designs, you can squeeze in an extra line for each day’s planning space. Otherwise there’s wasted space at the top and bottom of the page. To keep that line spacing at a smaller page size wouldn’t provide many lines to write on.
So the line spacing is usually about 7mm for these planners, but sometimes could be slightly more or less.
Making printables: Cut lines versus no cut lines
I also did various tests with different cut lines:
- Using Canva’s cut lines feature
- Creating my own cut lines
- Black versus grey cut lines
- Different shades of grey for the cut lines
- Intersecting cut lines versus spaced out ones (where you have to cut the sides of the pages in a specific order)
Tip: If you did want to add cut lines to a printable, you can add them in Canva then select ‘lock elements’ so they don’t move.
I really thought people would want cut lines so the results of the survey were a pleasant surprise…
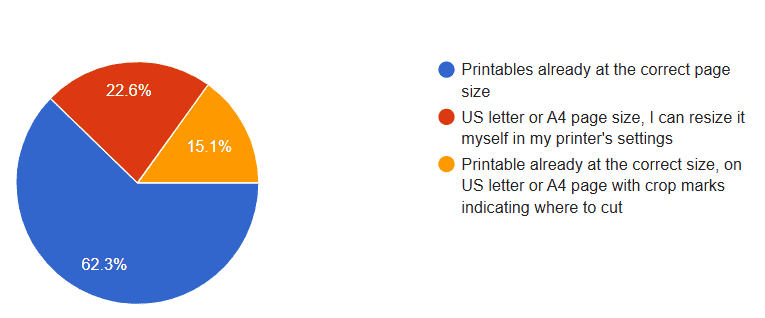
As I’ve never been motivated enough to spend the time doing crop marks. And I’m to lazy to set up design software to add them in for all the different page sizes. I want to spend my time designing and using the printables, not formatting them!
I previously added a grey background to the page for my Happy Planner half sheet printables, but a white background is more ink friendly.
I did test prints with a grey background, as well as with crop marks. But to me both options are more fiddly to cut accurately (even with a paper trimmer). People don’t seem bothered if there’s no crop marks so I decided not to waste my time adding them.
Most people seemed to care more that the printables were at the correct page size, so I decided to focus on that instead.
Making printables: Design elements
Some of the testing I did:
- Different spacing on the dot grid
- Compared lined, graph, blank and dot grid for sidebars of weekly planners
- Added ‘notes’ text or no text to designs
- Round checkboxes versus square checkboxes
- A border around the design versus no border
- Dashed versus dotted versus solid lines
While I was making 1 page weekly planners, I knew I was going to offer monthly calendars and 2 page weekly planners for people who prefer those. Here are some of the sidebar options I experimented with.
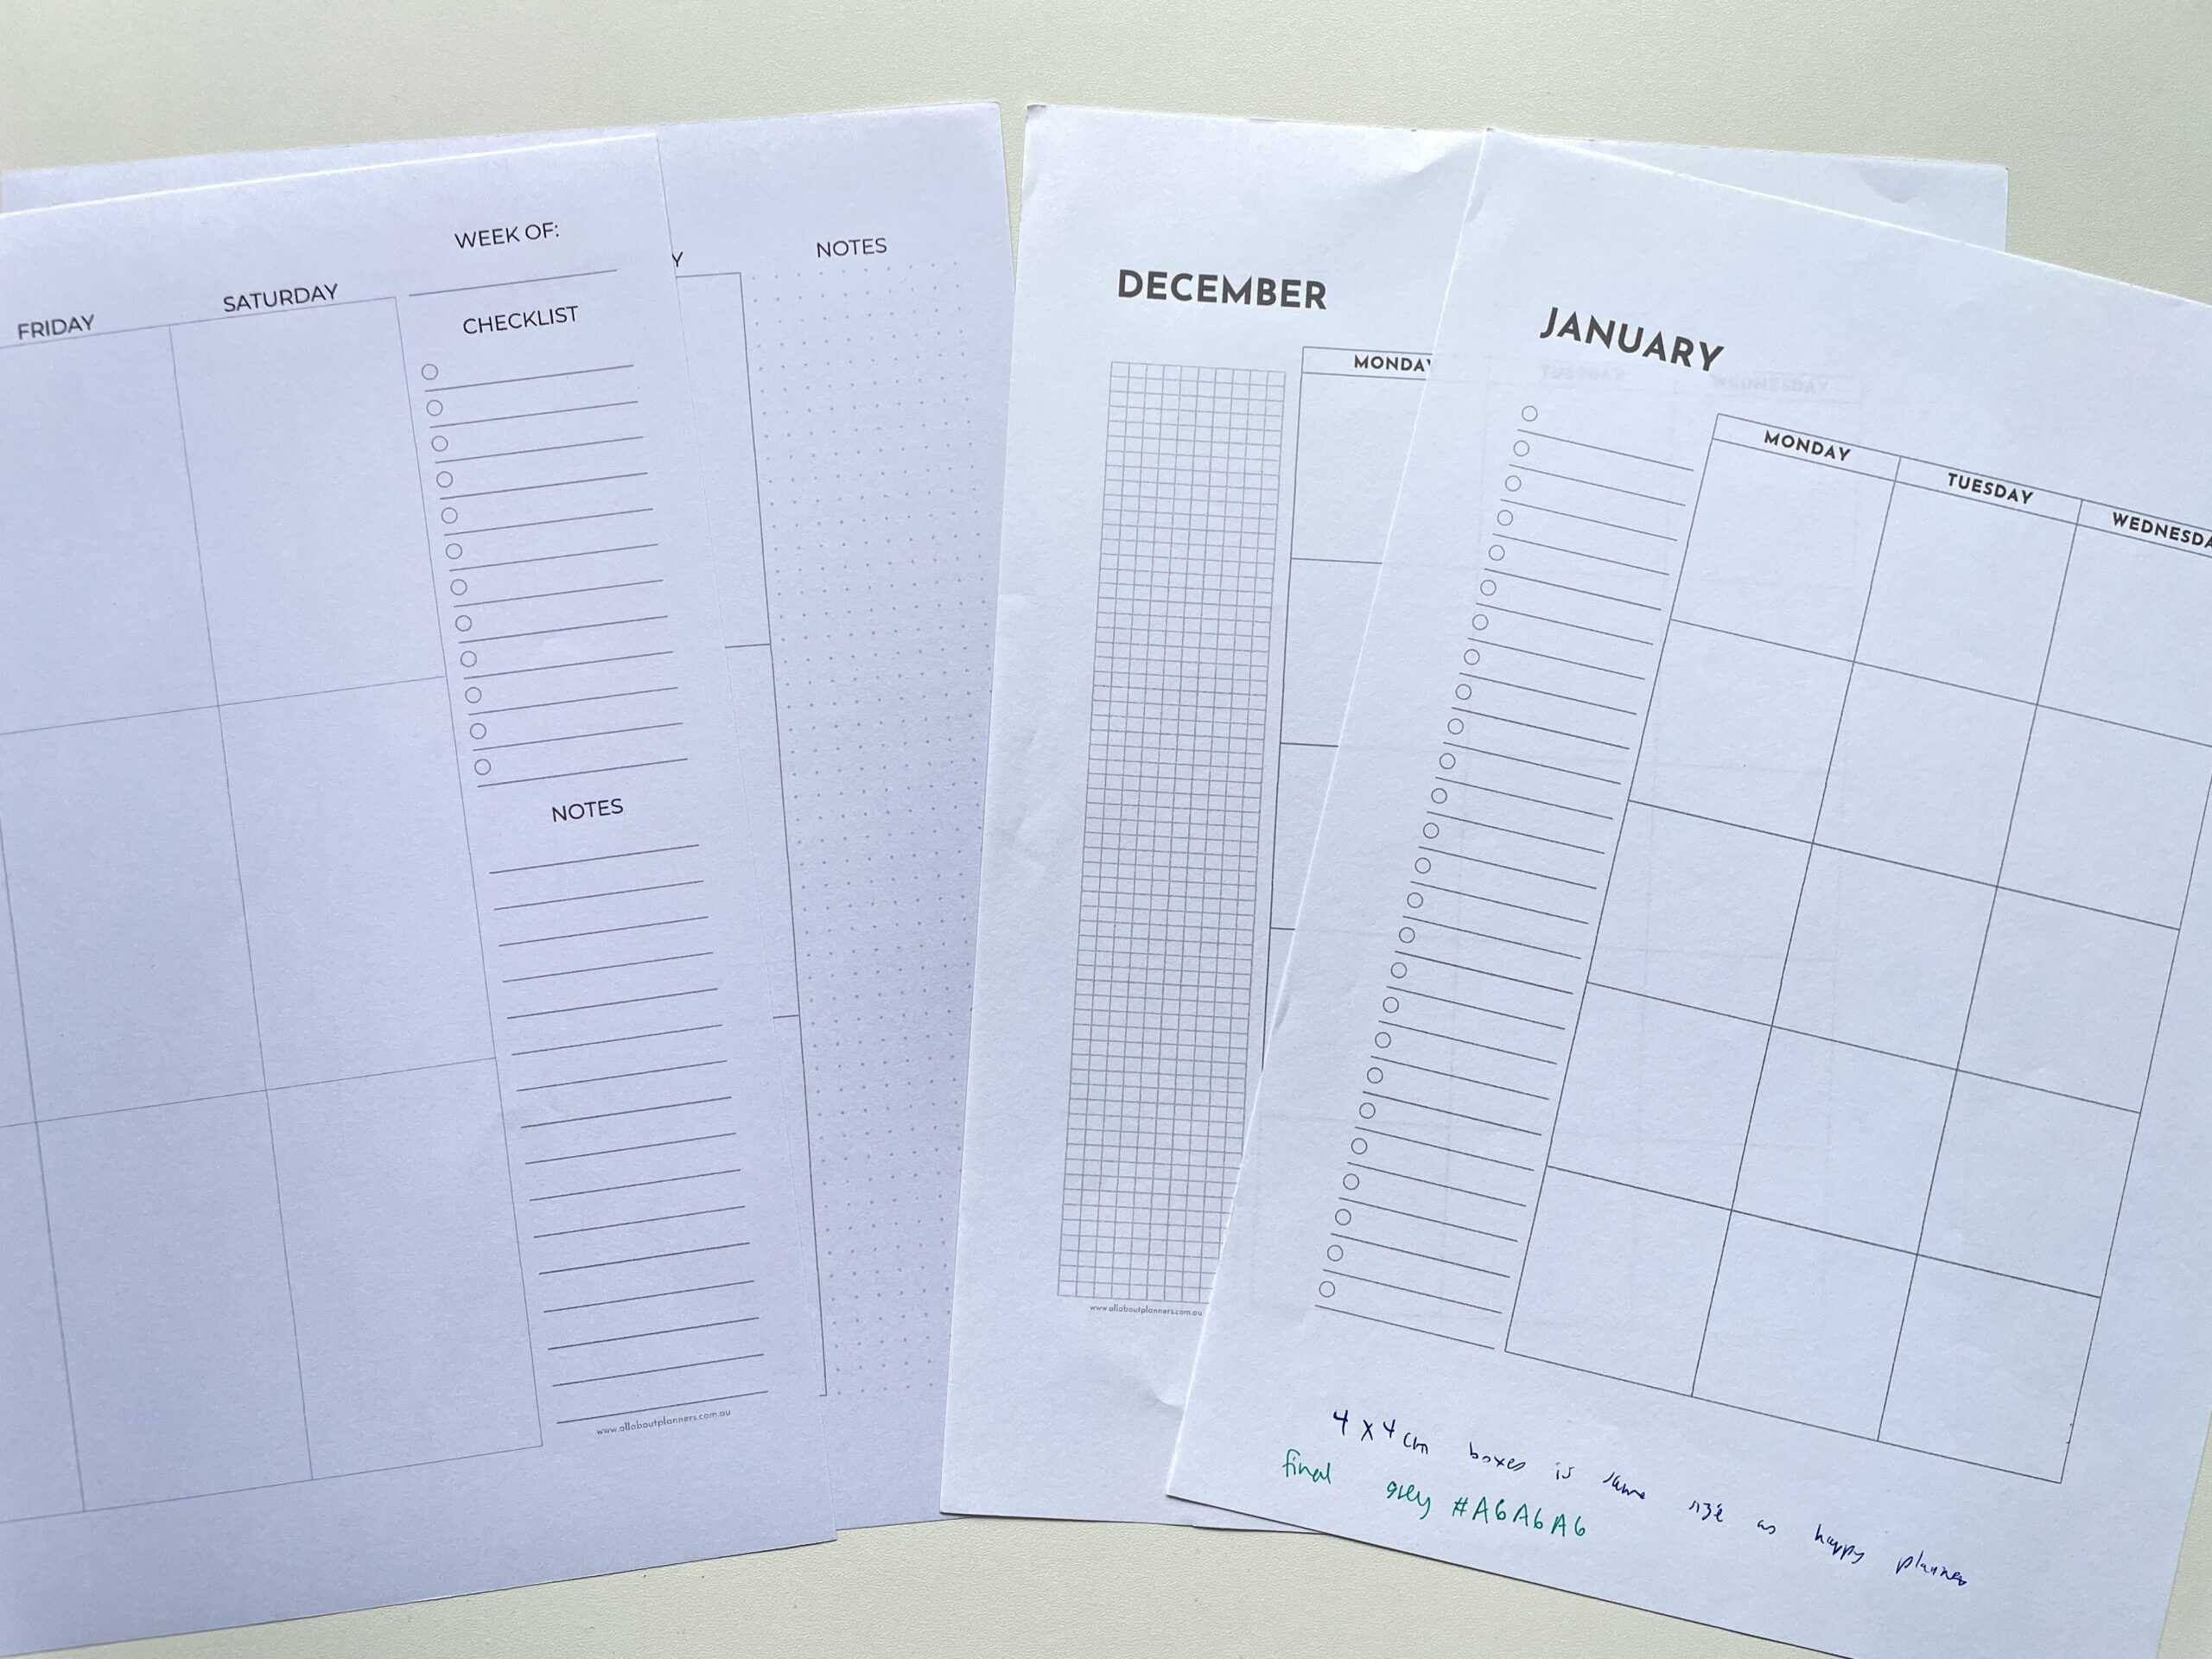
Notice the difference in paper in the photo above? I try and do test prints on different types of paper so I can see how the colors look. I prefer to use bright white but the type of paper a customer uses is out of my control. I want to make sure it looks good on all shades of white. Cheap copy paper (on the left) and slightly more expensive bright white paper on the right. I use a thicker bright white paper for printables that end up in my planner. If you have the option, always choose bright white paper!
I’m indecisive when it comes to simple things like this as some weeks I want just lined notes, other weeks I want a checklist and sometimes I want a dot grid. If I want different sidebar options then surely other people do too. I considered making a sidebar equally proportioned with all of these types of notes sections, but then that gets so specific it may end up appealing to no one! In the end I used a mix of sidebar options throughout the printables.
Step 4: Creating printables at different page sizes
Once I had some designs created, it was time to test out Canva’s resize tool.
Canva’s resize tool is a good idea in theory, but it’s not perfect. I was really trying to avoid manually adjusting the pages too much once the page size shrinks. If you want to maximise the page and maintain the 0.5″ margins, there are some manual adjustments to the design required whenever you switch page sizes.
Once I decided I wasn’t going to do A5 or half US letter size I did some testing to make sure the resize function in a home printer would still produce a good result.
Some of the testing I did:
- Test printed the US letter at US half letter (I page size I never use but which was popular when I sent out the survey)
- Seeing how a US letter size printable would print on A4 at ‘actual size’ versus ‘fit to page’
- Printing the US page size template at A5 size
The main thing that affects the design when resizing, is line spacing. You can see the difference in the the bottom planners (printed 2 x A5 size onto a single A4 piece of paper), versus Happy Planner classic size in the photo below.
I didn’t bother doing test prints at the mini Happy Planner size as not many people wanted that size. I don’t use the Happy Planner mini myself either, it’s far too small to use it for anything other than some checklists.
Step 5: The finished collection
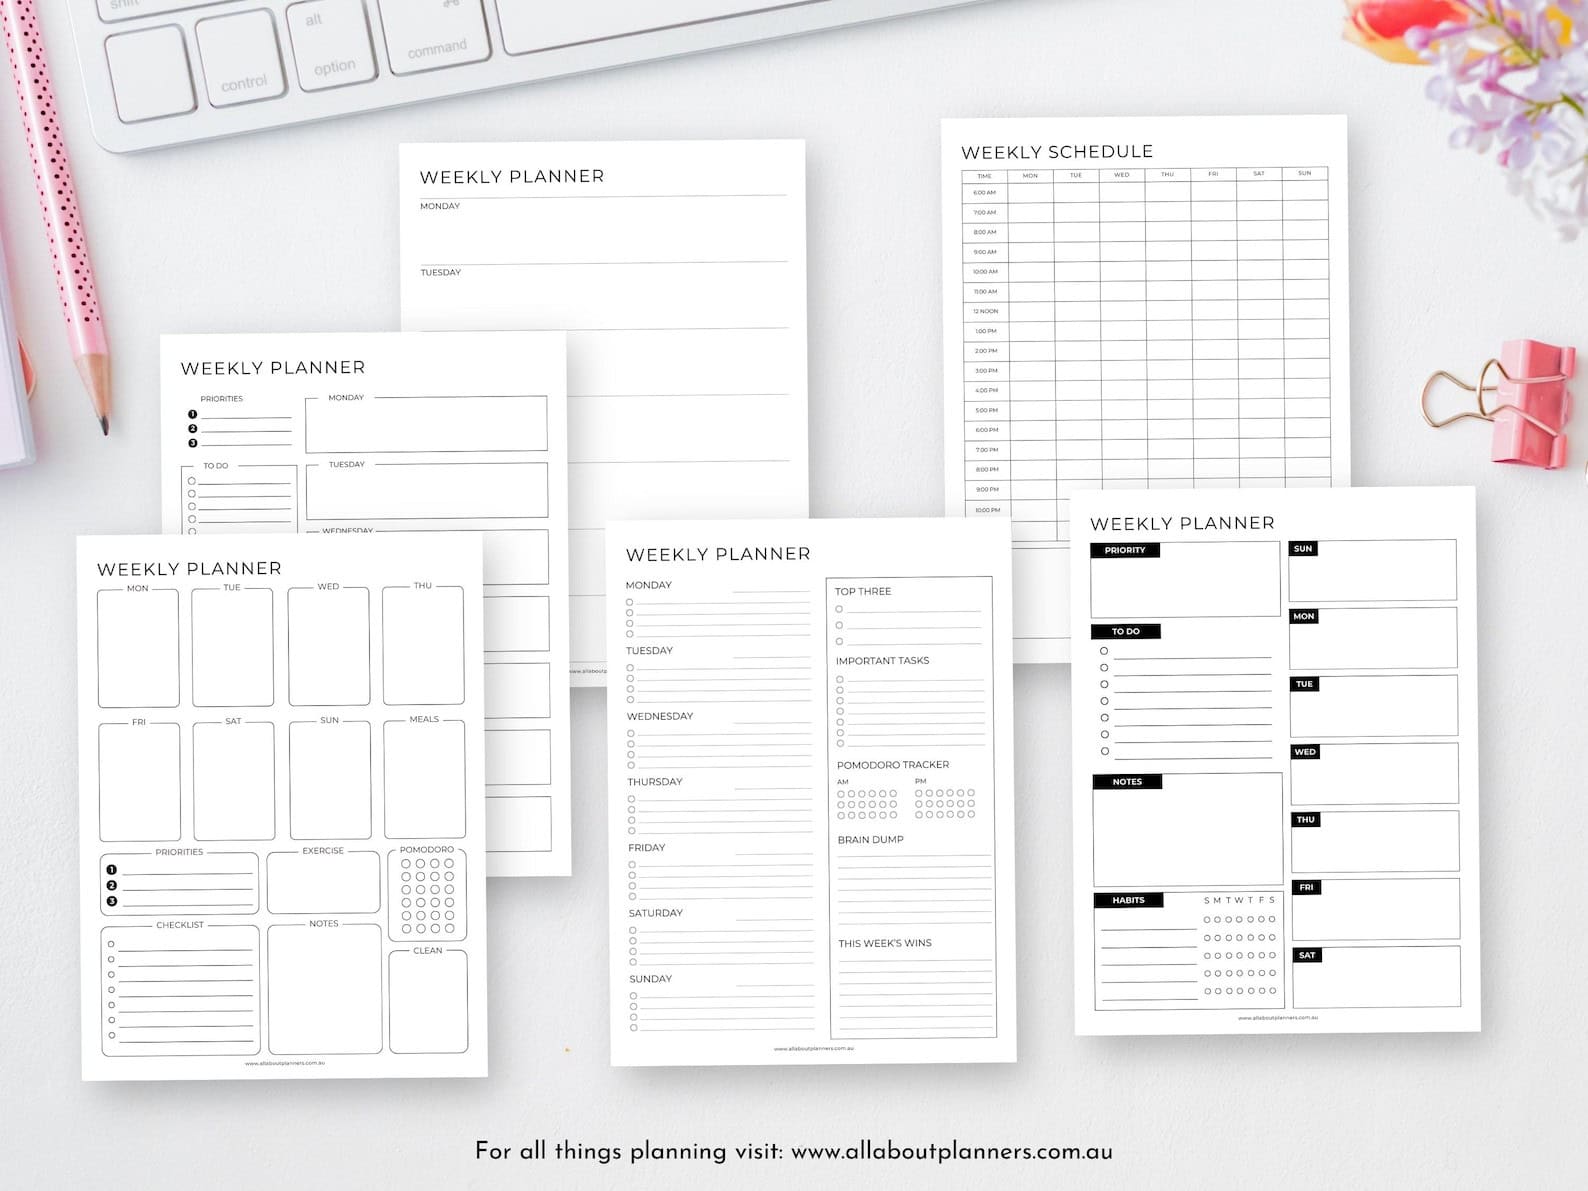
After all of that testing and tweaking, I went ahead and created 52 different weekly planner designs. This part was actually the easiest (and my favorite part!)
This set is available in my Etsy shop and online store.
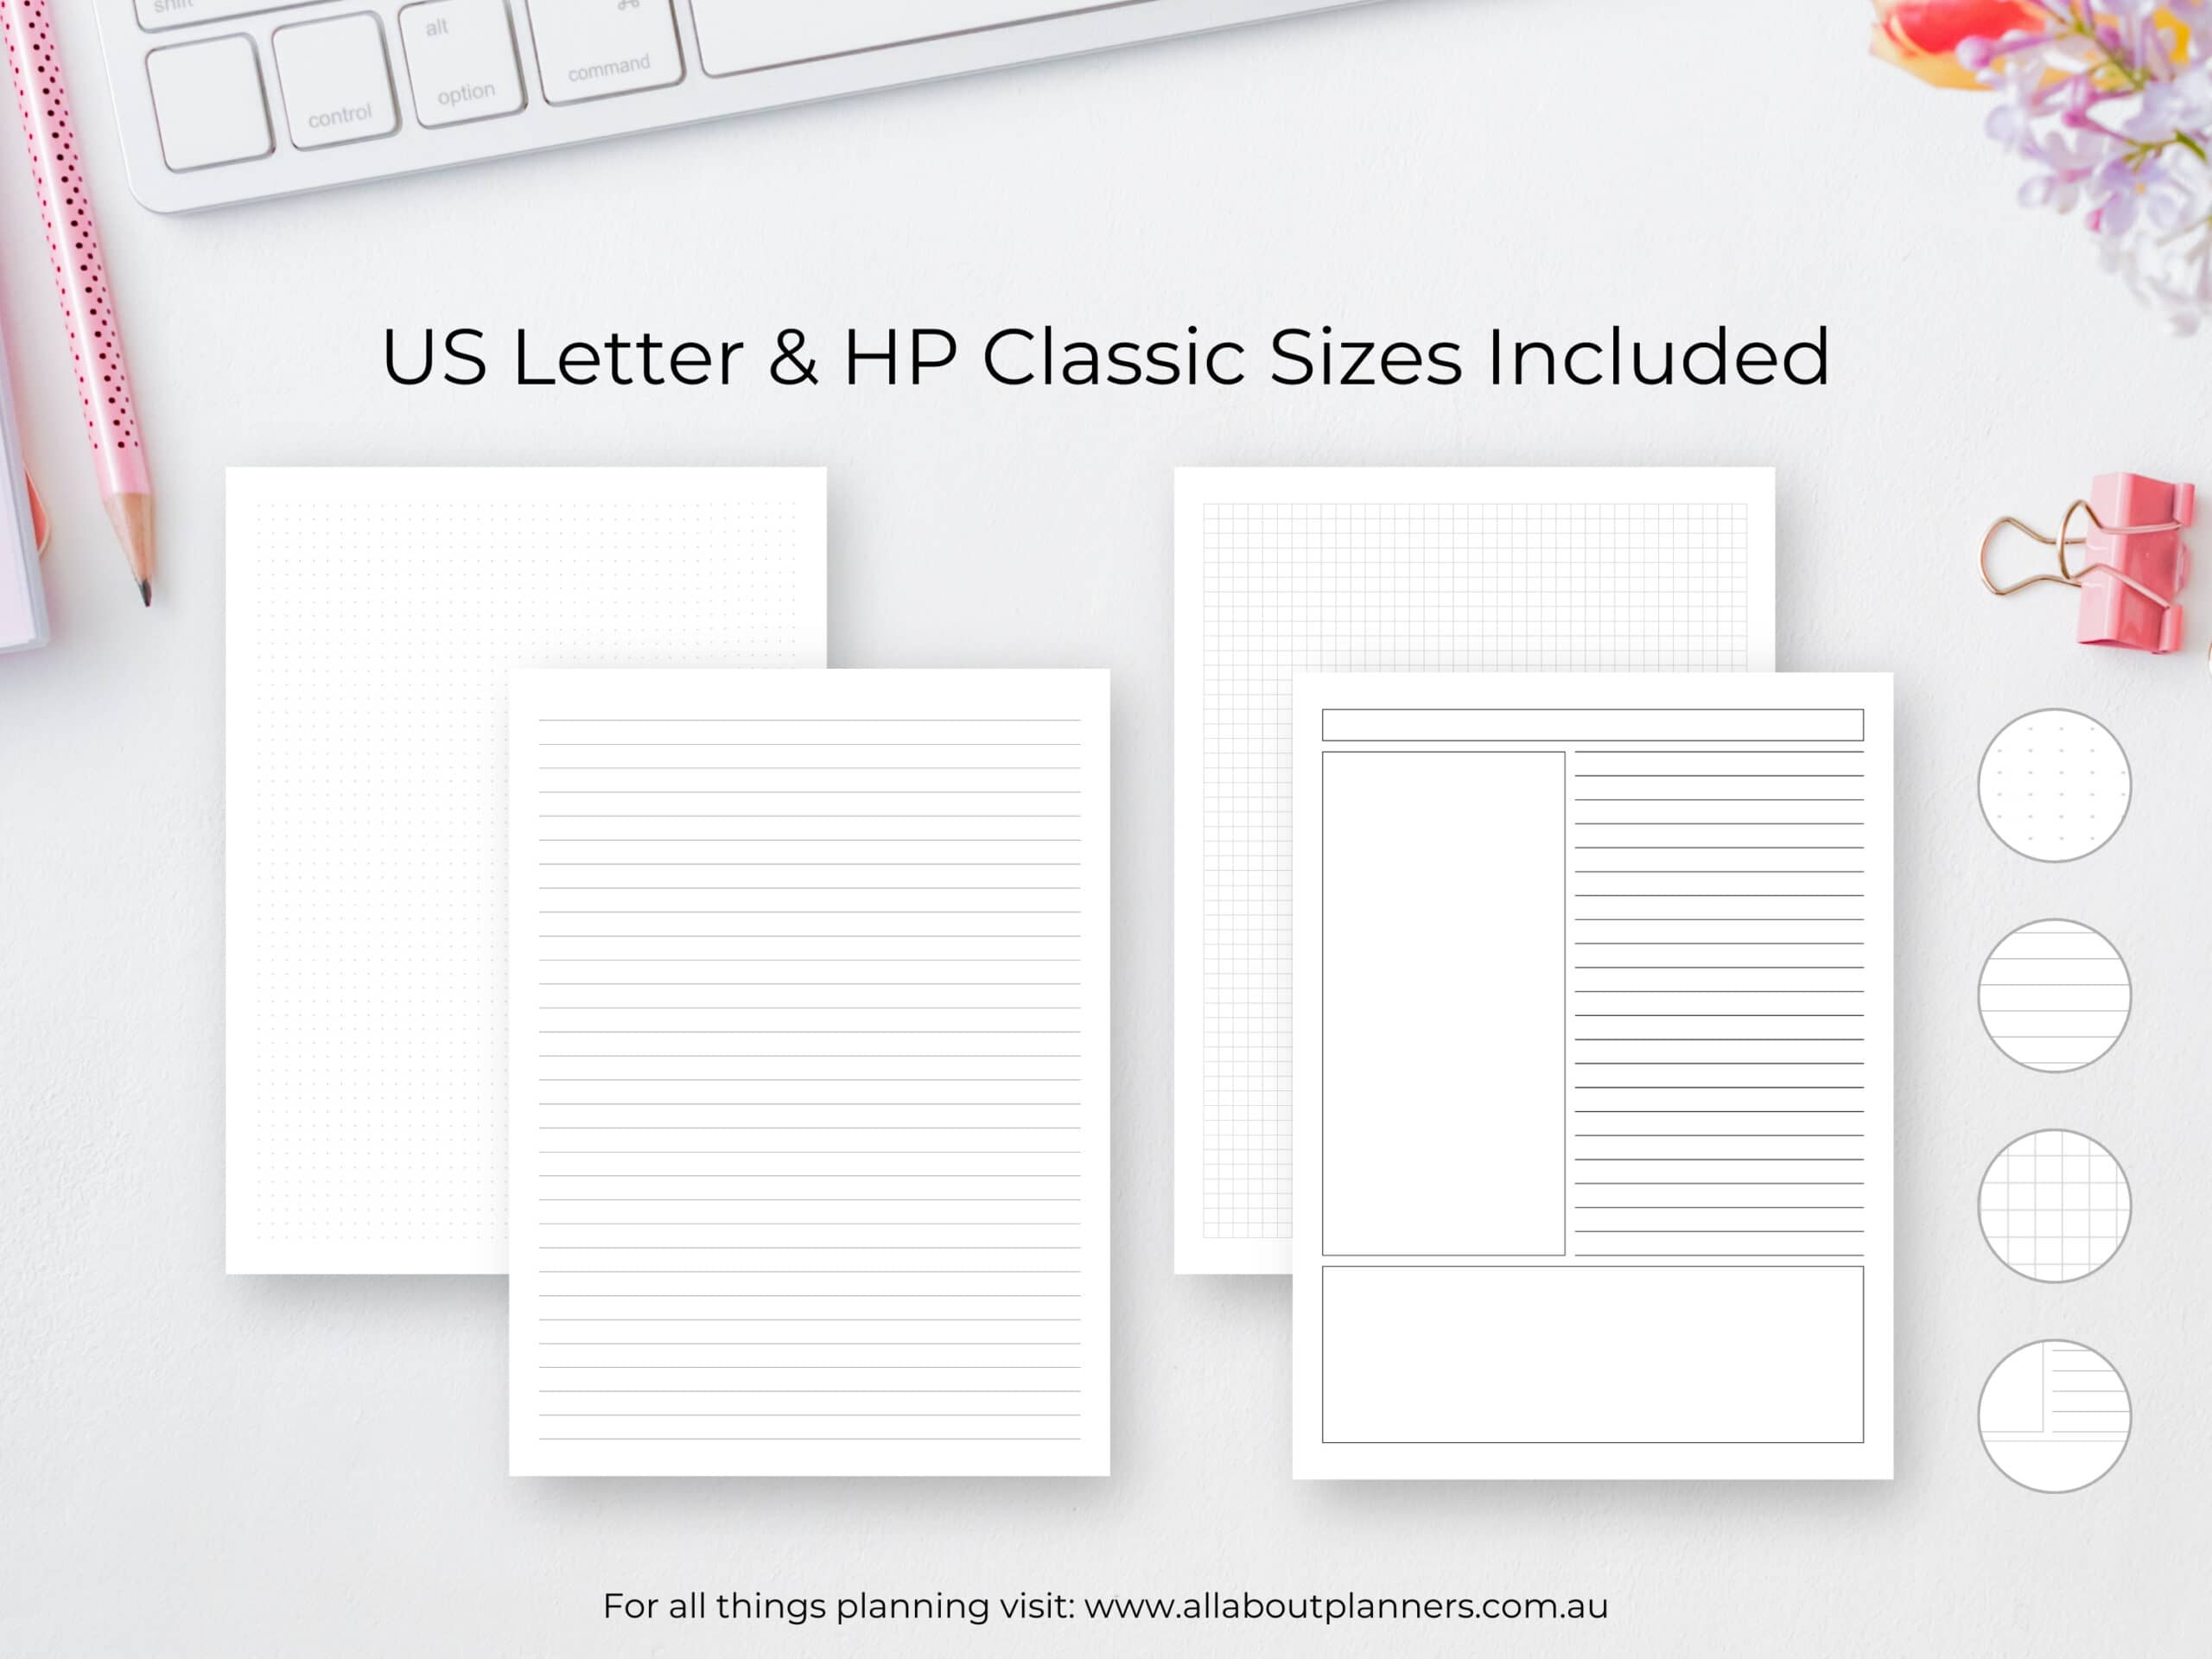
I was a bit extra and added some notes pages, as well as a weekend planner, as those are pages I like to use with a 1 page weekly spread so figured others would find them helpful too.
Step 6: Make the pages fillable
Over half of you wanted templates you can customise which had me cringing a bit as it’s not always a quick process to make printables fillable.
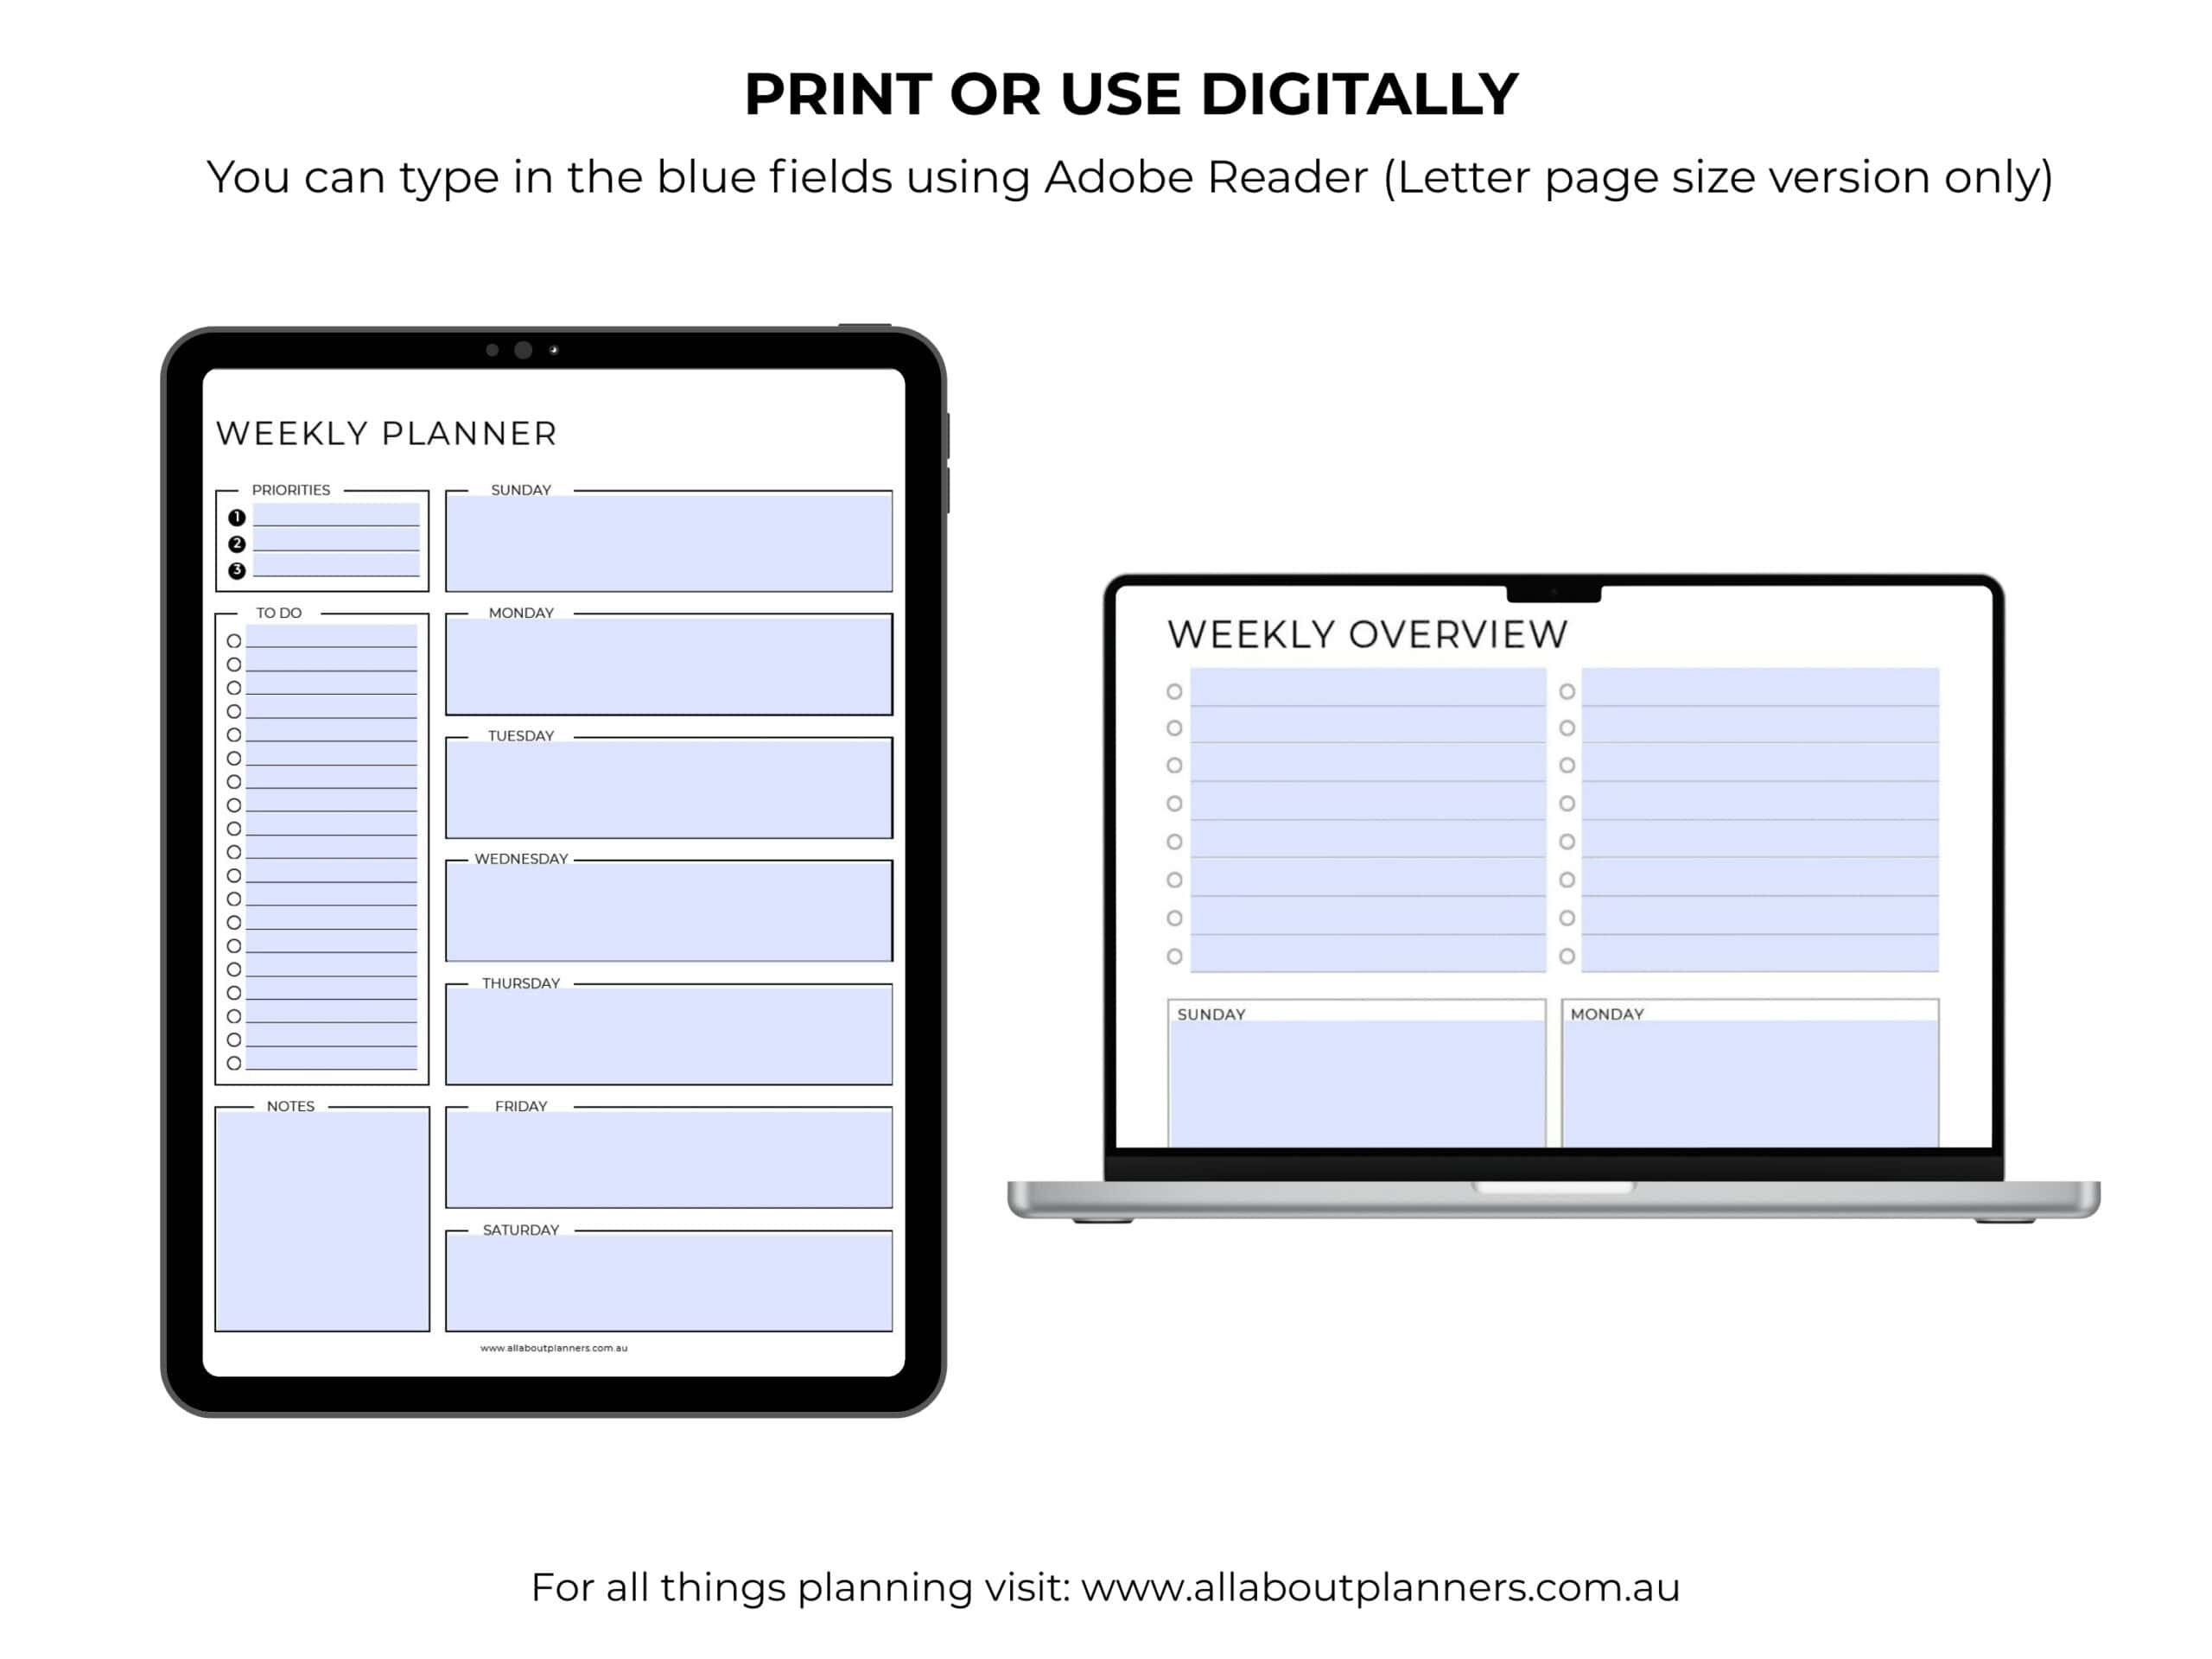
I’ve always used Adobe Professional to add the light blue areas where people can type.
There are various PDF software you can use nowadays. I did experiment with a few to see if they were any better. But most of them required a subscription (I already own Adobe Professional outright), or you had to pay each time you wanted to download a design you created.
As each of the designs is in both a Monday and Sunday start version, there are over 100 designs that needed to be made editable, it was most cost effective to do it in Adobe Professional.
Adobe Professional isn’t perfect, sometimes it intuitively picks up where you would want to add a fillable section to a template, other times you have to add it yourself.
At least the software allows you to duplicate form fields and copy and paste between PDF files so I could do the template for Monday start, then copy it over to the file with the same design in Sunday start to make the process quicker.
This was the most time consuming part of the whole process, as each weekly planner needed to be made fillable in both Monday and Sunday start. It’s not an enjoyable process, so I ended up only doing fillable versions for the US letter size (was still 100+ files to make fillable).
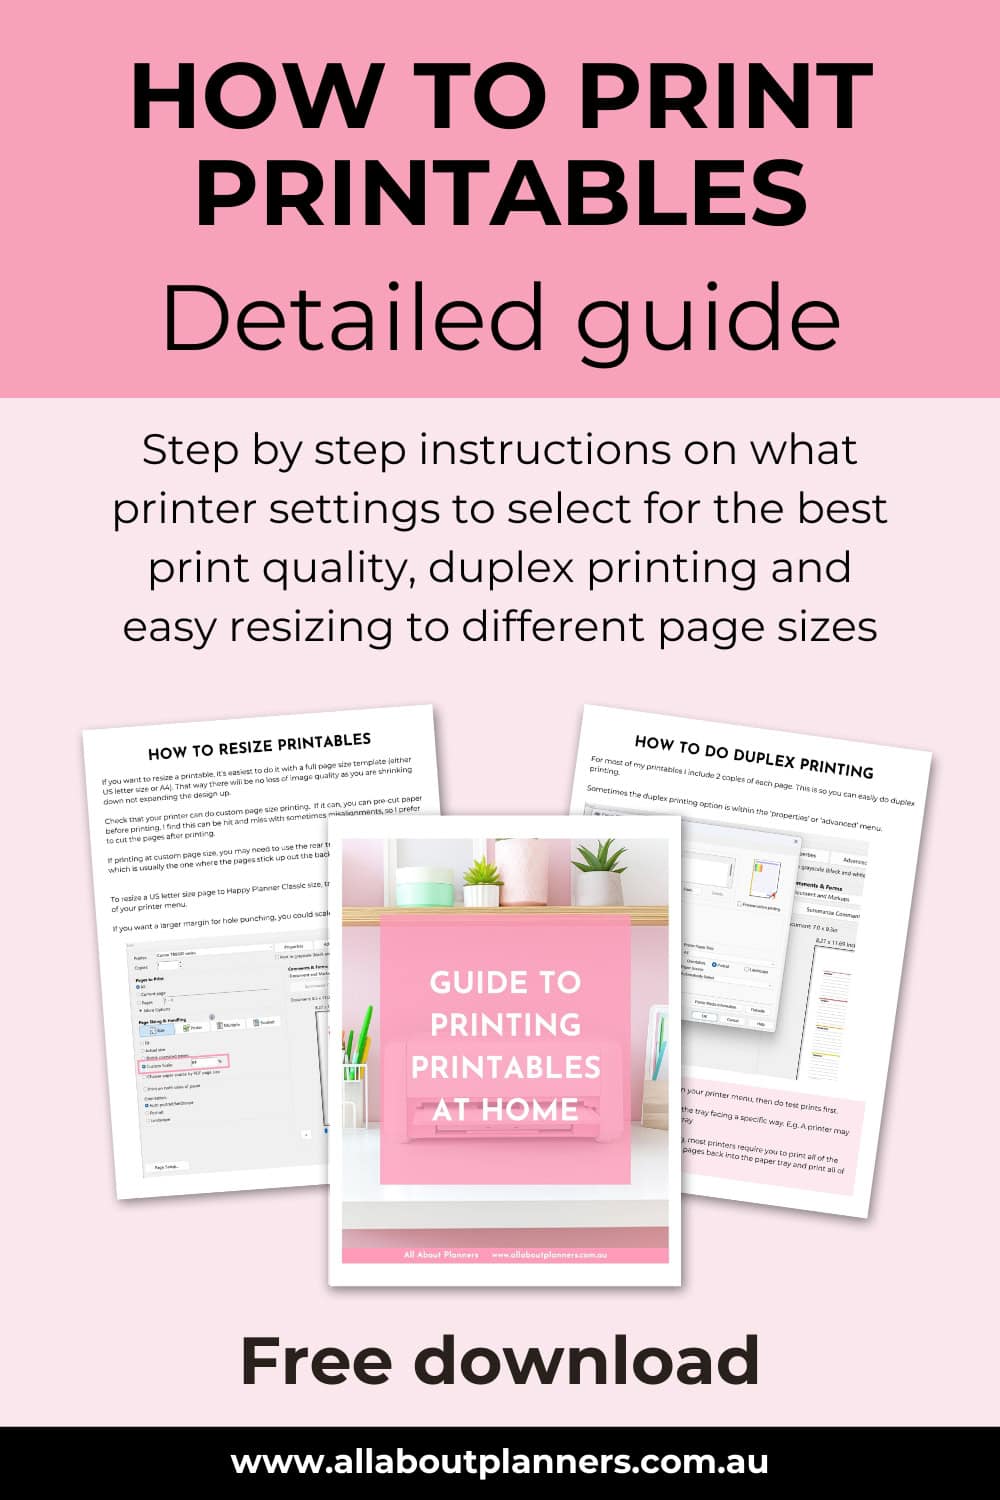
Step 7: Creating a printing guide
Customer expectations on Etsy have really skyrocketed in the past 5 years. People want a lot but don’t want to pay a lot!
I’ve considered many scenarios on how to add value without turning my shop into a flea market selling rushed designs off for $0.99 like a lot of sellers have had to resort to these days.
After directing customers to various links on my blog with printing tutorials over the years. I decided to spend another hour finally once and for all creating a printing guide that people can download when they purchase printables from me. Or you can download it now (no need to sign up to the free printables library, this link will take you directly to it).
Step 8: File size and formats
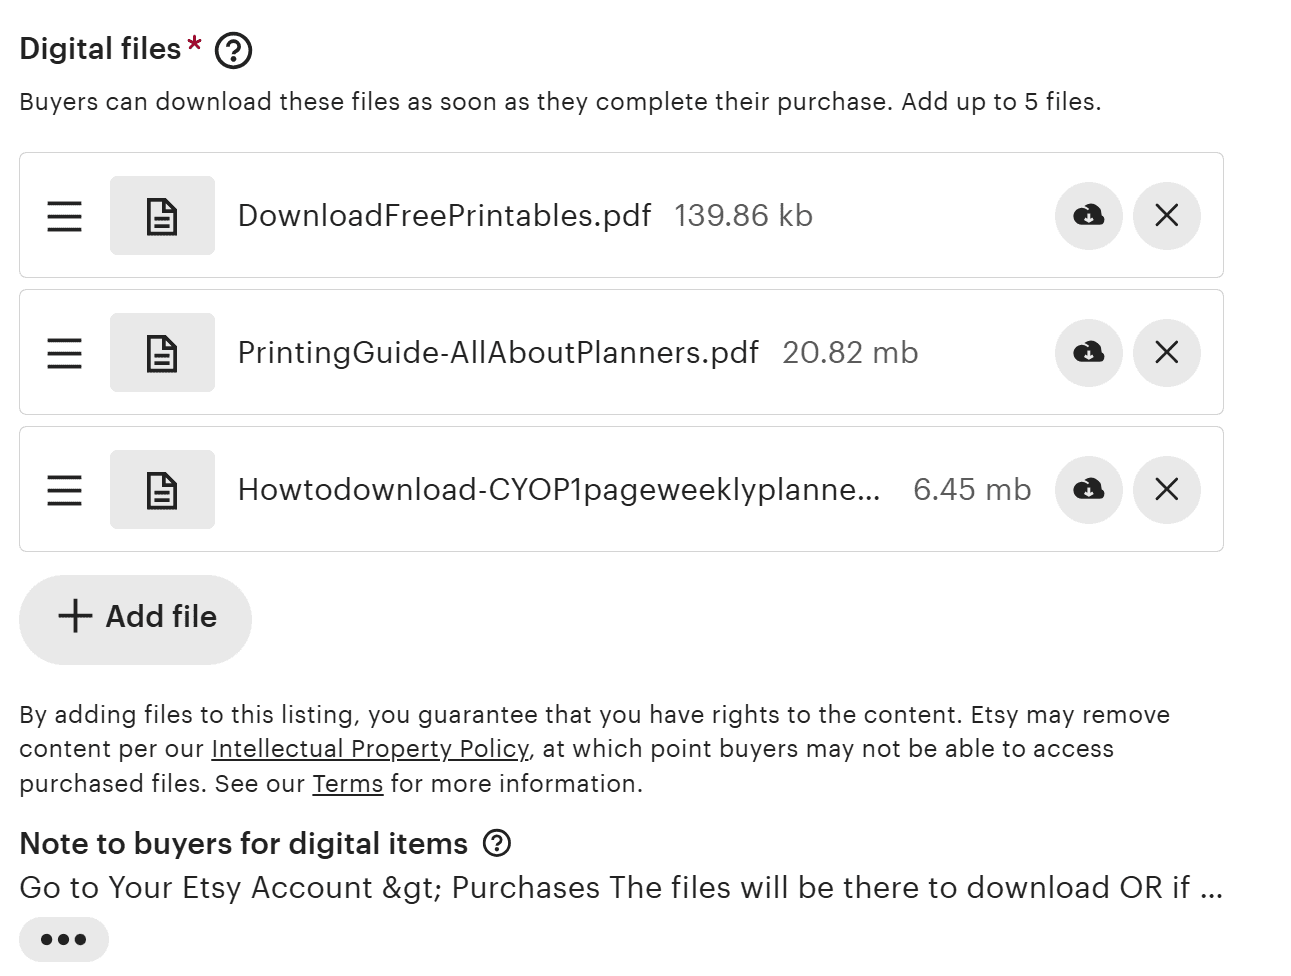
Etsy will only allow 5 files with a maximum of 20MB each.
The printing guide has lots of screenshots, I was able to just squeeze it under the 20MB limit. There are a lot of pages in this kit and I wanted to keep them organized into separate folders for page size and Sunday or Monday start. There are also the notes / add on pages as well.
So instead of using Etsy’s instant download system, I created a PDF with a link to the download page I host with a 3rd party site. People get this PDF file with the link immediately after their purchase, so it’s still an instant download.
Etsy has increased the number of photos per listing to 20 and added an option to add a video to each listing over the years, so I’m hopeful in the future they’ll either increase the maximum file size upload limit, or allow more files to be uploaded per listing.
Step 9: Create the mockups
I shared more about how I make my mockups in this post.
I decided to keep it simple and created images:
- Showing all the the layouts
- A mockup of a tablet and a computer showing they’re fillable PDF files
- A few other photos showing extras and other features like page margins and the notes pages that were a ‘bonus’ in addition to the weekly planners

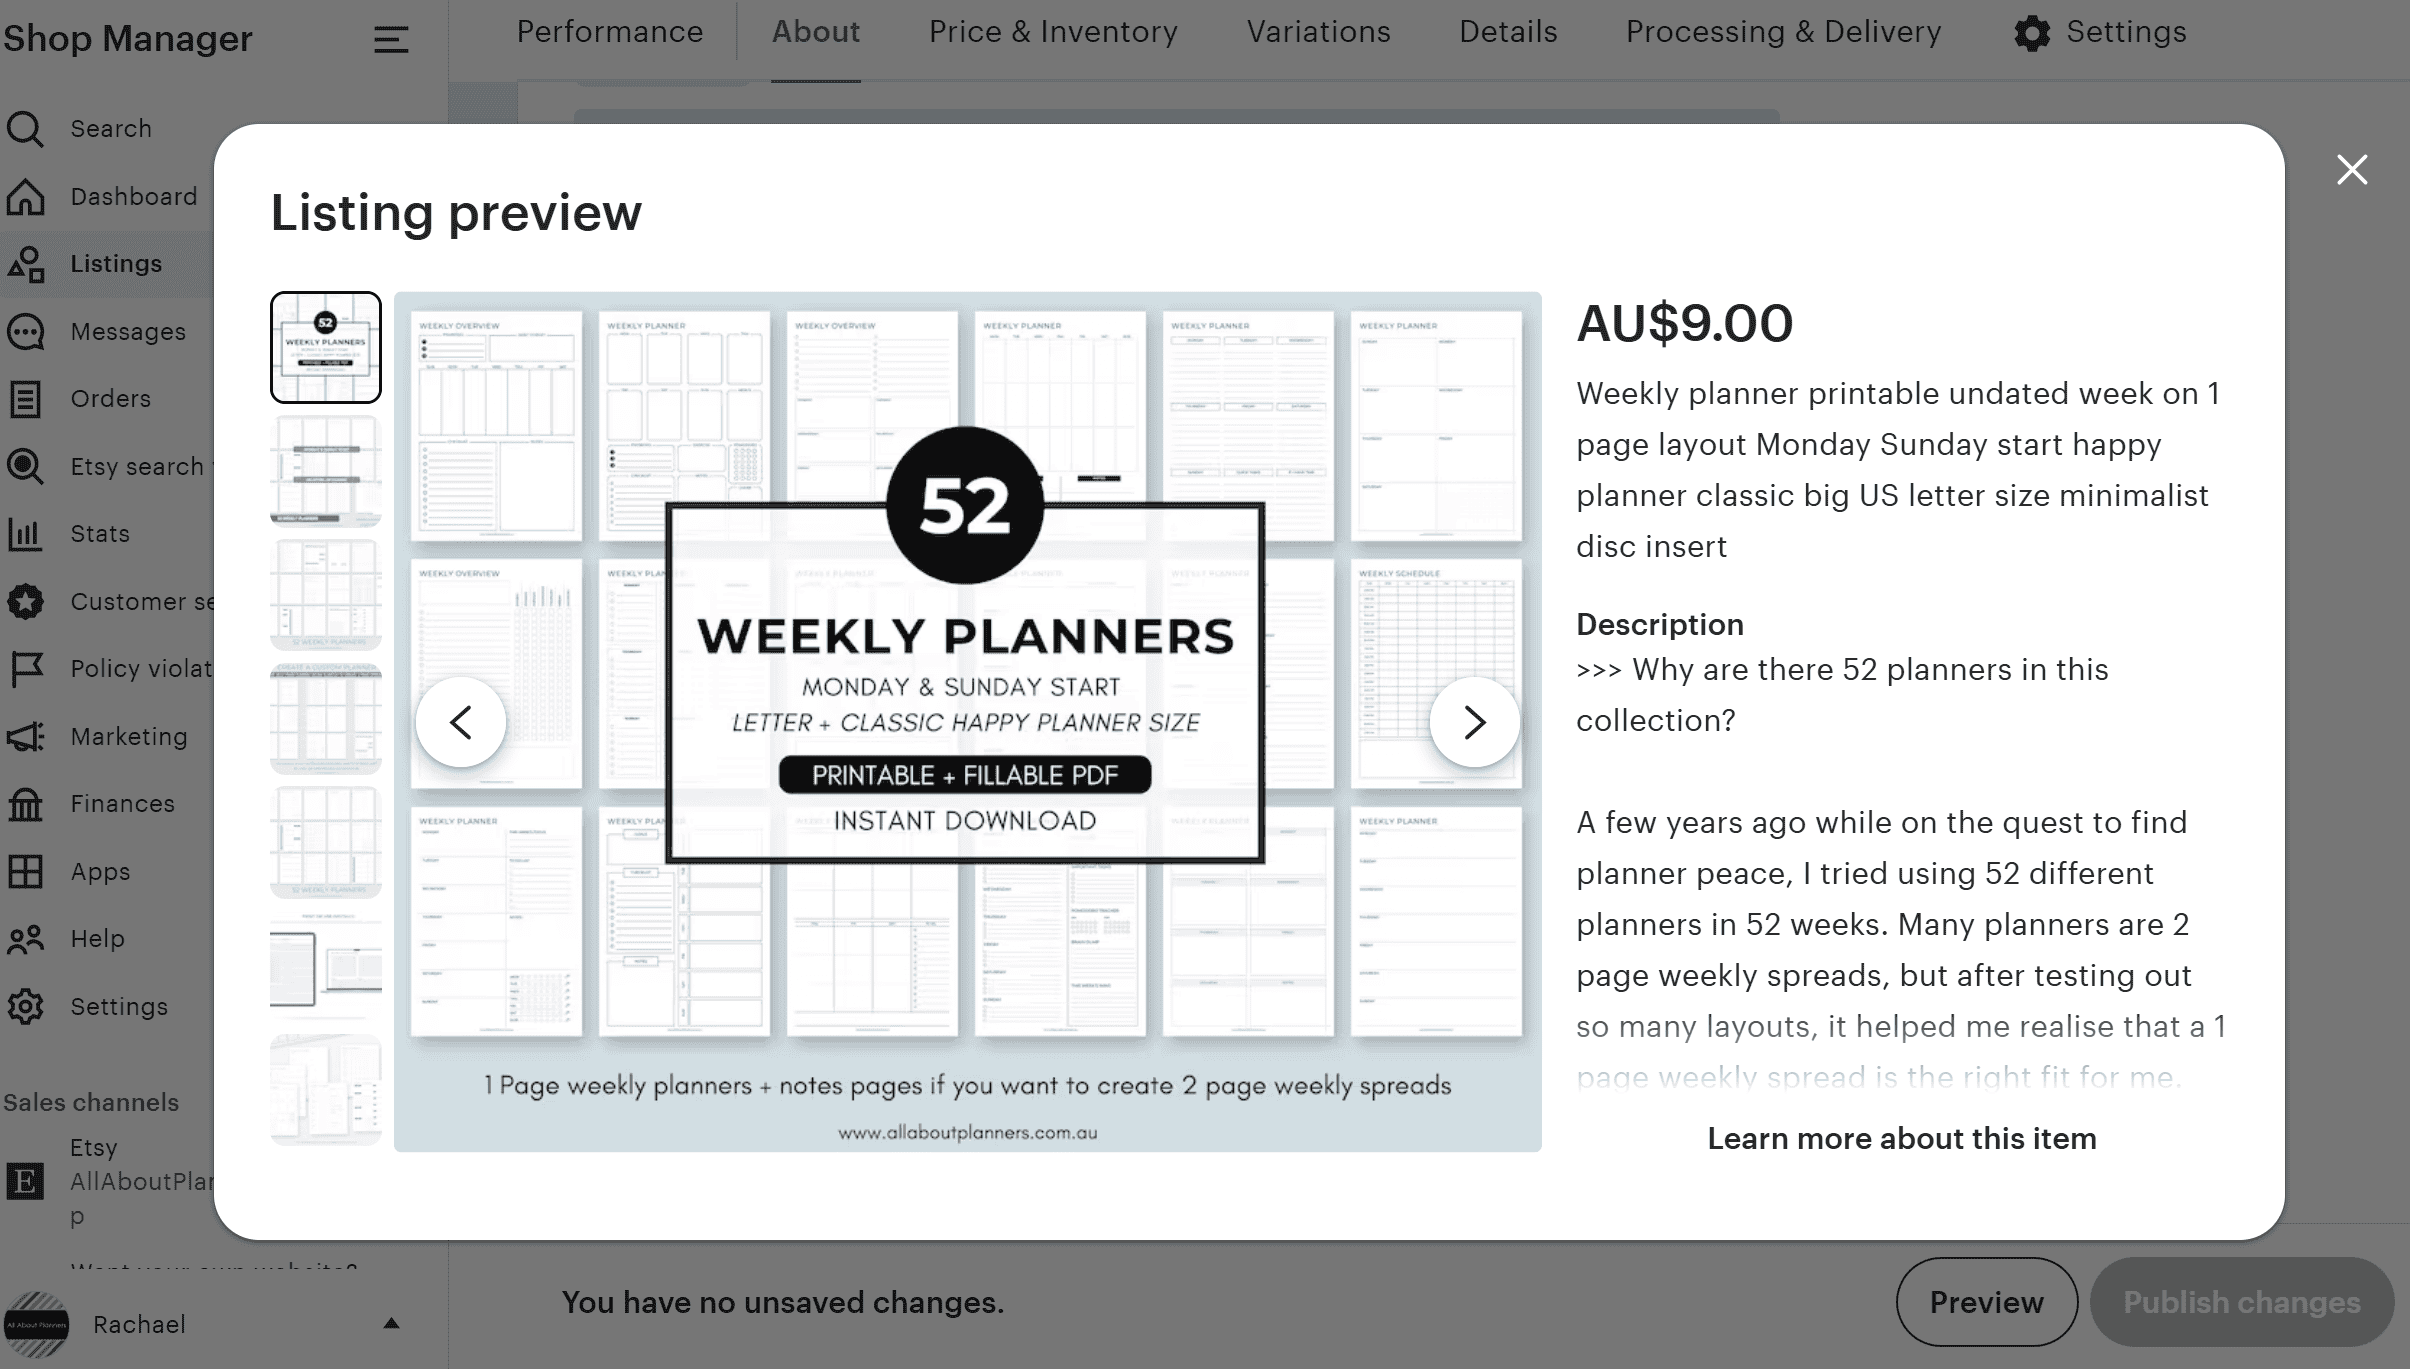
Step 10: Draft up the listing description
This is the easiest and fastest part of the entire process.
I just wrote about why I created the bundle, listed out what’s included, pointed out the features, page sizes and some other info I’d likely get asked questions about.
So that’s my workflow on how I make printables from start to finish. If you have any questions feel free to leave a comment below or email me via [email protected]
If you’d like to purchase this set, it’s available in my Etsy shop and online store.
Liked this post? Pin it!