Mi Goals Weekly Planner (52 Planners in 52 Weeks – Week 19)
For week 19 of the 52 planners in 52 weeks challenge I tried out the Mi Goals planner. I was excited to try this planner as it’s made here in Australia! (very hard to find planners that are made here). I ordered during a sale they had a while ago where there 2017 planners were 50% off 🙂 I also got a few other planners which I shared in this haul video:
To enlarge the screen of the video, click the square icon in the bottom right hand corner of the video (it will say ‘full screen’ when you hover your mouse over the icon).

For more planner videos, subscribe to my YouTube channel.
This is not a sponsored post – I paid for the planner myself – all opinions are my own.
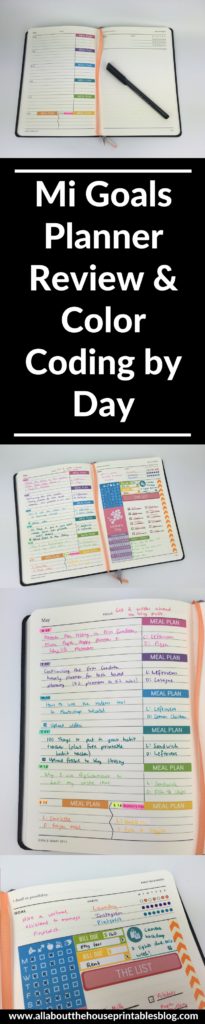
Using the Mi Goals weekly planner
First things first when I get a new planner – pen testing!
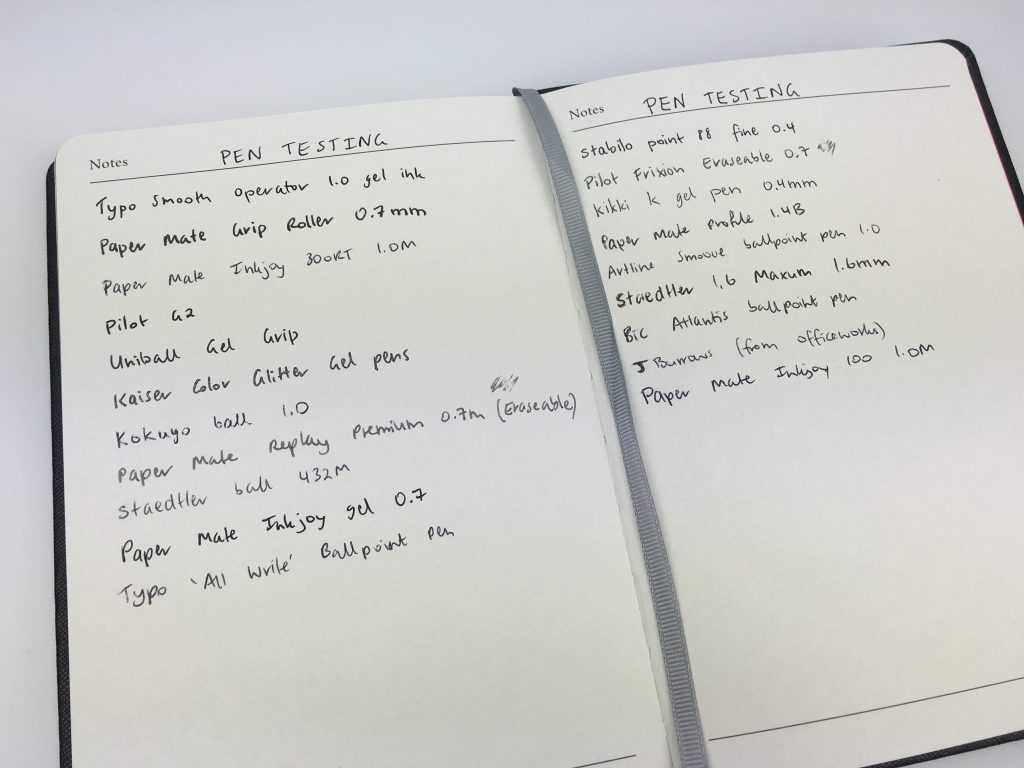
Unfortunately the paper in the planner is very thin. It does make the planner less bulky than most planners, but it also means that all of the pens (ink and gel pens) could be seen on the backside of the page.
Before the pen
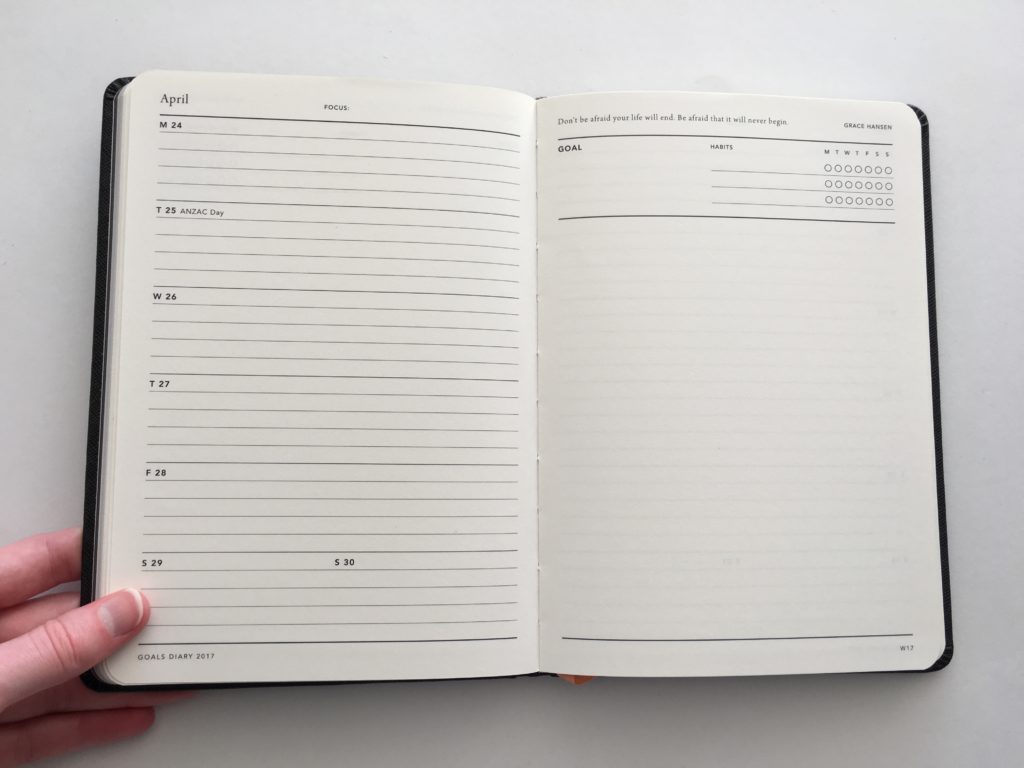
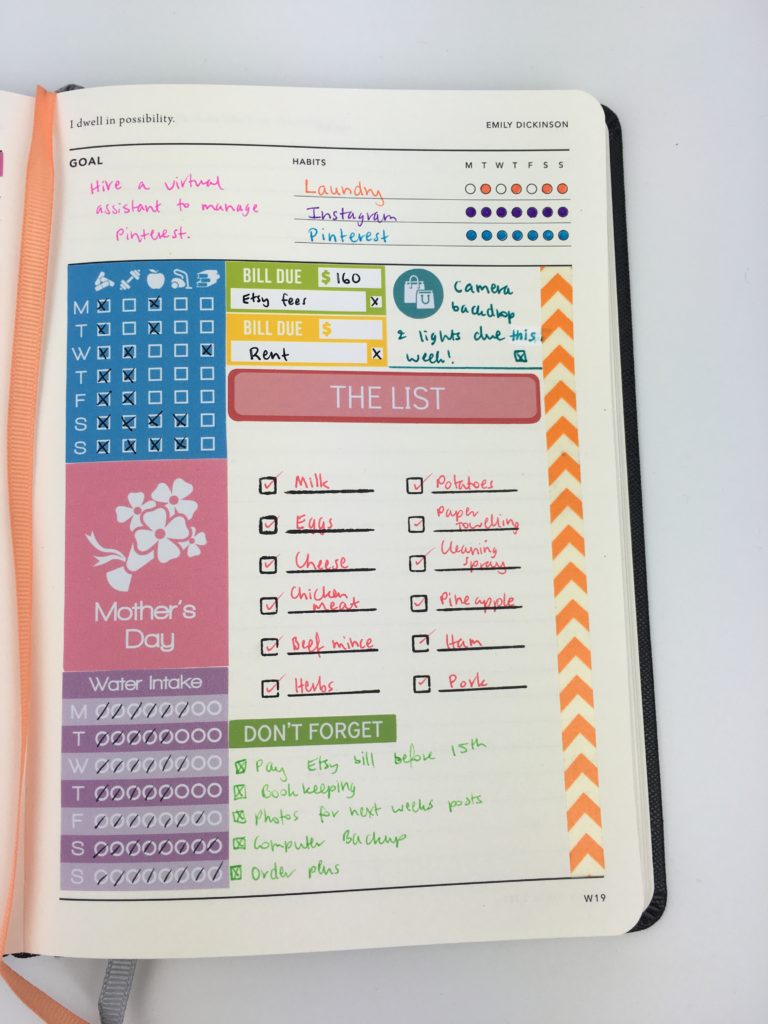
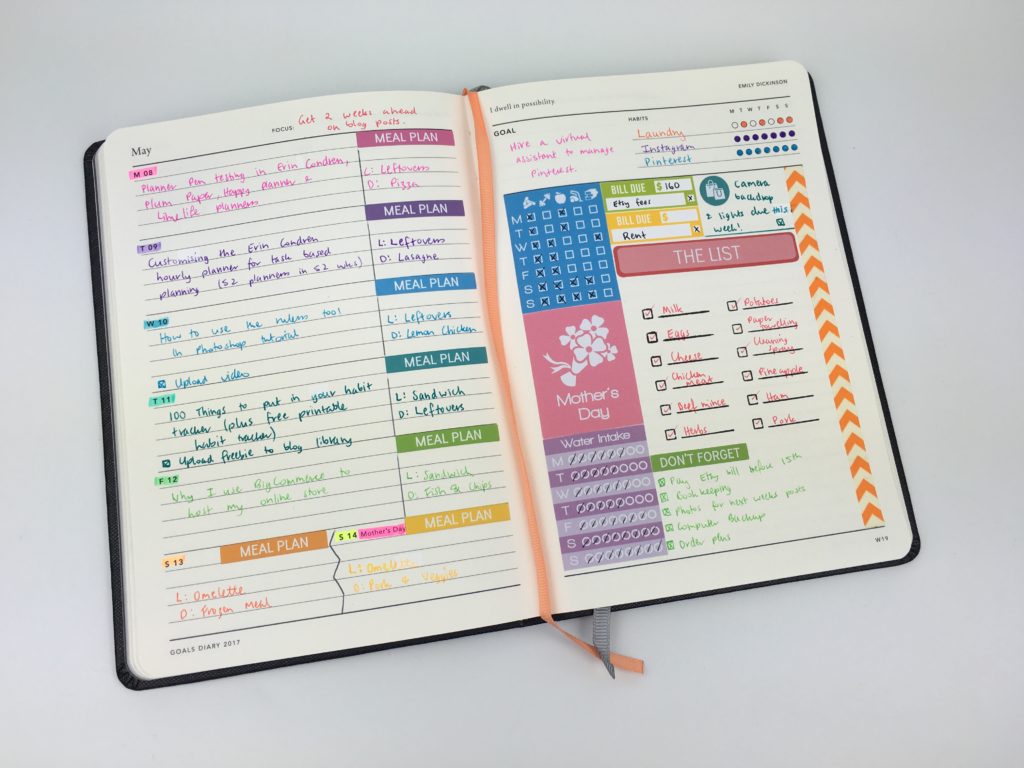
The Mi Goals planner features a simple, minimalist layout with weekly planning space on the left, and a habit tracker on the right with blank space you can use however you like!
Related: Mi Goals planners haul & review
I thought about keeping it minimal and just doing an all black and white spread… but that would’ve been a bit boring. Life’s better in color!
![]()
After the pen
I wasn’t really sure how to use the open ended space on the right page. Blank spaces in a planner tend to paralyse me a bit – I liked structured systems so i know what I’m putting where, otherwise there’s just too many possibilities!
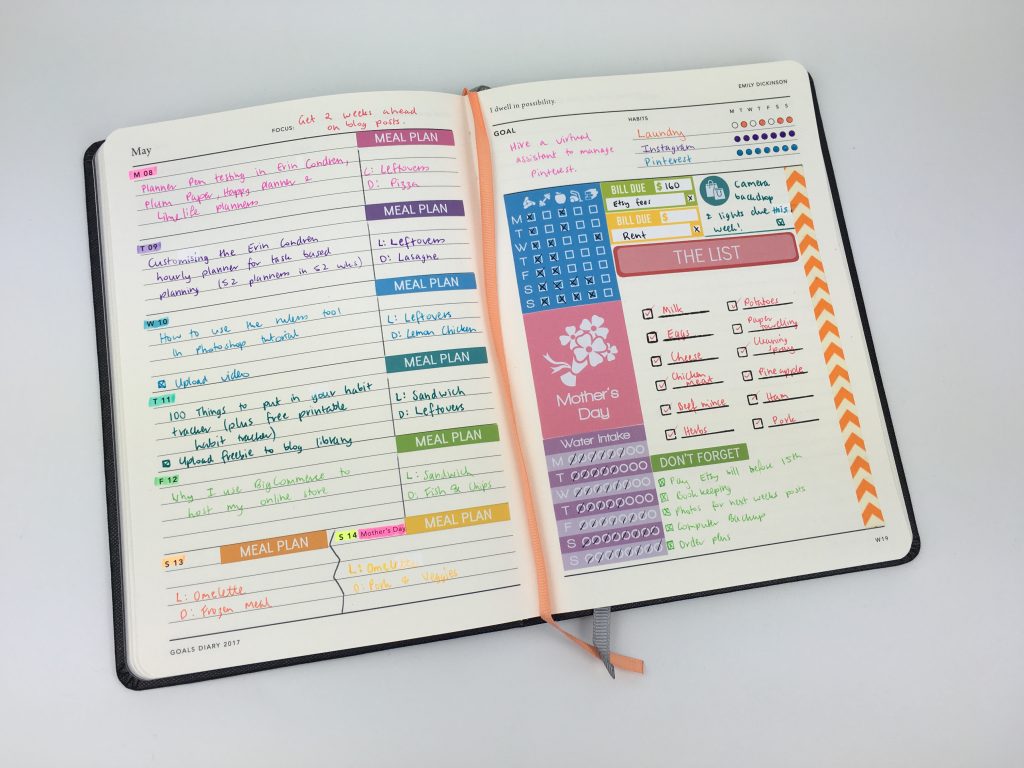
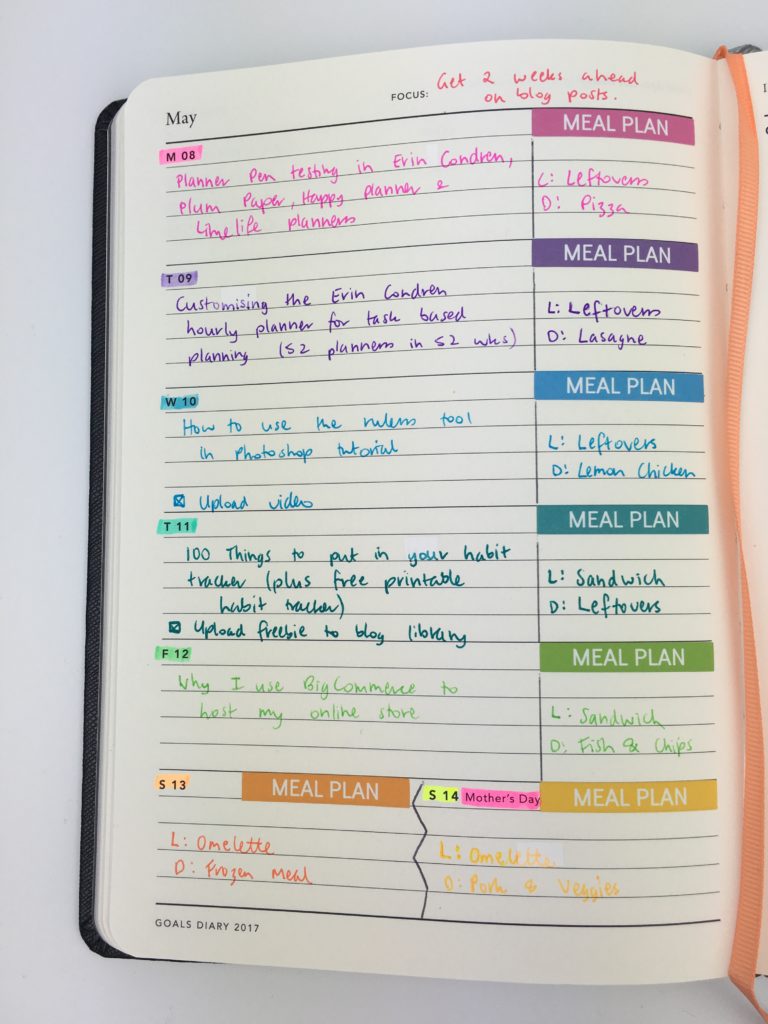
I set up the week with meal planning space on the right and space to put that day’s blog post on the left.
Because I have so many ideas for blog posts – as in literally hundreds of post ideas – I like to go through my blog post ideas pages (of which there are many) and pull out the 5 I’m going to post that week and put them in that week’s spread. Otherwise, I won’t stick to the plan – I’ll have an idea for a post and want to post it right away.
I find that if a task is not scheduled, it doesn’t get done.
I’ve found that when I plan blog posts with a bit more thought, that they tend to receive more views. So at the moment I try and plan content around:
- Product launches – so I did more posts about stickers when I was launching my ecourse: How to make planner stickers (if you’re interested in the course I have a free email course as a ‘taste test’ – click here to enroll!)
- Stuff that people ask about all the time (such as resizing printables, what editable means, questions about pens etc.)
- Stuff that’s popular (planner reviews)
- Affiliate income posts (which usually tie into sharing some ‘behind the scenes’ info about my shop)
- Posts that include a free download (such as a free printable habit tracker, or a guide to planner page sizes)
Read more posts about blogging here.
I ended up using the right side of the page for a random assorted of:
- Habit tracking
- Bill tracking
- Mail / parcel tracking – the studio lights finally arrived hence why the photos in this post look whiter than my photos normally do 🙂
- Shopping list
- Don’t forget
I’m not completely happy with how this section turned out and probably wouldn’t use the same stickers / layout again. I think next time I’d split this section into 3 (horizontal ways) and done checklists for:
- Blog
- Business
- Personal
I think that would be a better use of the space. It ended up being a bit of a random assortment of plans.
Stickers used in this week’s spread:
The stickers are from my shop (printable stickers) and my sister’s shop (printed & cut stickers):
- The Mother’s day sticker is from the holidays set
- Weekly habits
- Bill due stickers (I printed these on glossy label paper – much prefer glossy to matte label paper – the colors are so much brighter. I’ve never had issues with any pens when writing on glossy label paper – although I do avoid using really inky pens like the Pilot G2)
- Weekly hydrate tracker
- Don’t forget header sticker
- Meal plan header sticker
- The list sticker
- Shopping bag icons
Related: 7 Ways to make colors POP when printing using an Inkjet printer
![]()
Pens Used
I was intending to us the Staedtler Ball 432M pens but ended up using the Kikki K write in rainbow pens as they had the least bleed through. I also used my favorite PaperMate Inkjoy Gel 0.7mm pens for the teal and yellow. Teal because it’s hard to find in pens and is almost an exact match for my stickers, and the yellow as the Kikki K yellow pen is not easy to read. Note that the Kikki K pens tend to skip (have white spaces between the letters) if you write at an angle (like I do).
I used the Stabilo ‘swing cool’ highlighters (they’re the only ones I’ve been able to find with a teal color) and some cheap ones I found at Target.
The strip of orange chevron washi is the Doodlebug brand from my sister’s planner supplies shop.
The checklist stamp is by MAMBI / Happy Planner – it’s also available from my sister’s planner supplies shop. This stamp is a good idea, but I wish the lines to write on were longer, and that there wasn’t as much space between each checklist. I do like that this stamp is self-inking which means you don’t have to clean the stamps – no mess! 🙂
Related: Ultimate list of the best planner pen brands and how to choose colors for color coding
![]()
Color coding
This week I wanted to create a rainbow spread. I tend to color code by category but decided I’d go for aesthetics this week instead and color coded by day – I love how it turned out!
Related: 50 Category Ideas for Color Coding Your Planner
As I’ve been trying to cut down on re-writing the same repeat tasks I opted to use more habit tracking stickers, which meant less need for color coding.
I made a habit tracking sticker where I can track 5 habits on 1 sticker and save a ton of room. These are the tasks I associate the icons with:
- Vitamins
- Exercise
- Ate fruit (I’m really bad at eating fruit every day)
- Cleaning (this can be cleaning the apartment, bathroom, tidying my workspace but usually cleaning up files on my computer)
- The books are for self-education e.g. reading a chapter of an ebook, completing a course module, teaching myself how to do something new etc.
Using symbols rather than re-writing the same tasks each day saves a lot of space when planning and it’s much quicker to cross off a box each day.
Related: Using a planner key and symbols to code your planner (efficient planning methods)
![]()
Pros of the Mi Goals Planner
- Includes 2 bookmarks. I wish more planners included built-in bookmarks!
- Tells you what week number it is in the bottom right hand corner
- Includes a section for habit tracking (although it’d be good if this included space for more habits)
- A section to note the focus for the week and a weekly goal (or goals if you write small you could fit more than 1 in the space)
Cons of the Mi Goals Planner
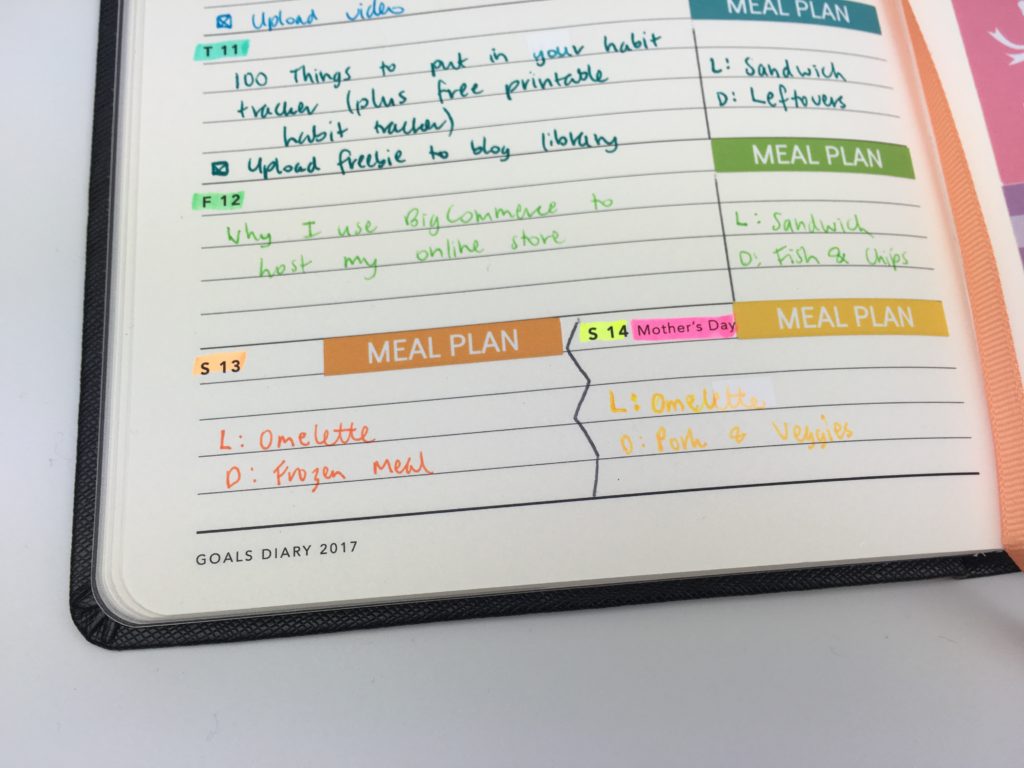
- I didn’t like that Saturday and Sunday shared the same amount of space as a weekday – it was nowhere near enough space to plan. Because I like to keep some white space when planning by leaving a line above and below other text, it meant there wasn’t much room for planning
- The open-ended space could end up being a brain dump ground. I much prefer structured planners.
- All of the pens bled through the page – the paper is quite thin (although it is nice to write on)
- My favorite pens – the Frixion erasable – didn’t erase well due to the paper. It actually ripped the paper when I tried to erase with them 🙁
Would I use this planner again?
I was surprised by how much I liked this planner. It’s the first glue / book bound planner I’ve tried since I normally steer clear of them as they tend not to stay open by themselves like spiral binding and discbound planners do.
I liked how splitting each day into 2 to create a meal planning space looked, but it did take up a fair bit of daily planning space.
Loved the size of this planner (5.75″ wide x 8.25″ high) – it’s smaller than the usual size for planners (7″ wide x 9″ high).
Because of the book/glue binding it’s also quite thin at only 1.5cm thick (approx. half an inch) and weighs hardly anything.
It’s a good compact planner I’d recommend for someone that just wants to put the most important tasks and appointments in the weekly planning space, and turn the right side of the page into a to do list.
I would definitely give more thought into how I used the blank space on the second page if I were to use the planner again.
I used the monthly spread for blog post planning – make sure you subscribe to be notified when that post is published (you’ll also gain access to the free printables library!)
Catch up on past weeks of the challenge:
- Week 8: Weekly Planning using the Plum Paper Memory Keeper Book
- Week 9: Customising the Erin Condren hourly planner for task based planning
- Week 17 (Part 2): Daily planning using to do lists categorised by time
- Week 18: Making a DIY printable planner with a flexible layout
Read all of the past weeks of the challenge here.
If you’re tired of drawing up weekly spreads, this printable bundle of 52 different 1 page weekly planners (you can mix and match to create 2 page spreads if you prefer), is available in my Etsy shop and online store.

Liked this post? Pin it!